A quick tour of Blondihacks World Headquarters.
I’ve had a number of requests for a look at my workspace, so I figured I’d finally sit down and do one. I like reading about other peoples’ workspaces, because it’s such a deeply personal thing. You learn a lot about someone by the crap on their bench. It’s a bit like a fingerprint- no two hacker workspaces are alike. For example, in my case, I’m a notorious cheapskate. If I started a religion, “Bang for the Buck” would be the first commandment. Well, maybe that whole “don’t kill each other” thing is still a good one, so that’d be at the top. But “Bang for the Buck” would be somewhere in the single digits, I think. Okay, enough theology. Let’s take a look around.
I have two work areas. One for the small clean stuff, and one for the big dirty stuff. The former is probably where I spend the most time, so let’s start there. This is the first work area I set up. It worked well in the small apartment I was in at the time. When I moved into a larger place, it was easy to relocate as-is.
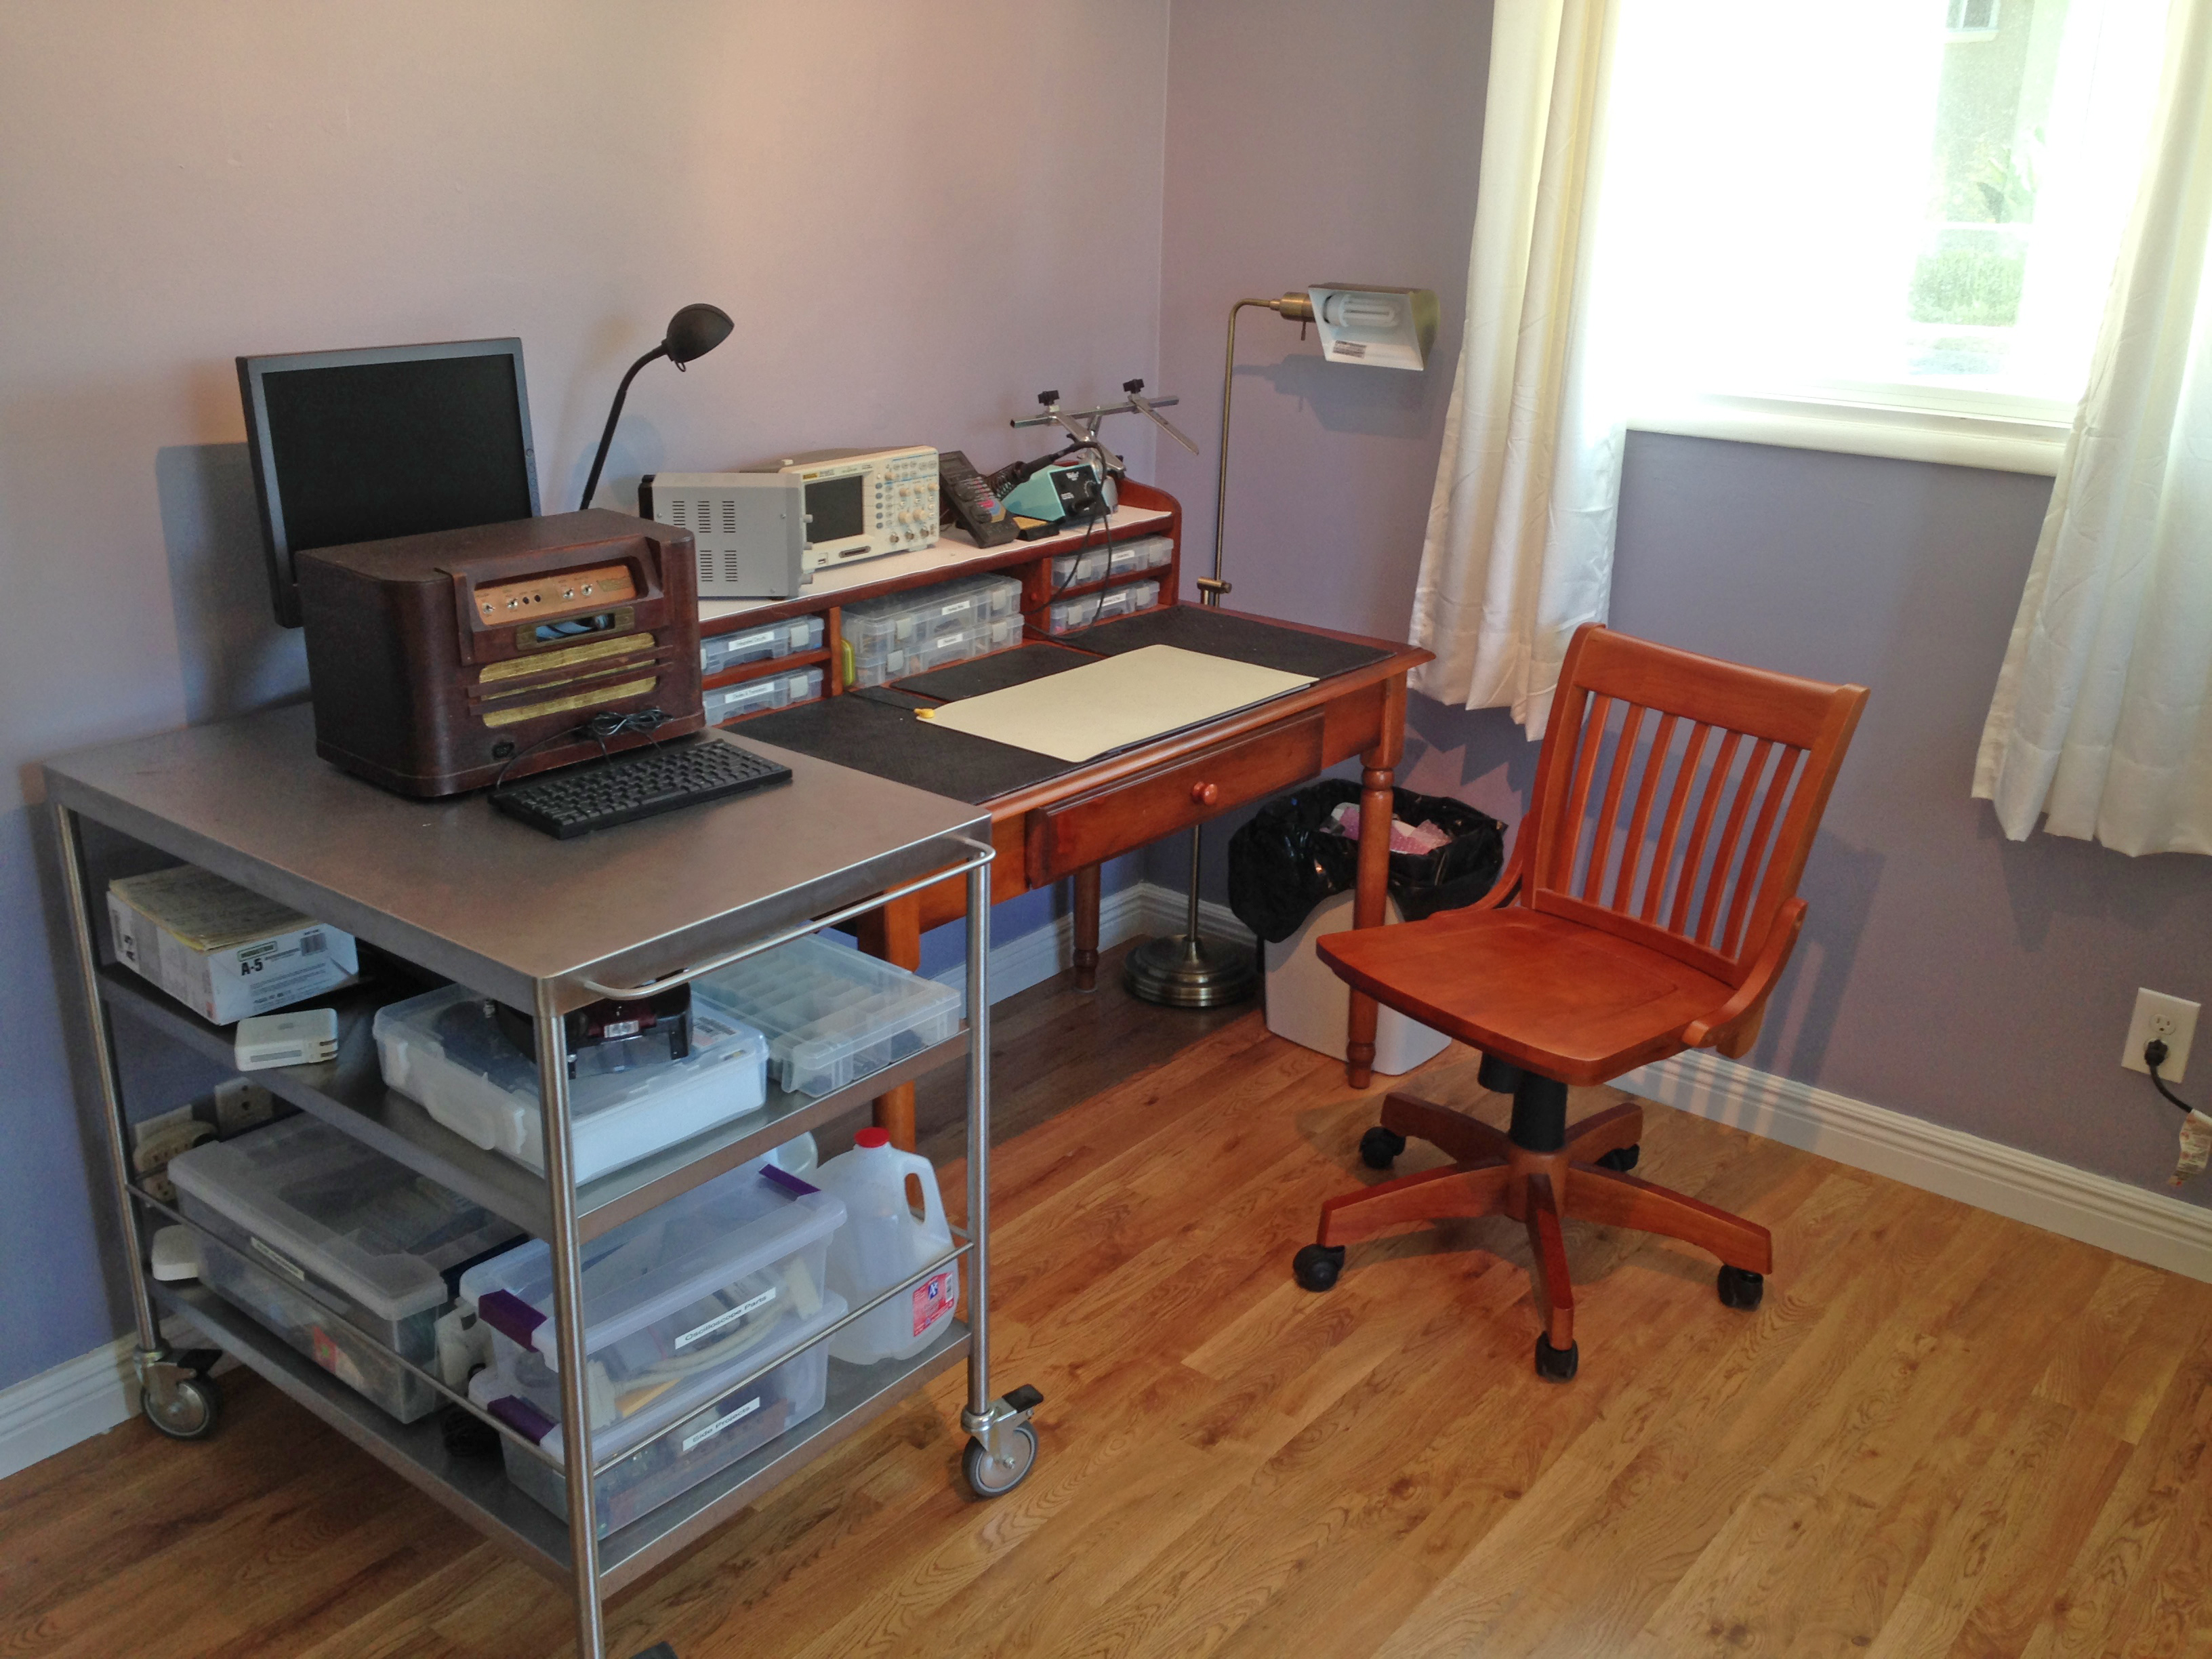
My “bench” is actually just a computer desk with a hutch on top. I wanted something that looks like furniture, since it’s in the house and I have to look at it every day. The best way to make your workbench look like furniture is to make your workbench furniture. This is pretty easy to get away with for electronics, since it’s a pretty clean activity. The desk is nothing fancy. I think I googled “desk with hutch” and bought something that came up in the results. Getting the matching armless banker’s chair was a little tougher, but this isn’t an interior decorating blog, so I’ll skip that story.
Next to it is a stainless steel cart from Ikea that I got second-hand. A metal surface is handy sometimes (you can ground it!), and the open shelves make handy storage for things I need often, but don’t need to be immediately at hand. I like to think of storage in terms of “deep” and “shallow”. Deep storage is stuff you need maybe once every six months. This goes away in a box in the closet. Shallow storage is stuff you need multiple times a day. This goes somewhere immediately at hand when seated. This rolling cart is somewhere in the middle. It holds PCB making supplies, for example, which I don’t need that often. The cart also acts as a movable work surface. My main desk area is very efficient, but not very big. Sometimes you need to spread out more, and a movable surface gives you options.
Okay, let’s zoom in a little now. The devil is always in the details. There’s a running theme throughout my work areas- organization and tidiness. I could give a whole speech about how being organized makes you more efficient and you can get more done and blah de blah de blah. I could also simply admit that I’m mildly obsessive compulsive, and arranging my screwdrivers in a row makes me feel all warm and fuzzy inside. As with most things in life, the truth is somewhere in the middle.
Starting with the hutch on top of the desk…
All the bins you see in the hutch are from Art Bin. I like them because they positive latches, good hinges, and moveable compartment dividers. They are also made of a smooth plastic that allows labels to stick, but still be removed cleanly. The value of this is flexibility. No storage system is perfect on the first attempt, and you’ll always need to rearrange things at some point. The simple act of buying a new resistor value that you never had before can throw the whole system into chaos if you don’t have a system that can adapt. In my experience, inflexibility is the death of most attempts to organize. Getting organized is pretty easy. It’s staying organized that takes practice and technique. One of my other hobbies is managing logistics for an endurance racing team (when I’m not in the car, of course!). You learn all this stuff in a hurry when you have get a couple thousand pounds of gear moved all over the state, and still be able to find an exact size O-Ring on a moment’s notice when the Chief Wrench asks for it.
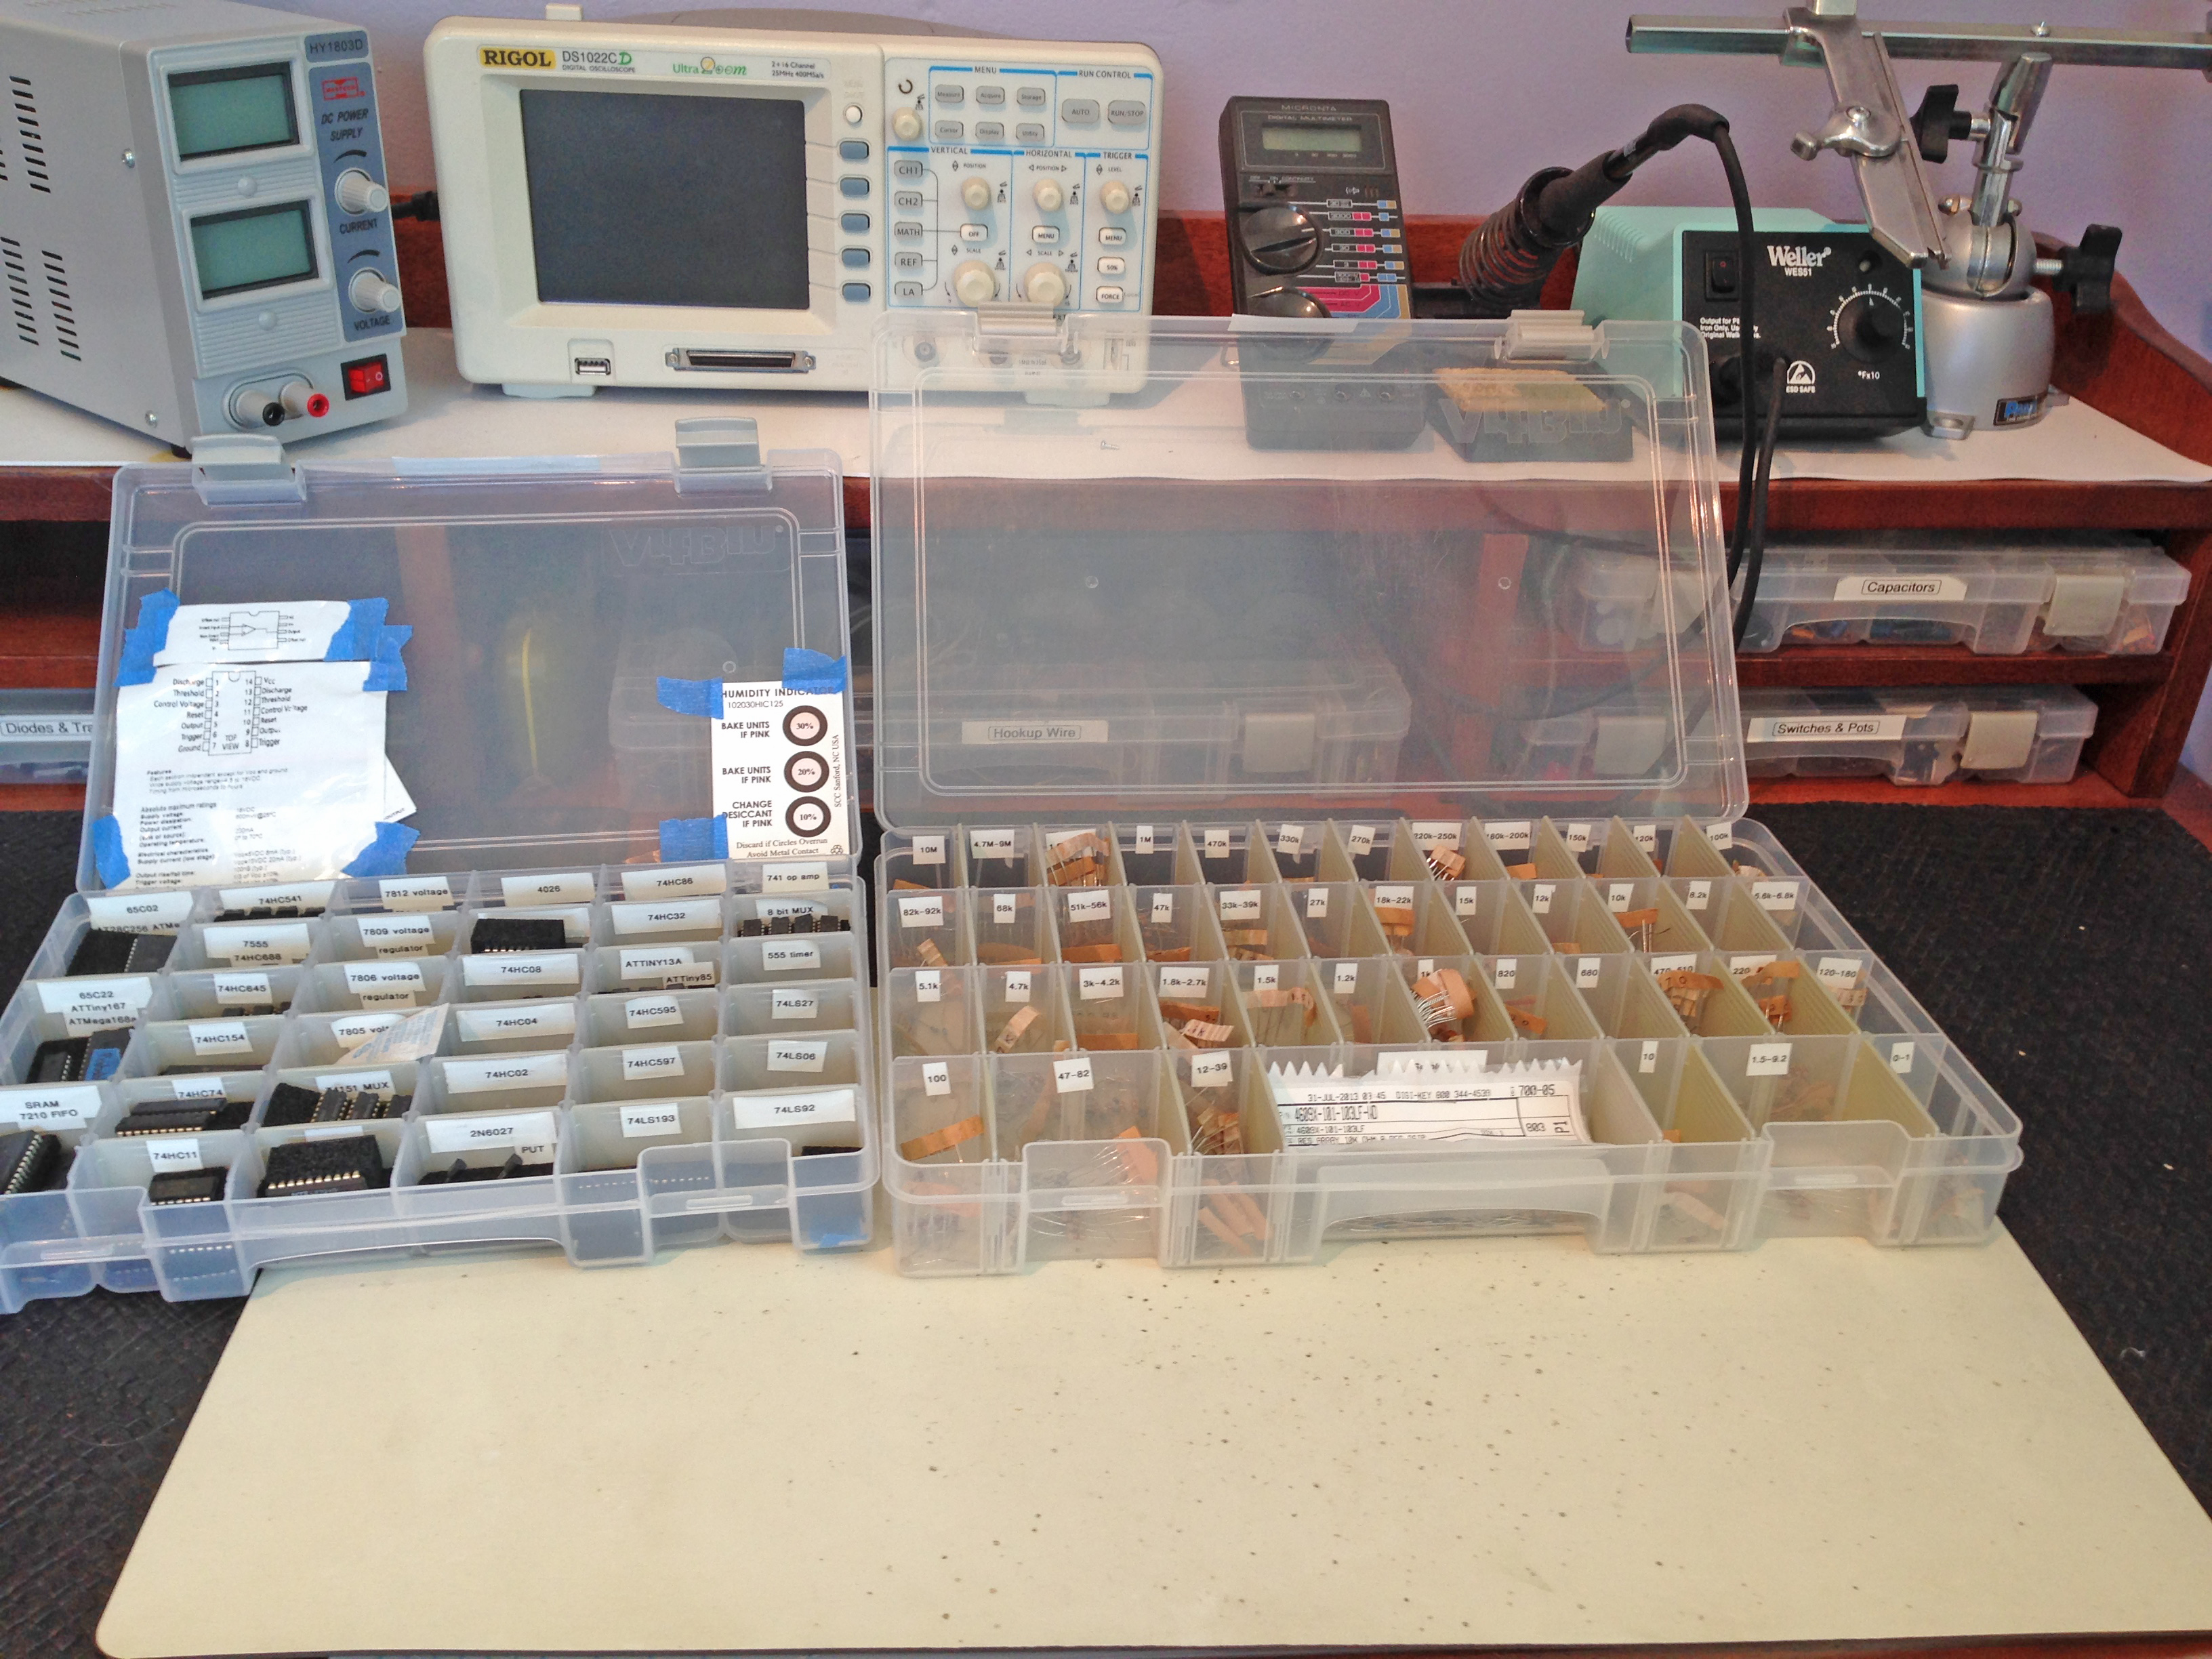
Moving up on top of the hutch now, we have the most-used electrical tools. Getting them up above the work surface is very convenient, because all these tools have wires dangling from them. Elevating the tools moves those wires into the third dimension, instead of having them lying all over the work surface. In other words, putting your multimeter up high means the test leads will be floating in space over the desk, instead of splayed out on it, eating valuable real estate. It also puts displays closer to eye level. By maximizing use of space in all three dimensions, you can do a lot with a little.
Here’s what I’ve nominated worthy of elevated hutch space, left to right.
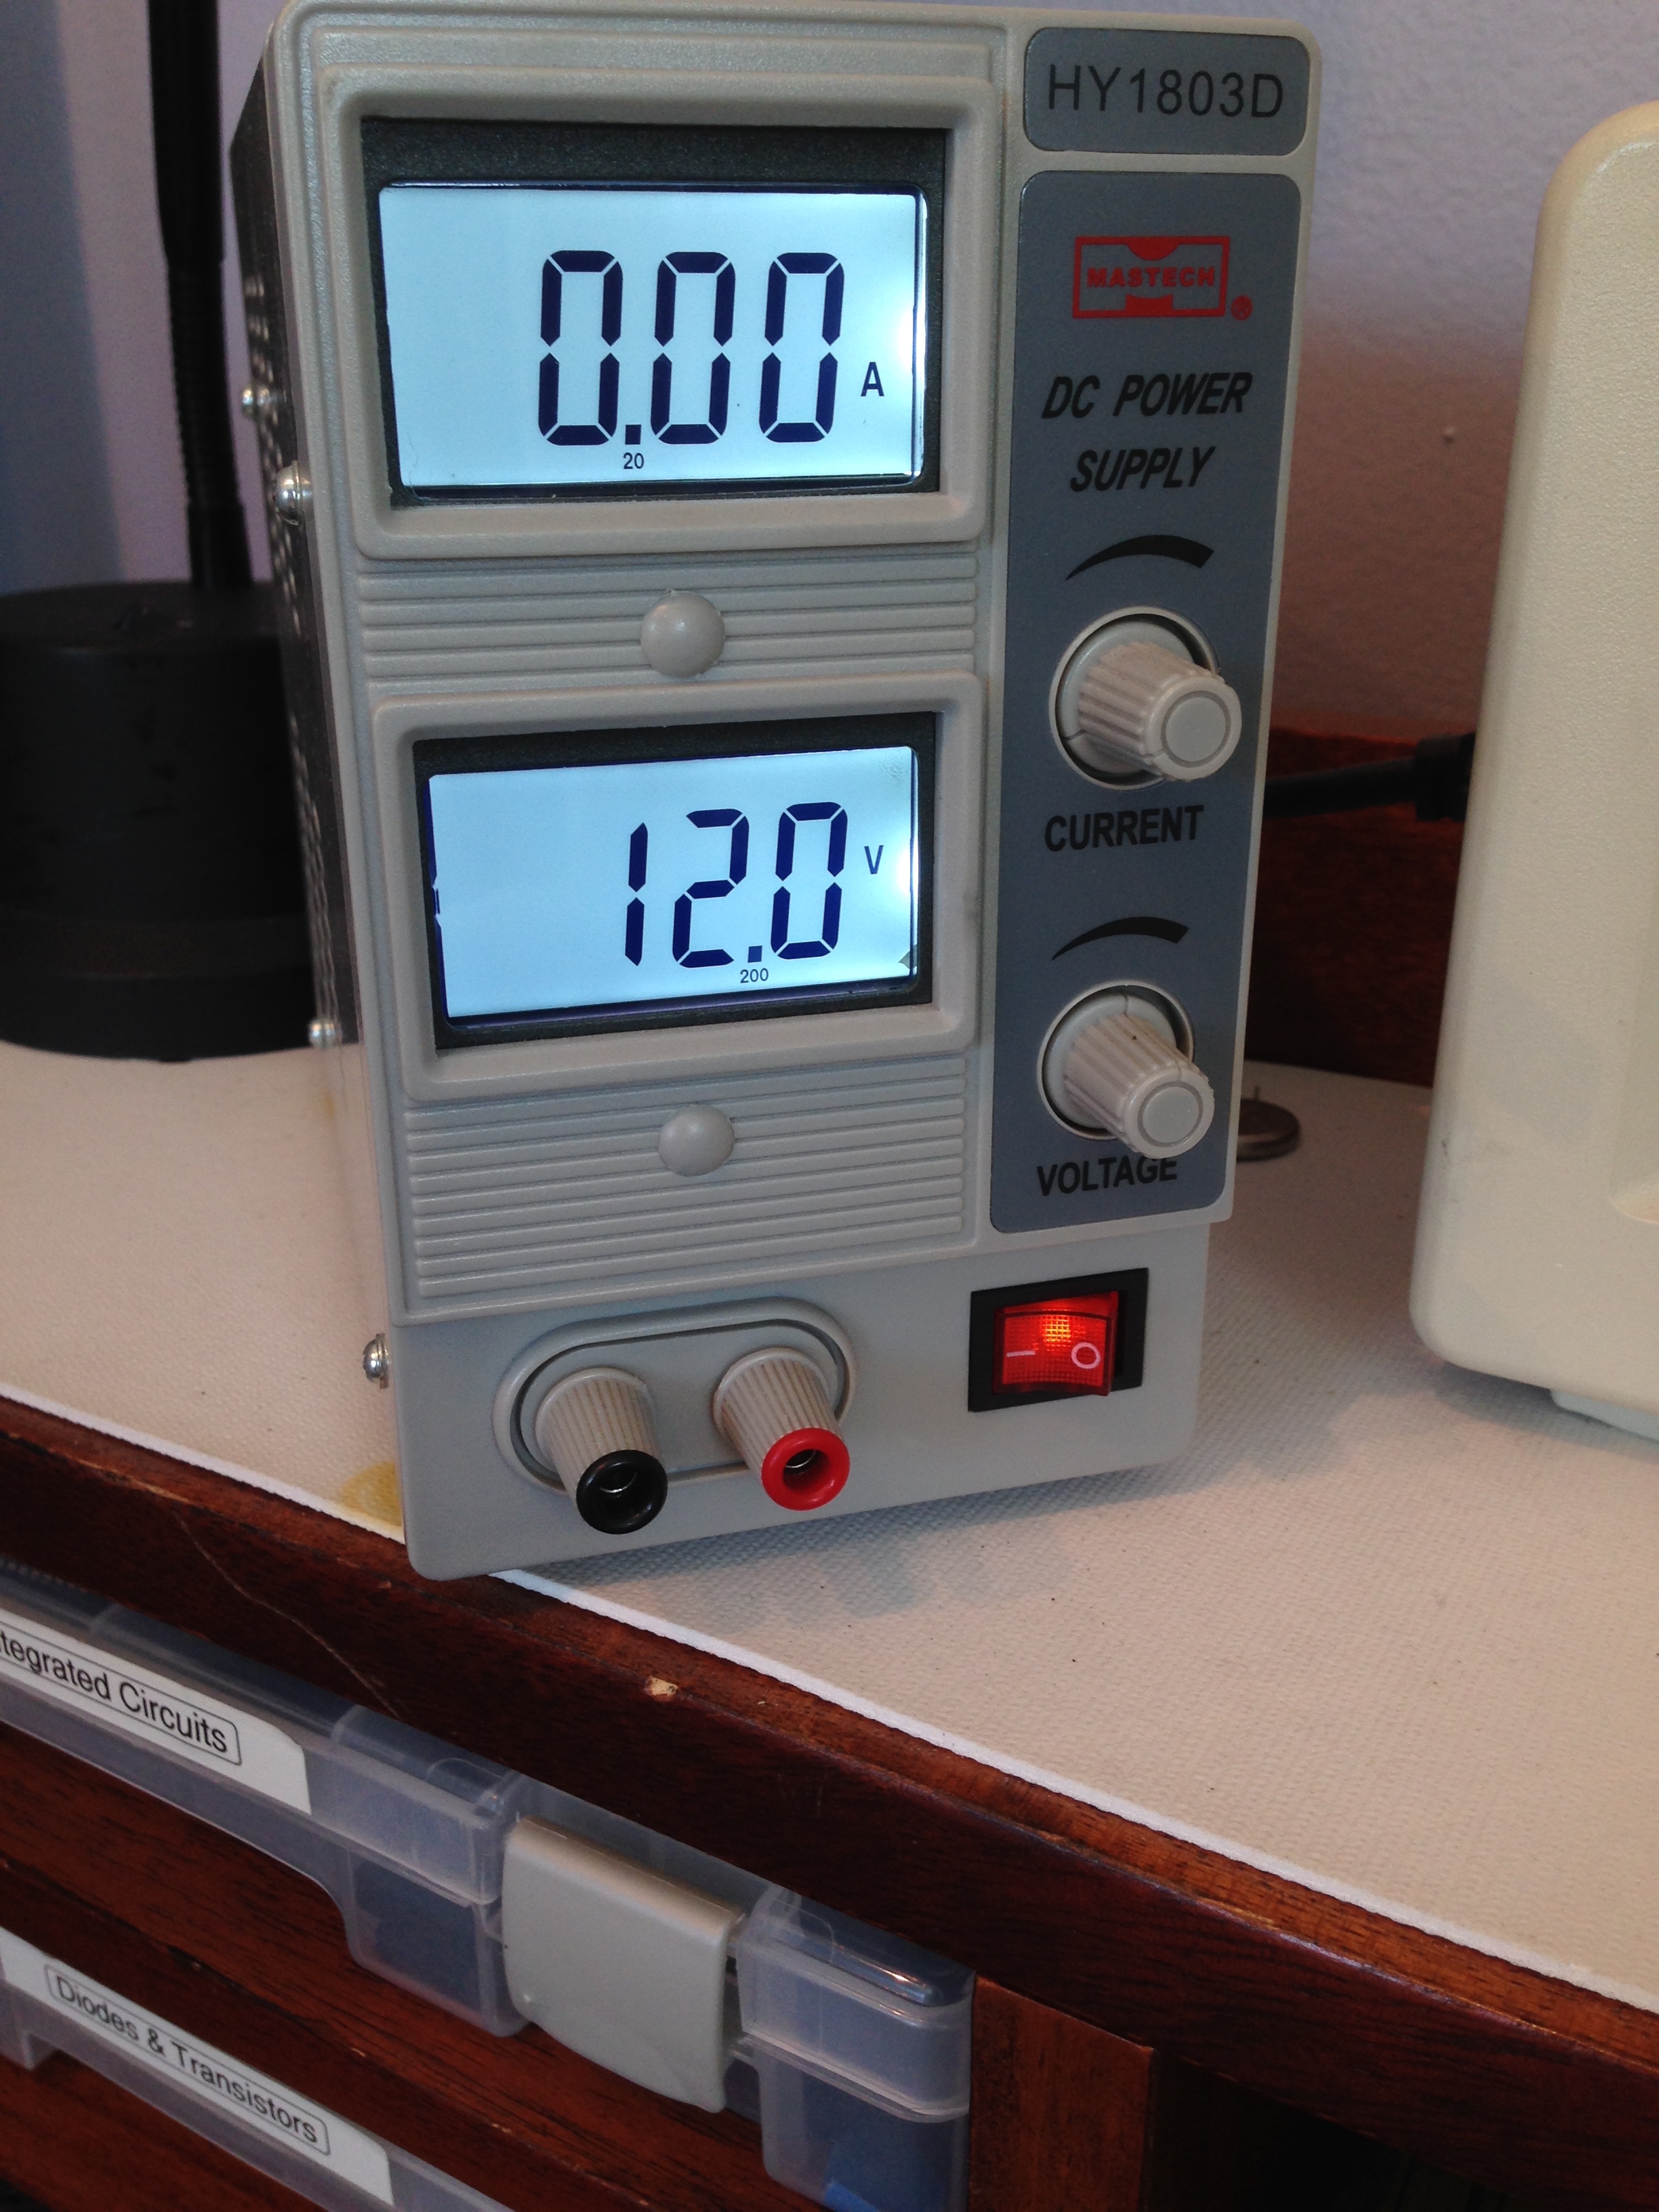
This bench supply is a great example of another philosophy of mine- making everything do multiple jobs. A key advantage of a supply like this is the displays. In particular, the ammeter. Any time I connect power to a project, the first thing I do is glance at the ammeter. That tells you a great deal about what the circuit is doing. If there’s a short, the ammeter will jump immediately to a high value that you can tell “doesn’t seem right”. That gives you enough time to disconnect without damaging anything, and start looking for the problem. The ammeter tells you other things as well- for example, on Veronica, I can tell if there’s bus contention because the current draw will be 50-60mA higher than normal. There’s a surprising amount of diagnostic utility to be had from an “always-there” ammeter. It also frees up the multimeter for other things, like finding the short that’s causing the amps to spike.

Hackers and electronics hobbyists love oscilloscopes. They have big screens and they’re covered in knobs, and they reveal deep dark secrets about electrical signals. What’s not to love? Truth be told, I think they’re far less necessary for most kinds of hobbyist stuff than people seem to think. There’s only a few times that I’ve genuinely needed a ‘scope to debug something, and that includes building a home-brew computer from scratch. Having said that, they do make life easier if you take the time to learn how to use them. Also, look at all those knobs and blinkenlights! Did I mention the knobs?
Scopes are expensive, however, and I am cheap. How do we reconcile these conflicting facts about the universe? The answer is “eBay”, but more specifically the shadowy secondary market that exists behind eBay. In my opinion, there aren’t many great deals to be had on eBay anymore. However, if you use eBay as a starting point, there are deals to be had behind the scenes. My scope here is a good example. I searched the completed listings for mixed signal scopes that had the features I wanted. I found one like you see above that went for a really great price. I sent a message to the seller, asking if they had another one, and would sell it for the same price. This tactic fails 99% of the time. The other 1% of the time, however, you get a great oscilloscope for an embarrassingly low price. The seller happened have another one in his basement that he had forgotten about, and was happy to get rid of it, since I asked. Another common tactic is to buy something from a seller, then ask if they any other related items they’d be willing to do a deal on. Often they will have other stuff they haven’t listed yet, or will pull stuff out of other listings they have. Once you have a personal dialog open with the seller, the price drops a lot and you get great package deals. I use this technique a lot when indulging my Snap On tool fetish. I love them, but could never afford to pay anywhere close to retail. Thanks to the shadow eBay market, I never have.
It’s worth noting this is an older Rigol scope. It’s “only” 25MHz. However, it has a 16 channel digital logic analyzer. That’s easily a $1000 option on current scopes. The fact is, 25MHz is way more than enough for anything I’m going to build. It’s easy to fixate on the numbers and decide you “need” a 1GHz scope. However, a logic analyzer is infinitely more useful (to me, anyway), and it is by far the most used feature for me. Going with a much older model allowed me to get the really sophisticated mixed-signal option I wanted. A proper 16-channel digital logic analyzer is an amazing tool, and I could never have afforded one otherwise.

In terms of bang-for-buck, it’s hard to do better than a multimeter. No doubt anyone reading this blog knows that, but it bears repeating for younger hackers who might run to the ‘scope too quickly. A surprising number of things you might use a scope for can be done on a meter with a little thought about what you’re trying to test. In case you’re wondering, that meter is not a museum piece or a funny funny joke. It is in fact a Radio Shack house brand meter from 30 years ago. I have honestly had it that long. Sure, I’d like a shiny new Fluke, but I can’t justify buying new tools if the old ones still work; and this thing JUST WON’T DIE. The only thing that has EVER gone wrong with it was the continuity beeper became intermittent recently. I popped it open, resoldered the wires on the piezo element, and it’s been fine since. This thing once sat in a crate with leaking batteries in it for five years, and never missed a beat. It. Won’t. Die.
Having said that, I do genuinely like this thing. In particular, I’m a fan of manual ranging. It’s hard to get a meter that isn’t auto-ranging these days, and frankly I find auto-ranging really annoying. If I’m working on a 12V circuit, and there’s no meaningful voltage, just show me a zero, m’kay? I don’t care if you think there’s 26mV detectible there. That tiny mental analysis required every time I glance at the display drives me nuts. “Oh, the range changed to mV, so this is really saying zero”. Ugh.
Speaking of under-appreciated tools…
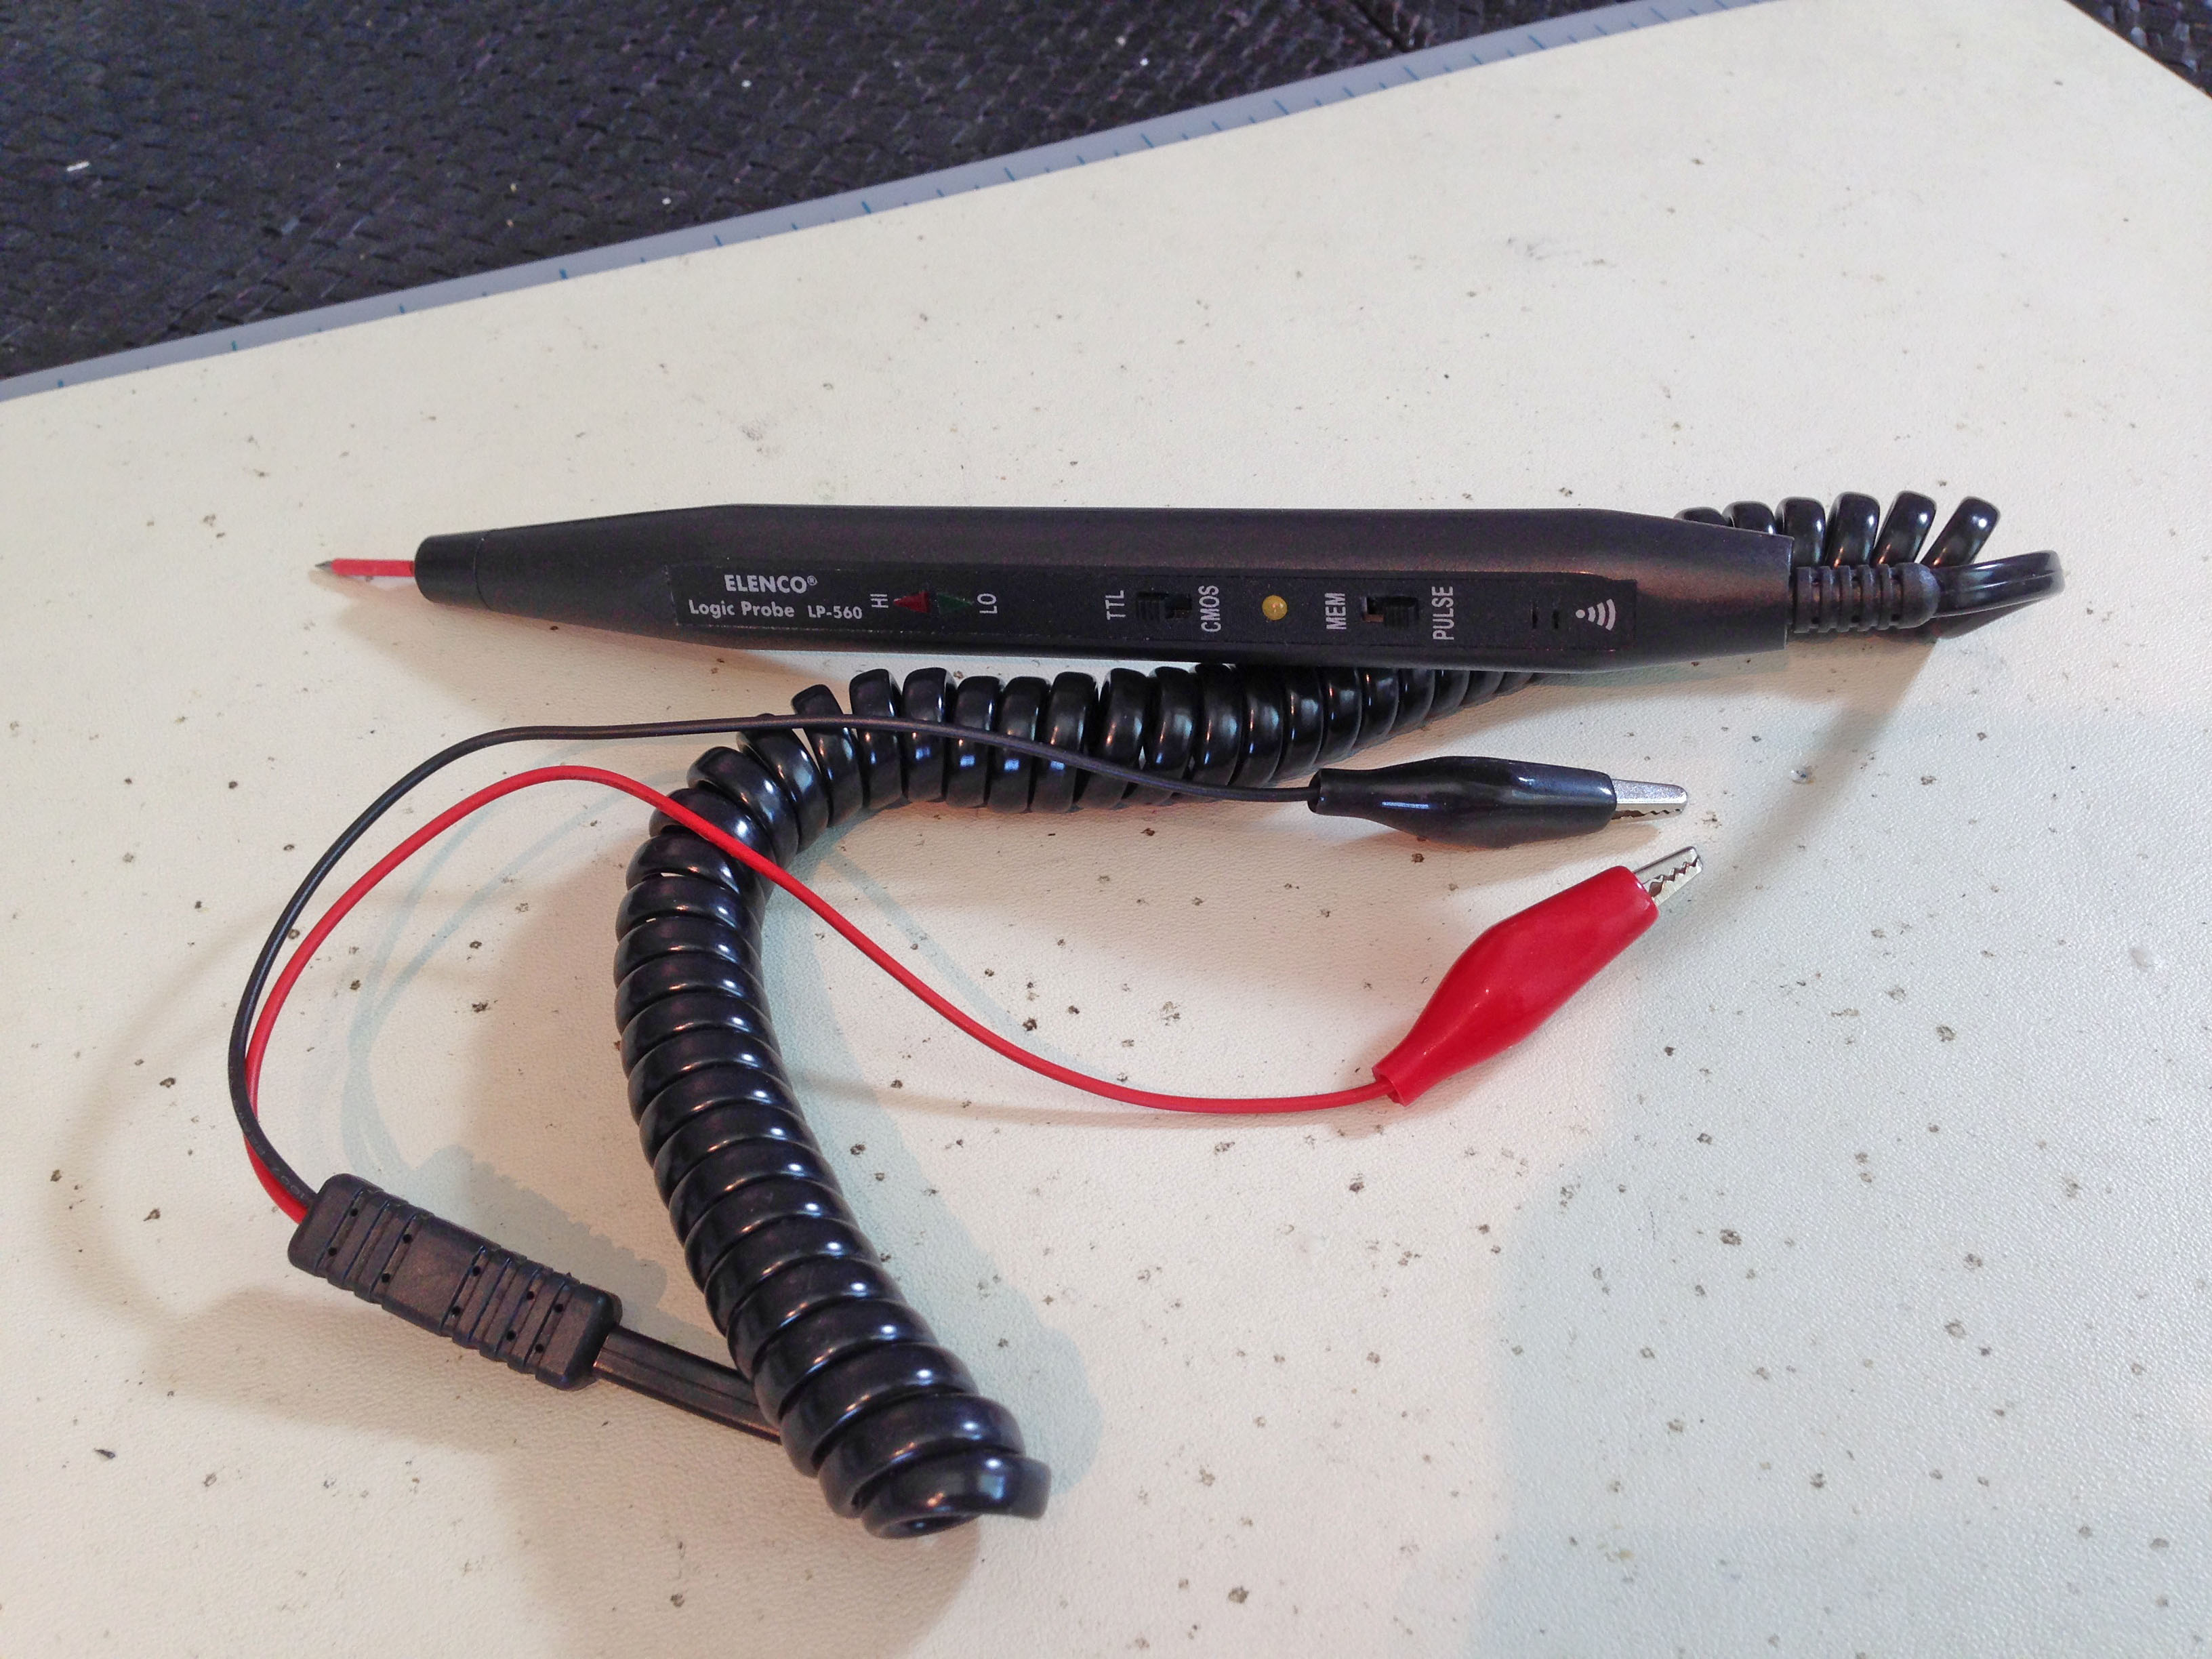
I’ve never quite understood why logic probes don’t get more press in the hacker community. If you’re doing anything digital, this is an incredibly powerful and inexpensive tool. There’s a sort of “zen state” you can get to with this thing, whereby you can read frequencies, and debug protocols entirely by ear. For example, I debugged almost every aspect of Veronica’s video system with a logic probe. Only when I got into a couple of really gnarly high-level protocol issues did I genuinely need to bust out the logic analyzer. In terms of bang-for-buck in diagnostic tools, it’s hard to beat the logic probe.
Moving along…
‘Nuff said.

A lot of people like those “helping hands” things, and I used them for a while myself. These days, however, I’m finding a PCB vise more useful. I received this as a promotional item. It’s not brilliant, quality-wise, but the prices are fairly reasonable on them. However, note the rolls of blue tape. If blue painters’ tape was a person, I would marry it. Again, on the bang-for-buck scale, it’s hard to beat this stuff. It’s a mask, it’s a clamp, it’s a helping hand, it’s a labelling system, it’s a mounting device, this stuff does it all. As much as clamping things in this vise, I just as often tape stuff to it while working. I keep a couple of squares of tape around all the time to hold wires in place while soldering and such. A couple of pieces can be used over and over during a work session. As for the vice itself, I appreciate what they’re trying to do with it, but the screw clamps don’t hold very well, and need constant adjustment. It’s a bit annoying.
Moving down to the work surface itself, now…
As I mentioned before, my “bench” is really just a writing desk, so I don’t particularly want to mess up the surface. I have a base layer of wicker placemats for general protection. On top of that is a cutting mat, and on top of that is an ESD mat which is properly grounded. Normally I work on the ESD mat (as evidenced by all the burn marks). A word of praise for cutting mats- these things are great. An X-Acto knife is a marvelous tool, useful for a great many things. A quality cutting mat underneath it amplifies the effectiveness of that tool. It’s one of those things that, once you have it, you don’t know how you worked without it. Combine it with a good steel straight edge, and you can conquer the world.
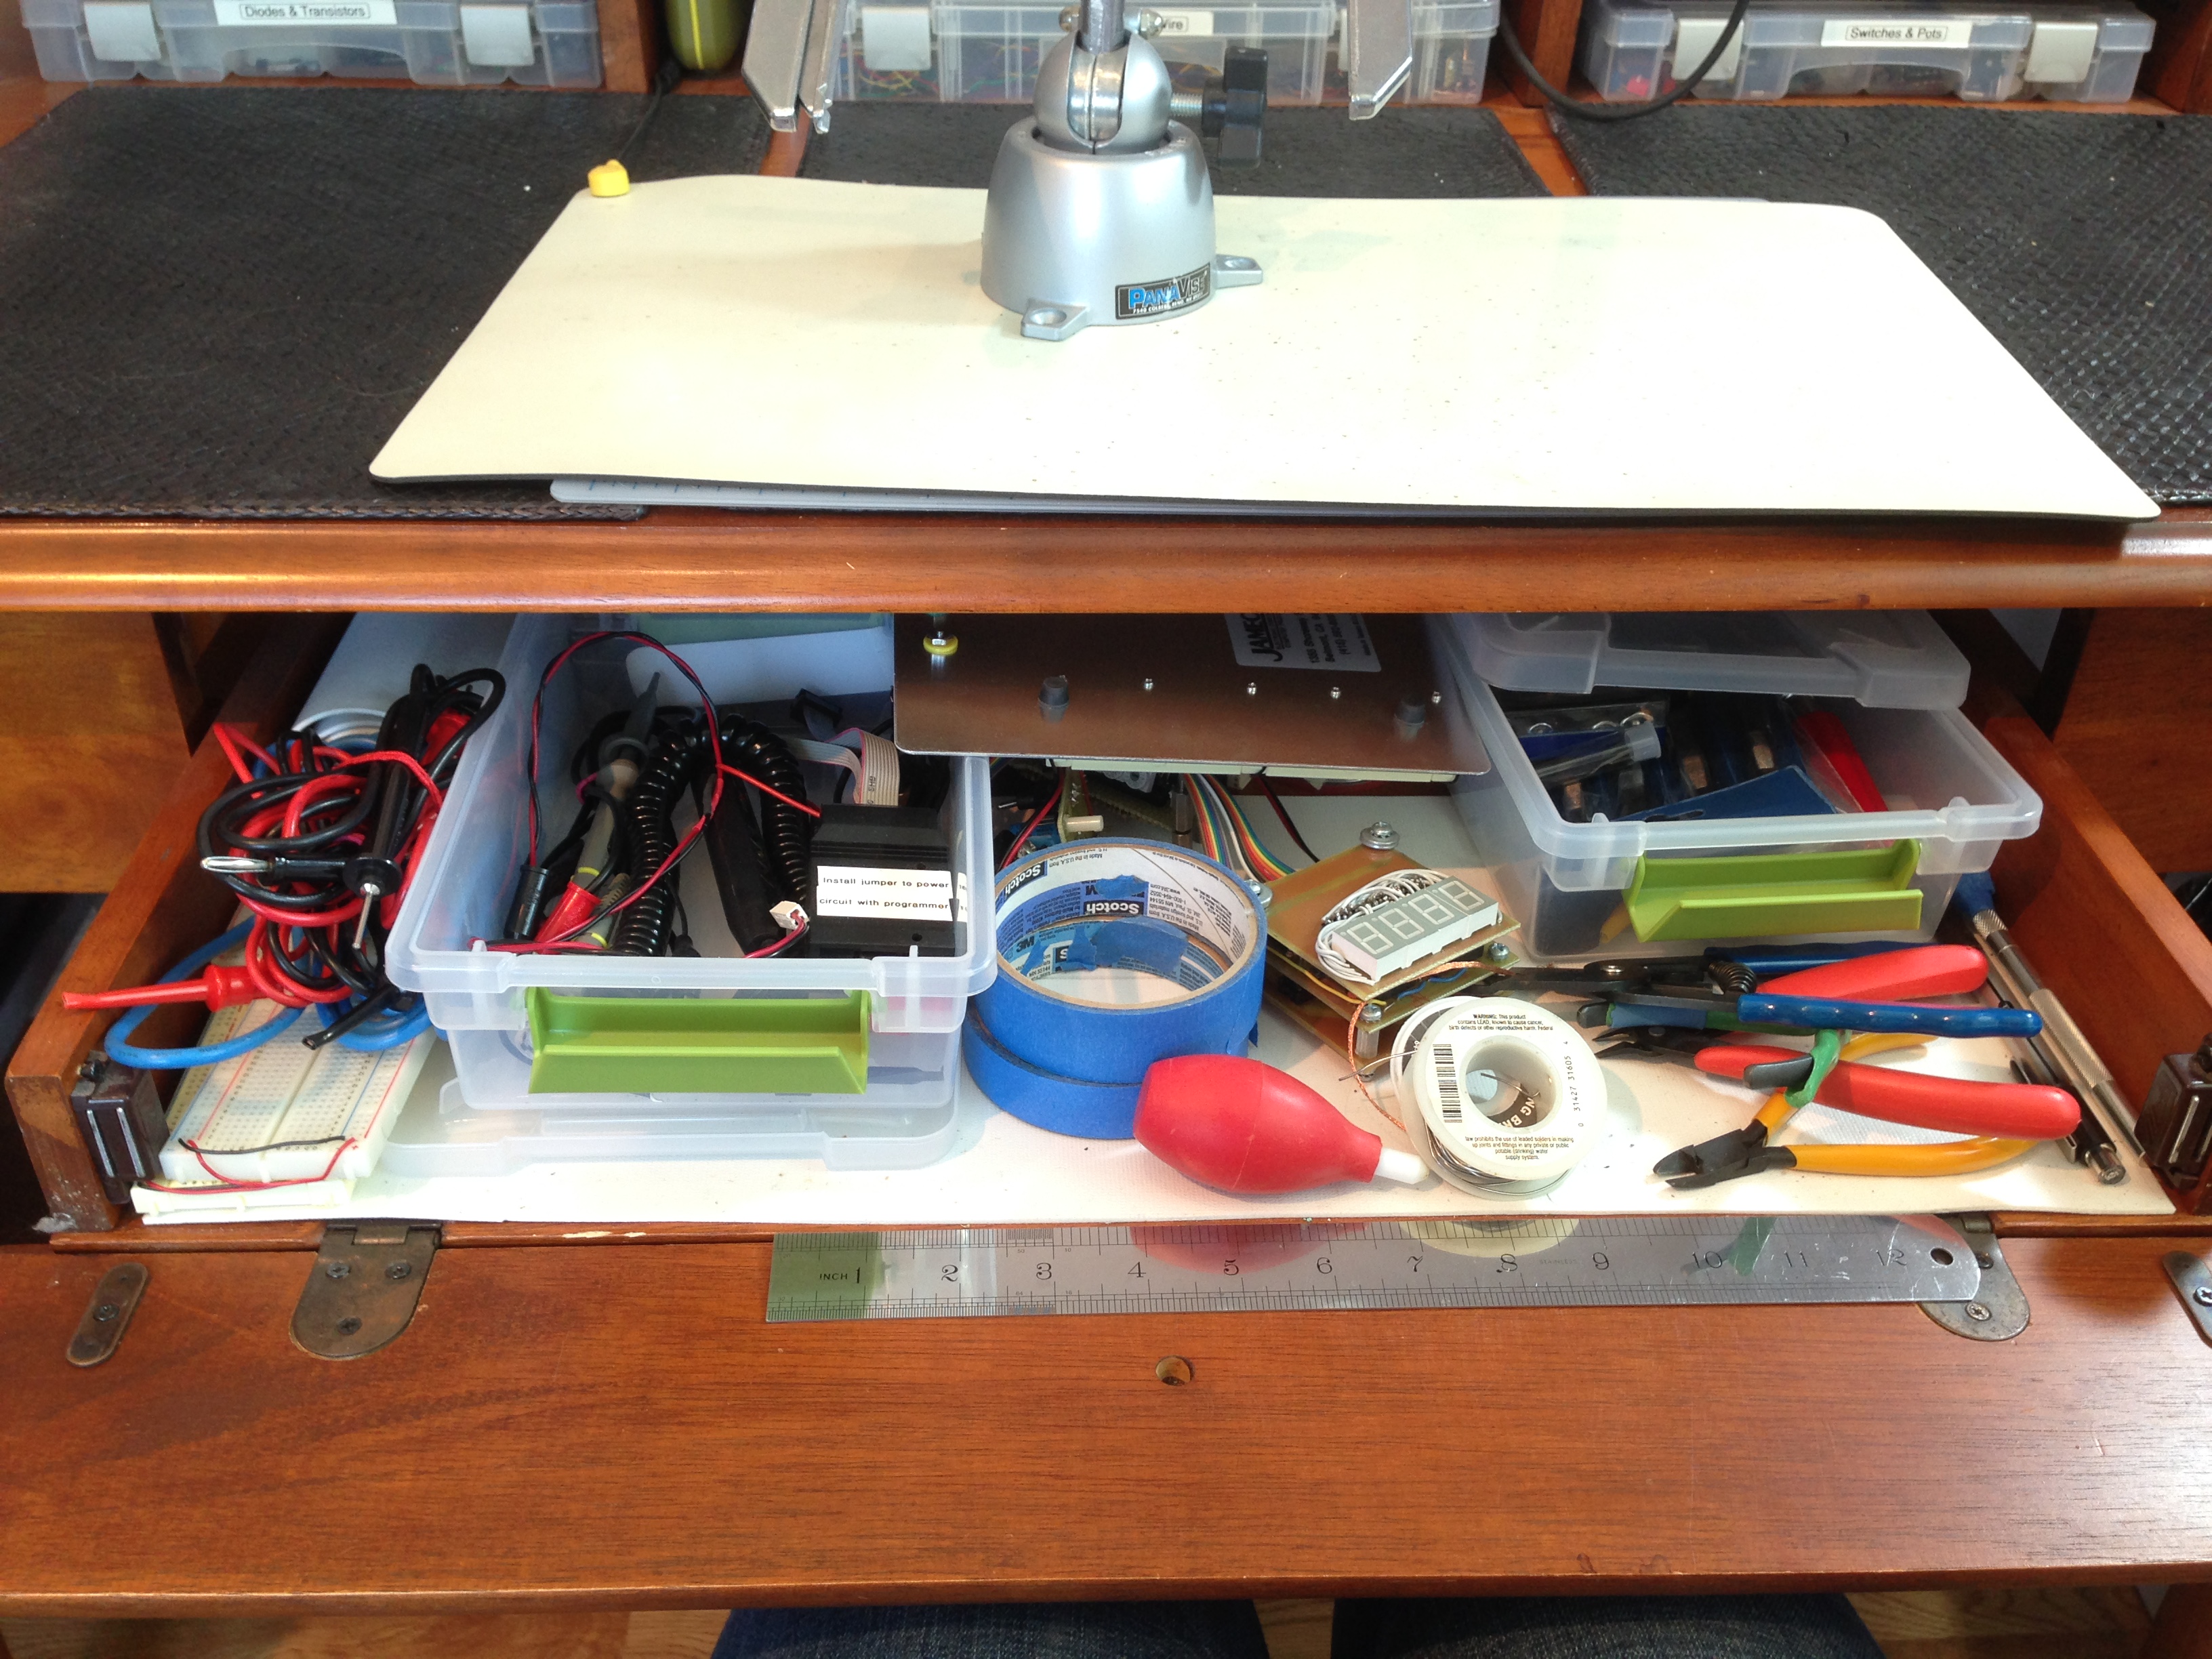
The drawer in this desk is actually a keyboard tray, as this is intended to be a computer desk. This works to my advantage, because the drawer front flips down, in addition to the drawer pulling out. This is great for quick access to small items, so I put all my frequently-used small tools in here. The flip-down front means you can access things without opening the drawer if they are near the front. The less commonly-used stuff gets shoved in the back. It all adds to the efficiency- cutting down on little motions needed to grab a tool means you get things done a little quicker. It also makes cleanup quicker, making it easier to stay organized. It all snowballs into glorious productivity.
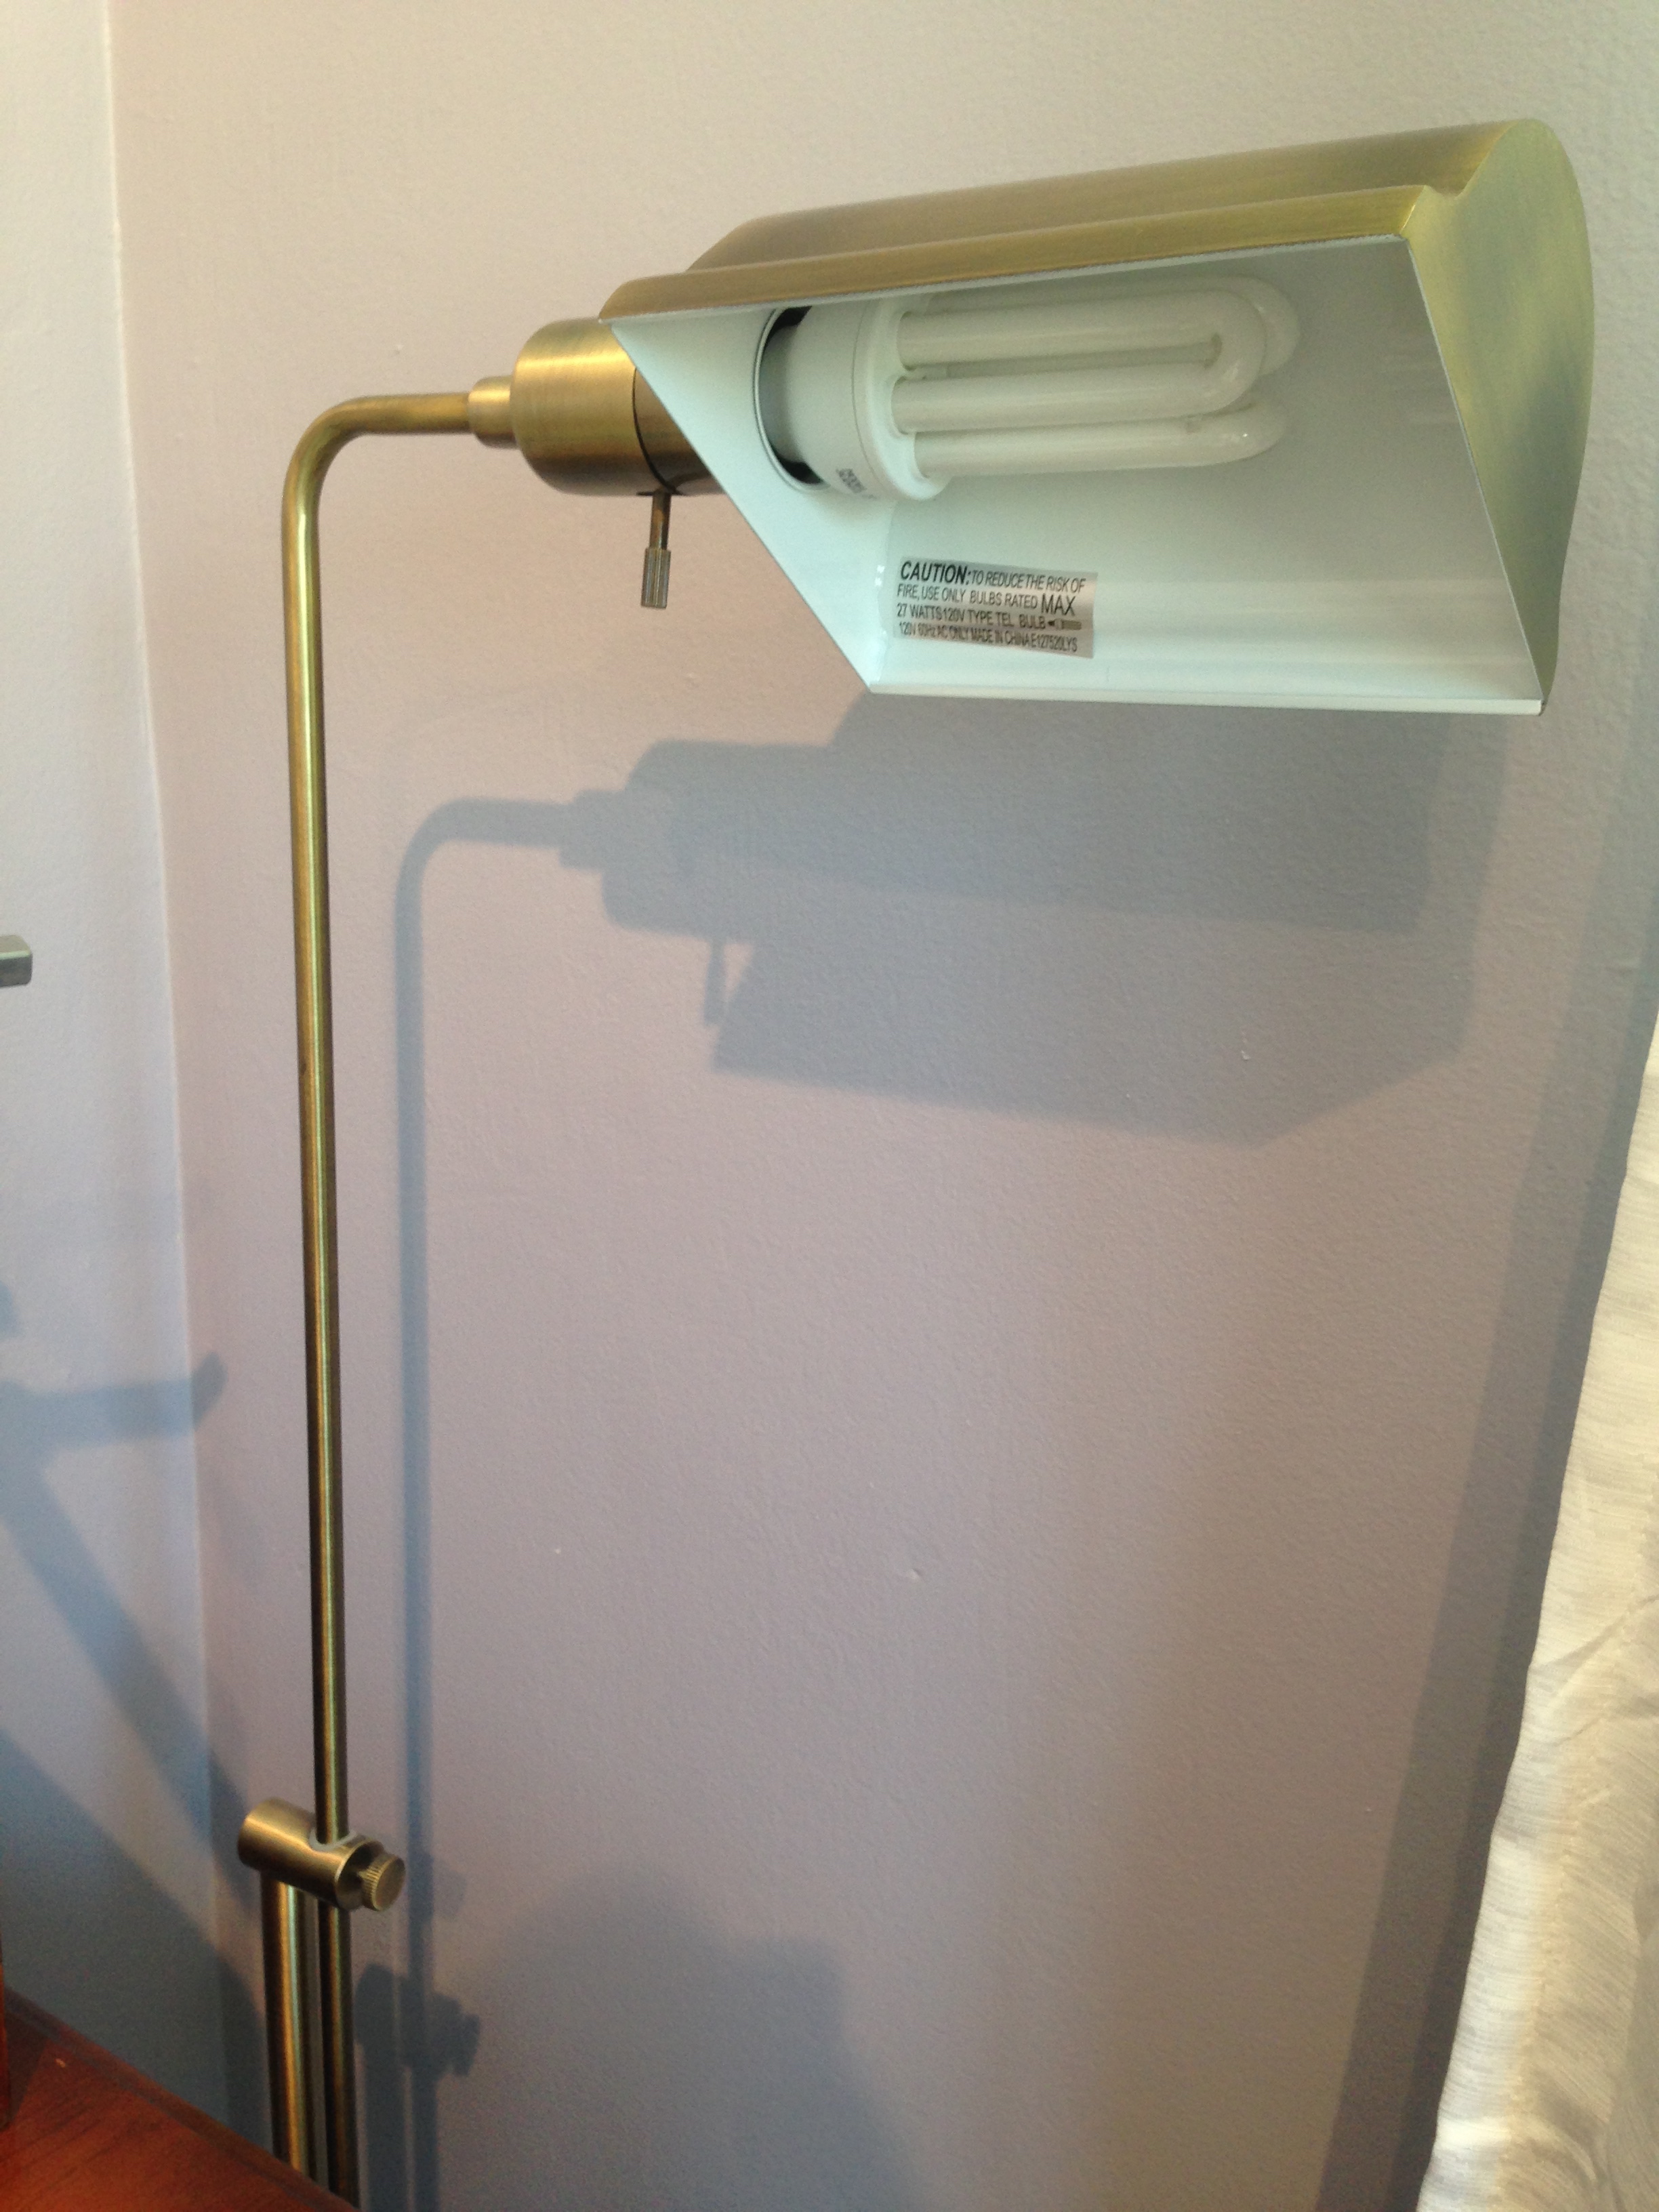
I love lamp. In keeping with our themes, this fellow serves double-duty. It has a daylight CFL bulb in it, which shows accurate colors in your work. This makes reading resistor color bands easier. Furthermore, it is very effective for exposing UV-sensitive PCBs. Note the height adjustment- when it’s time to expose a PCB, I can lower it down to desk-level and position it directly over the board being exposed. Simple, and it even has a classy faux-bronze finish to compliment the desk.
That’s it for the inside workspace. For many years, that was all I had. Recently, Blondihacks World Headquarters has relocated to a larger facility, which means I now have a second area for big messy stuff. Let’s go have a look at that.
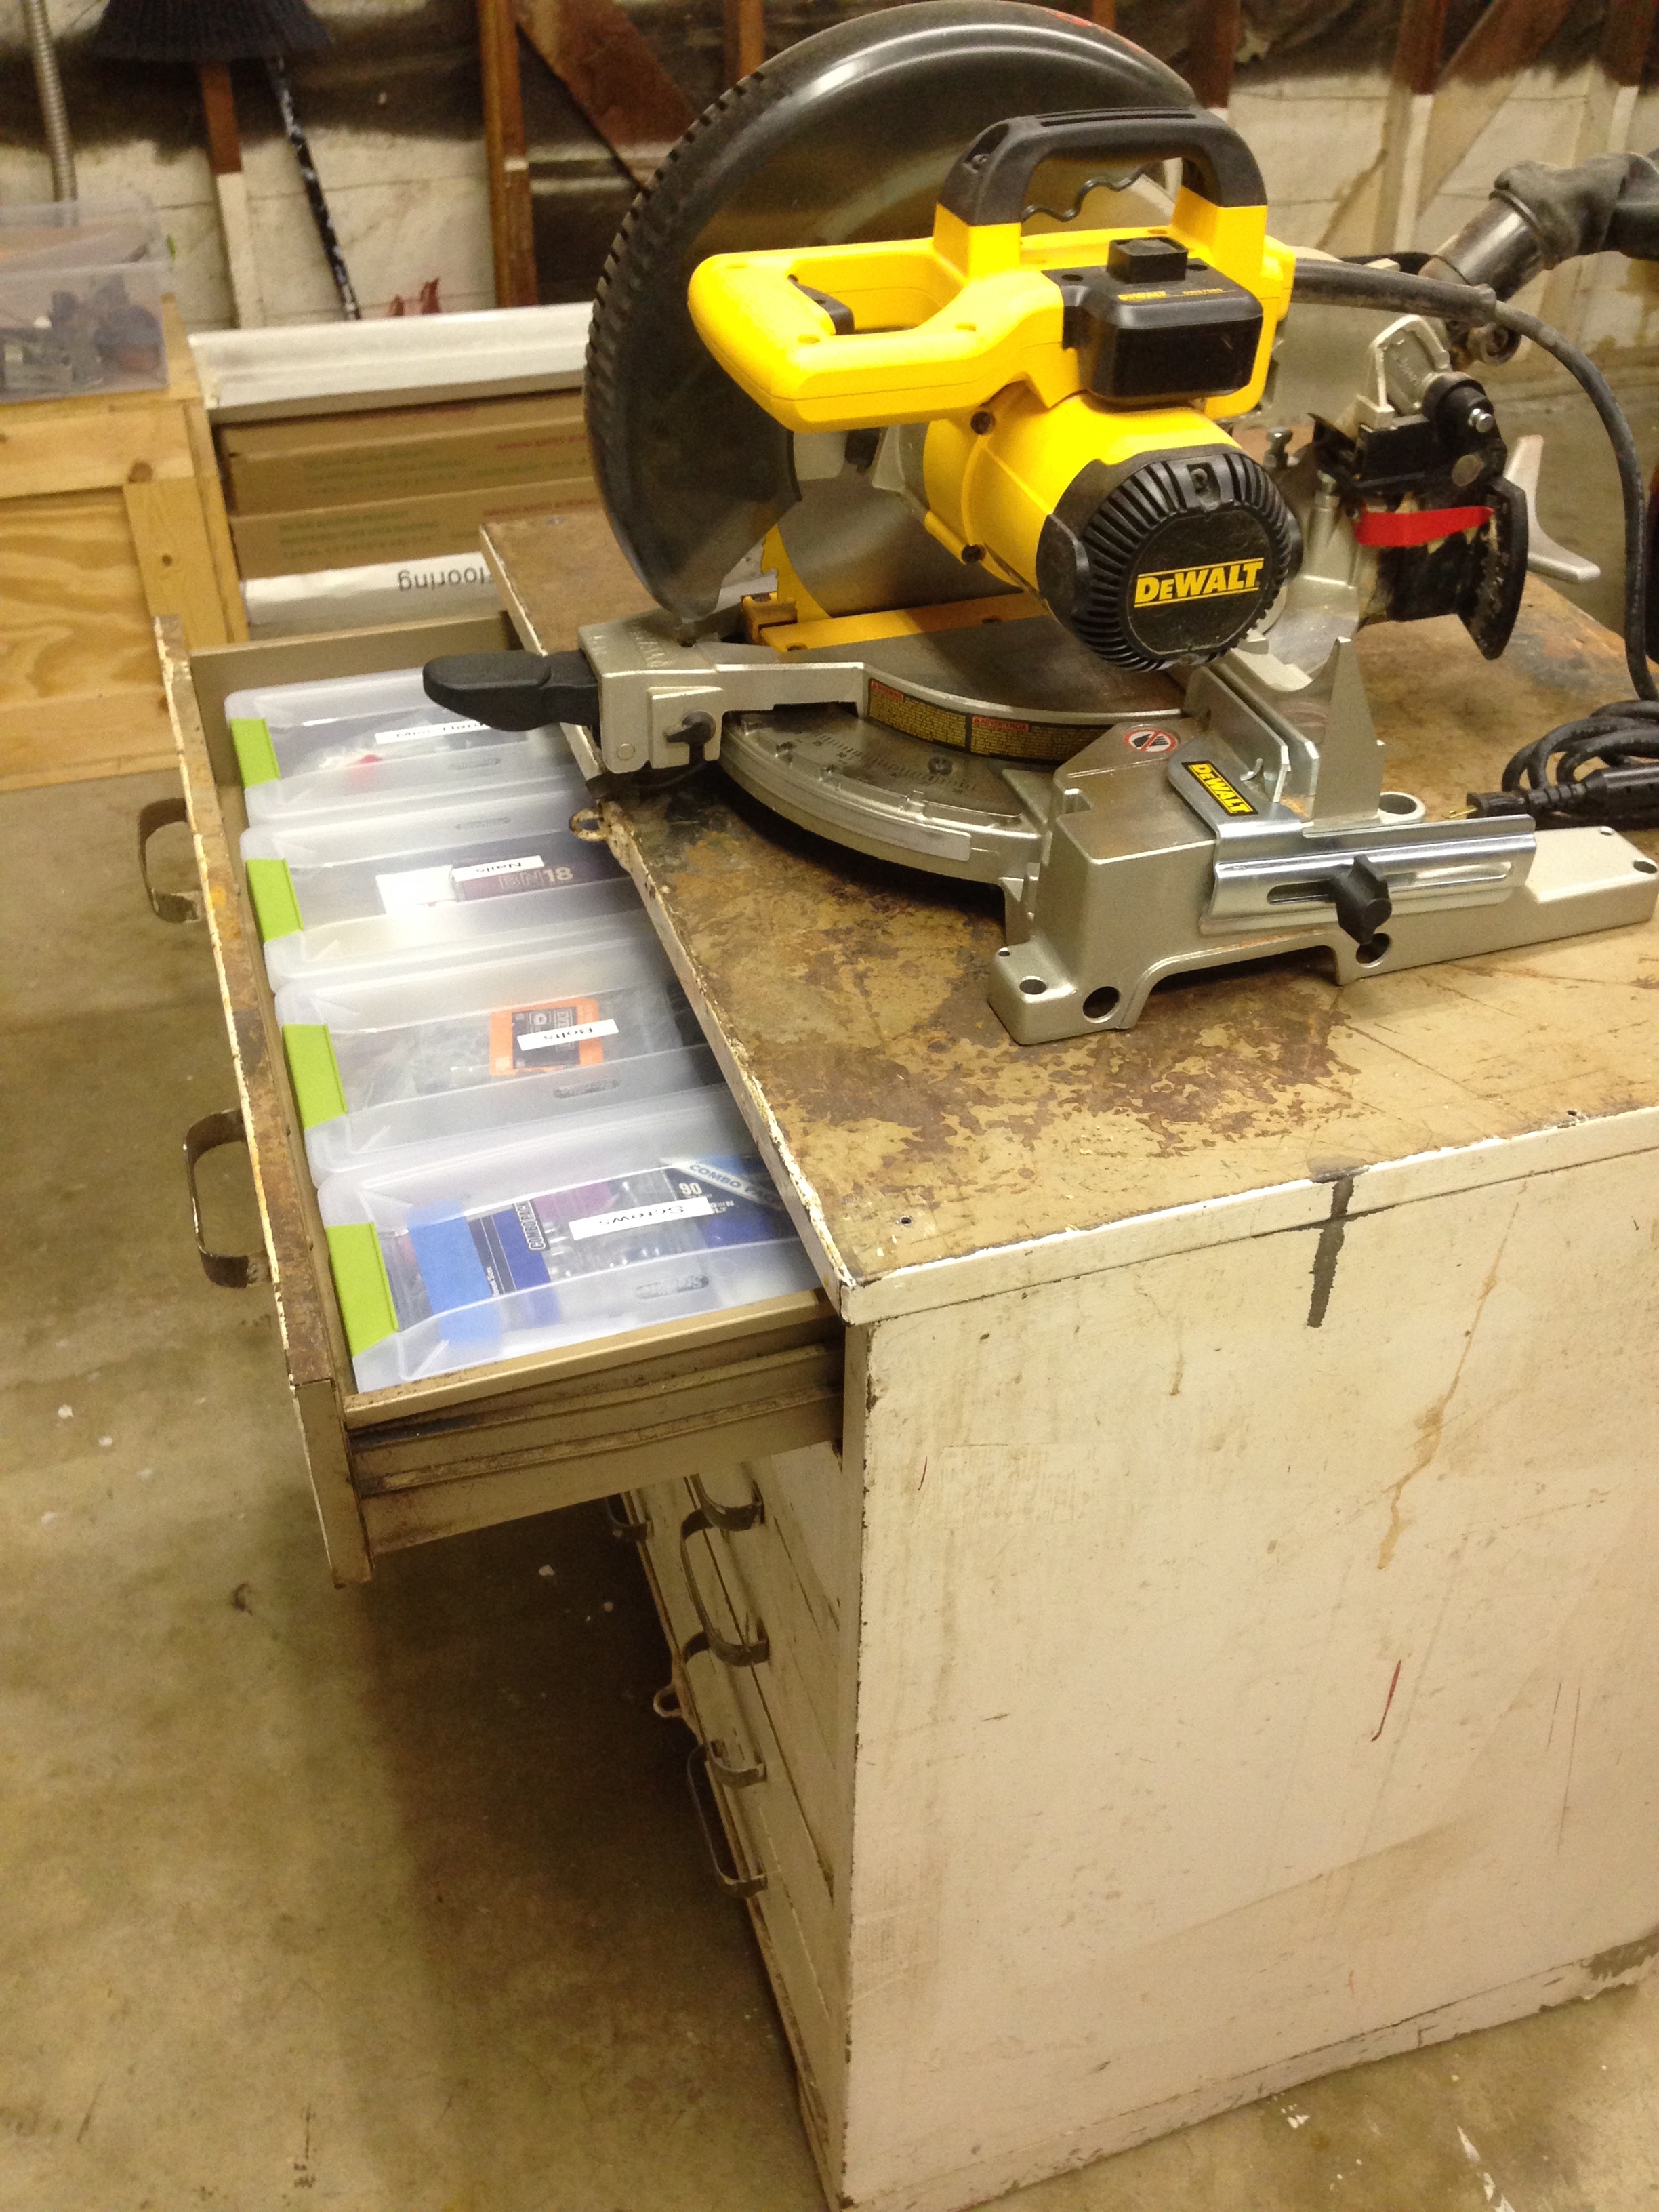
Before I had this space, I used to do messy stuff outside. This was fine for small jobs like cutting a PCB or painting an enclosure. That’s not convenient for bigger projects, though, so I’m lucky to have this now.
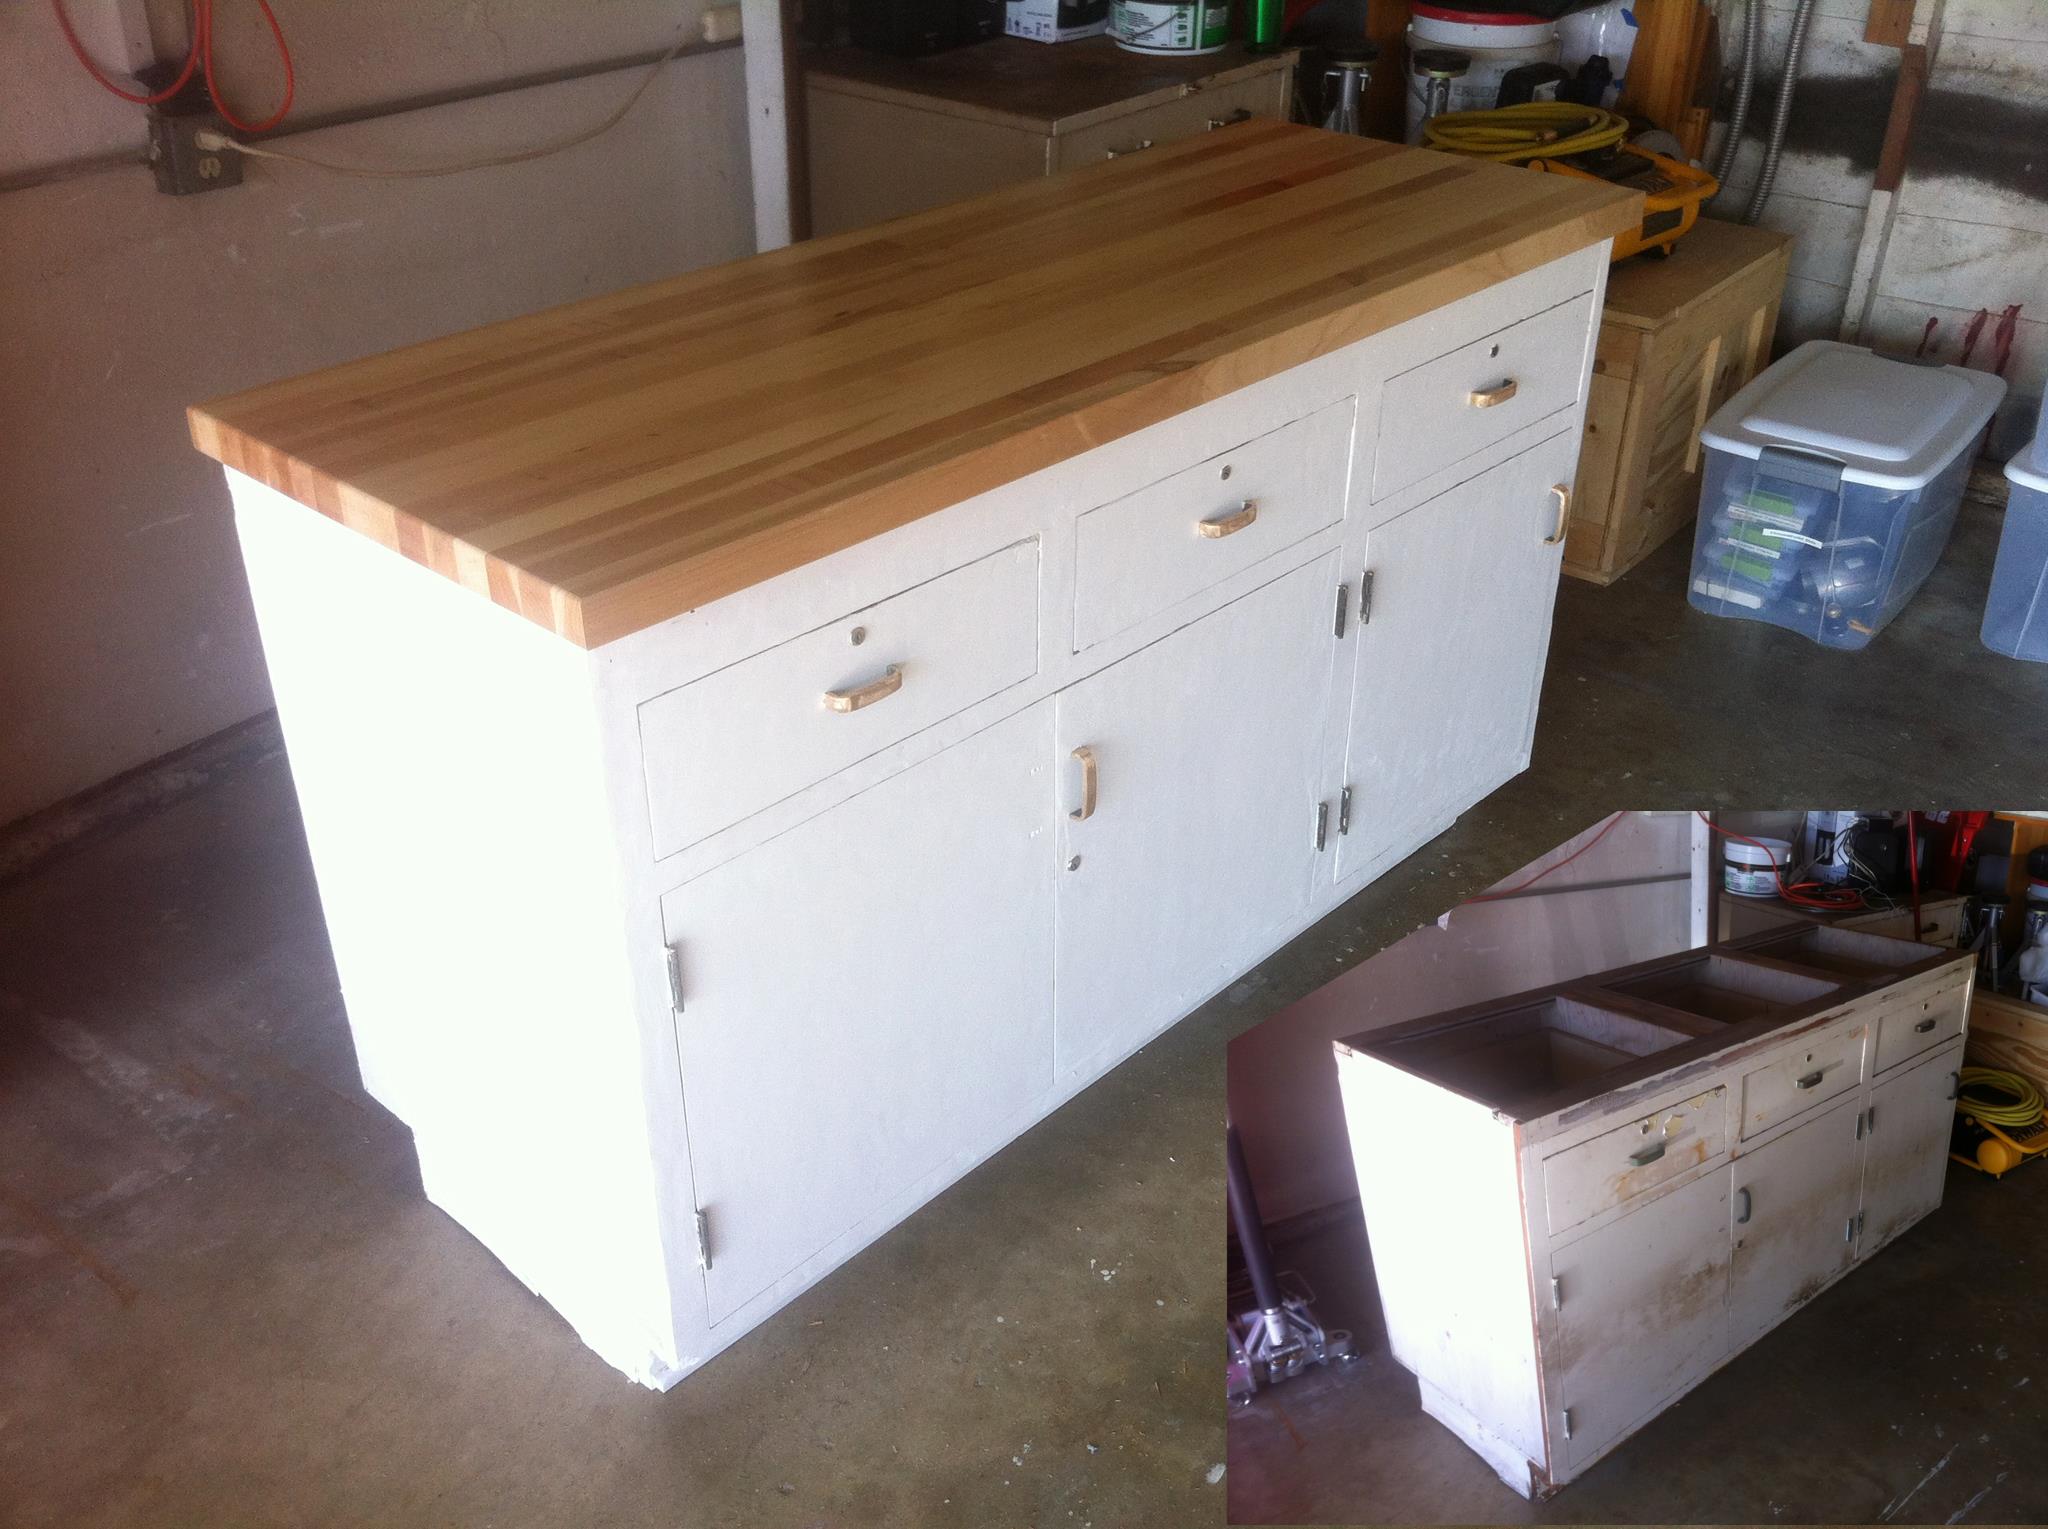
The workbench you see above was a project itself. The shell of it was left behind by the previous owner of the house. It was a real mess, but you could see underneath the crud, it was really well made. Judging from the brass spring-loaded hardware, I’d say it’s maybe from the 1940s. Hard to say, but with a little elbow grease and a new maple top from Grizzly, it came back to life in terrific form.
To the right of the workbench, there’s a grey steel cart. That’s a makeshift pinball lift, for when Johnny needs moving around. In the spirit of multiple uses for things, it also acts as a mobile work surface when in the jacked-up position. In the spirit of being a cheap-ass, it’s a 500lb hydraulic lift cart from Harbor Freight bought on sale (and with a coupon code), hacked into a pinball lift with Stanley gate hinges. Total investment, about $100, for a very useful and heavy duty tool. In addition to moving pinball machines, it’s also great for loading heavy things into trucks, working on transmissions, and riding down hills in traffic.
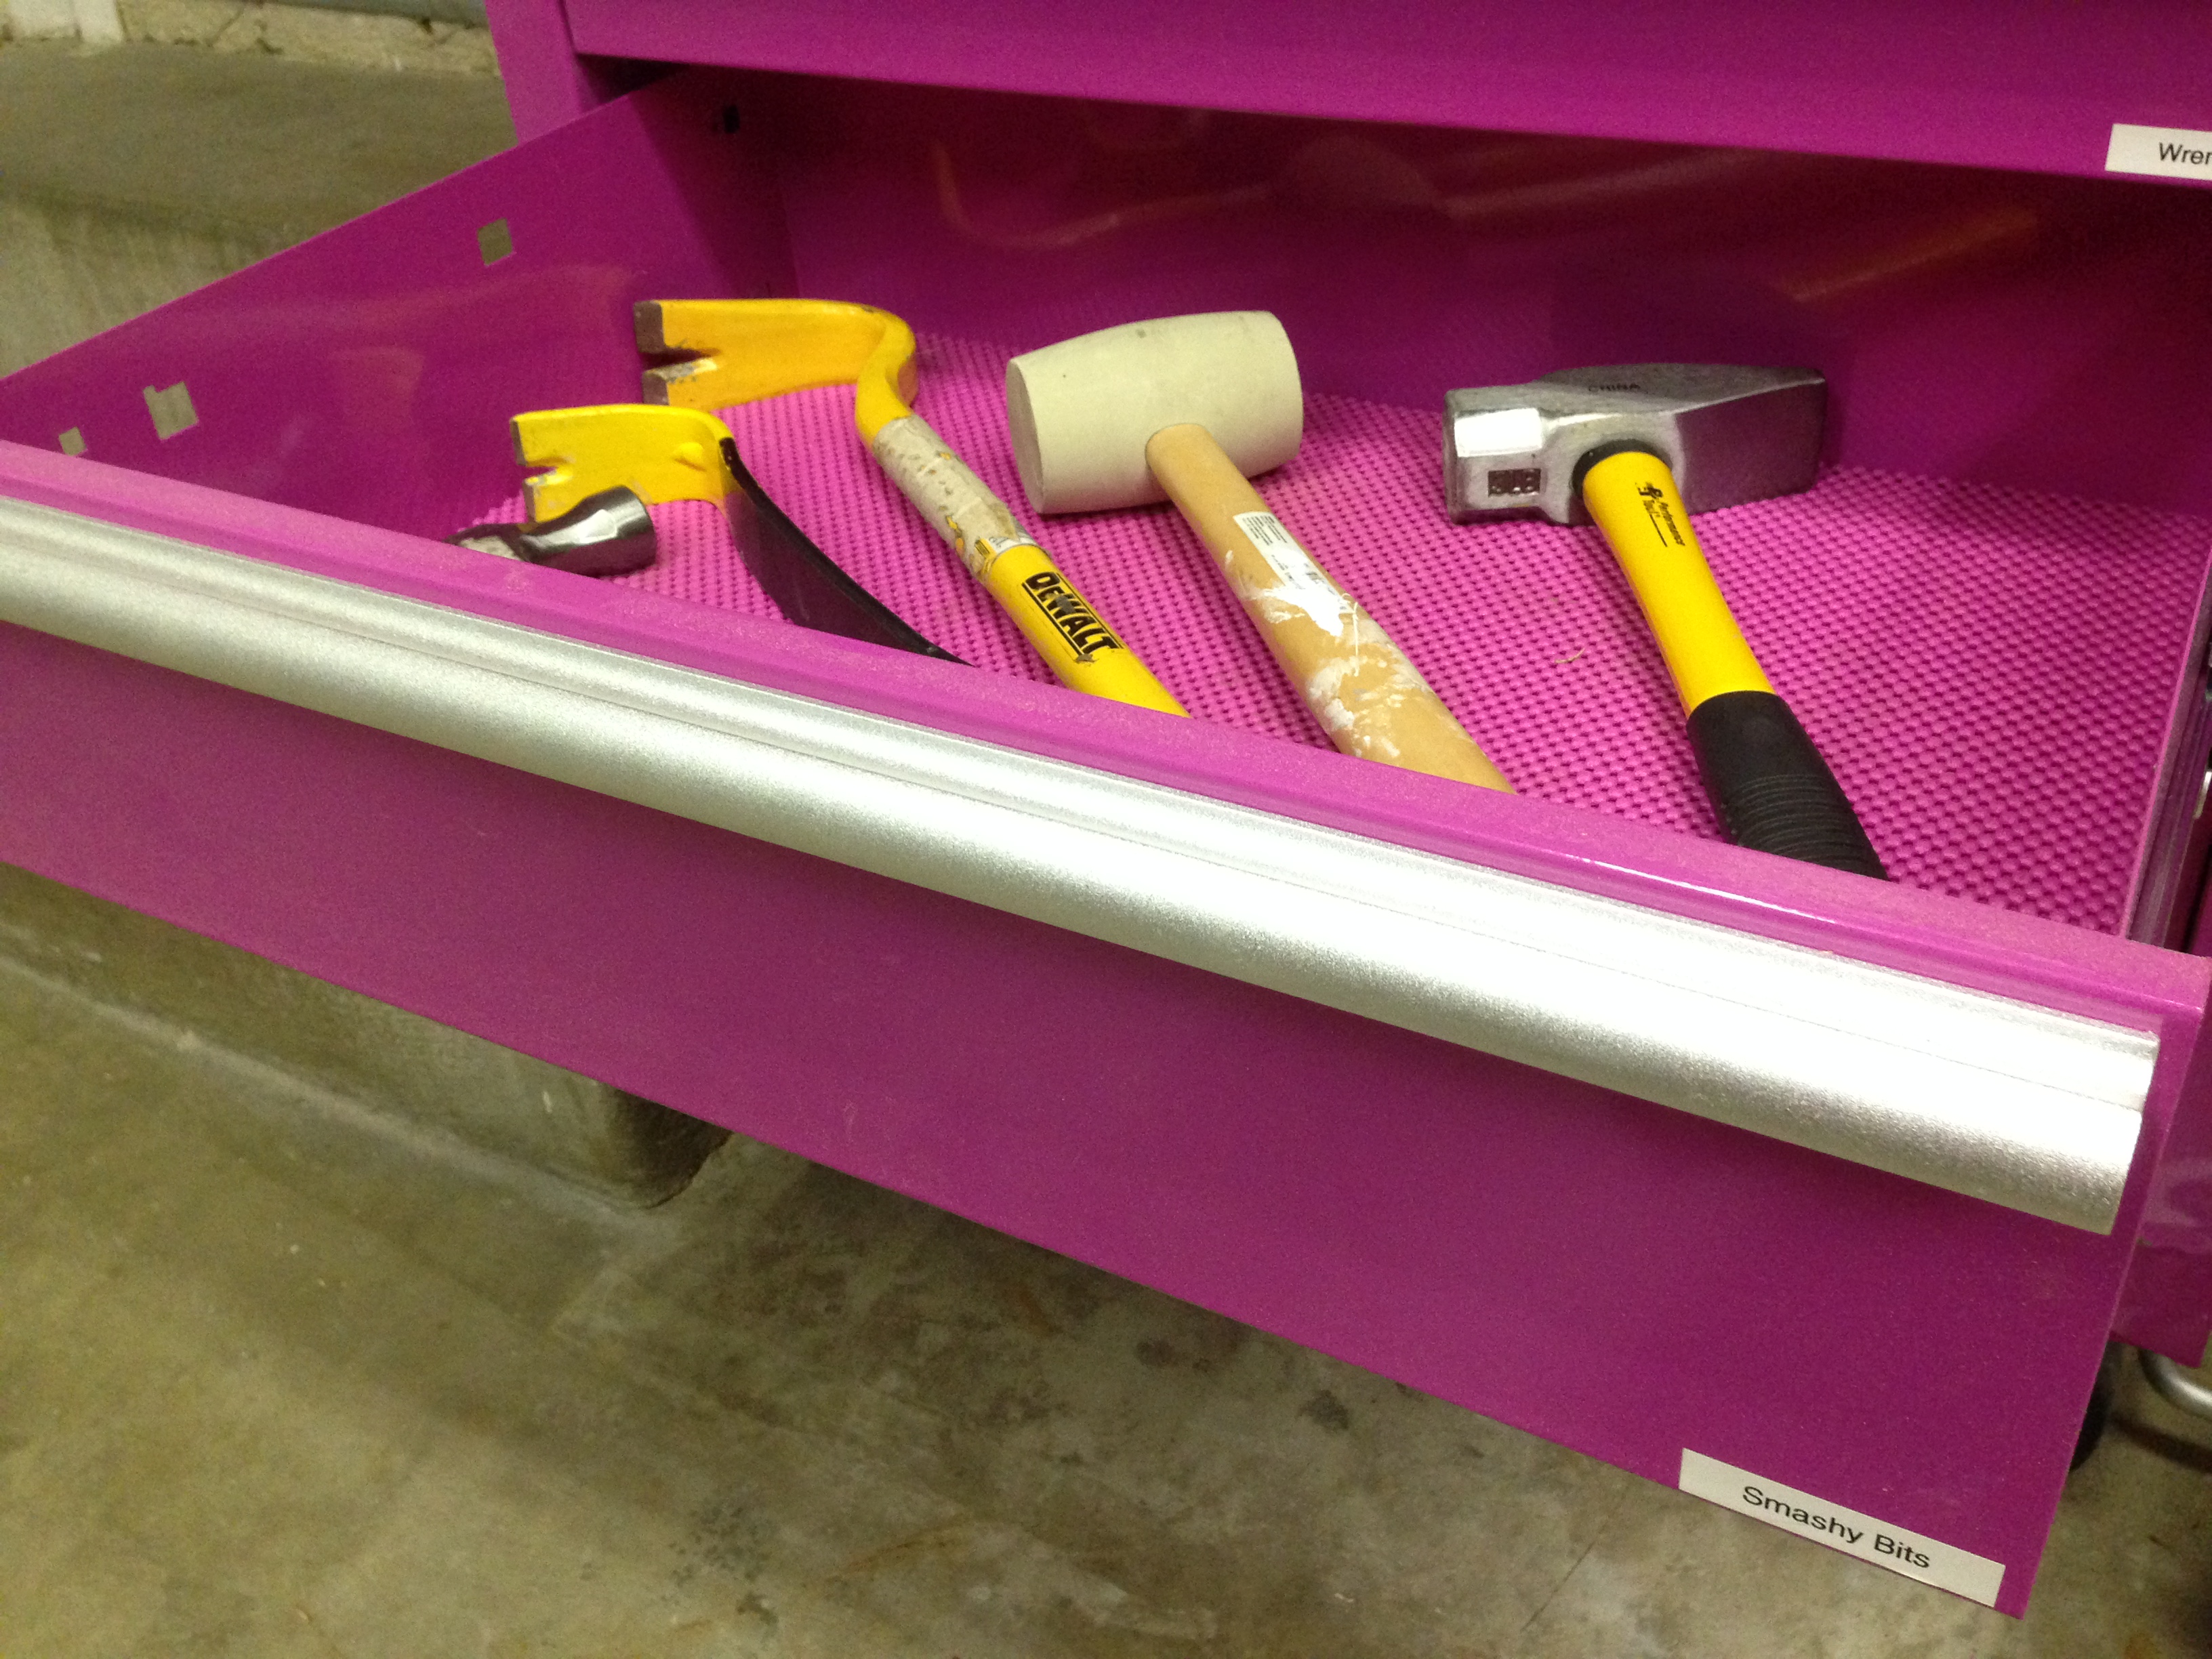
To the left of the workbench is something everyone always asks about.
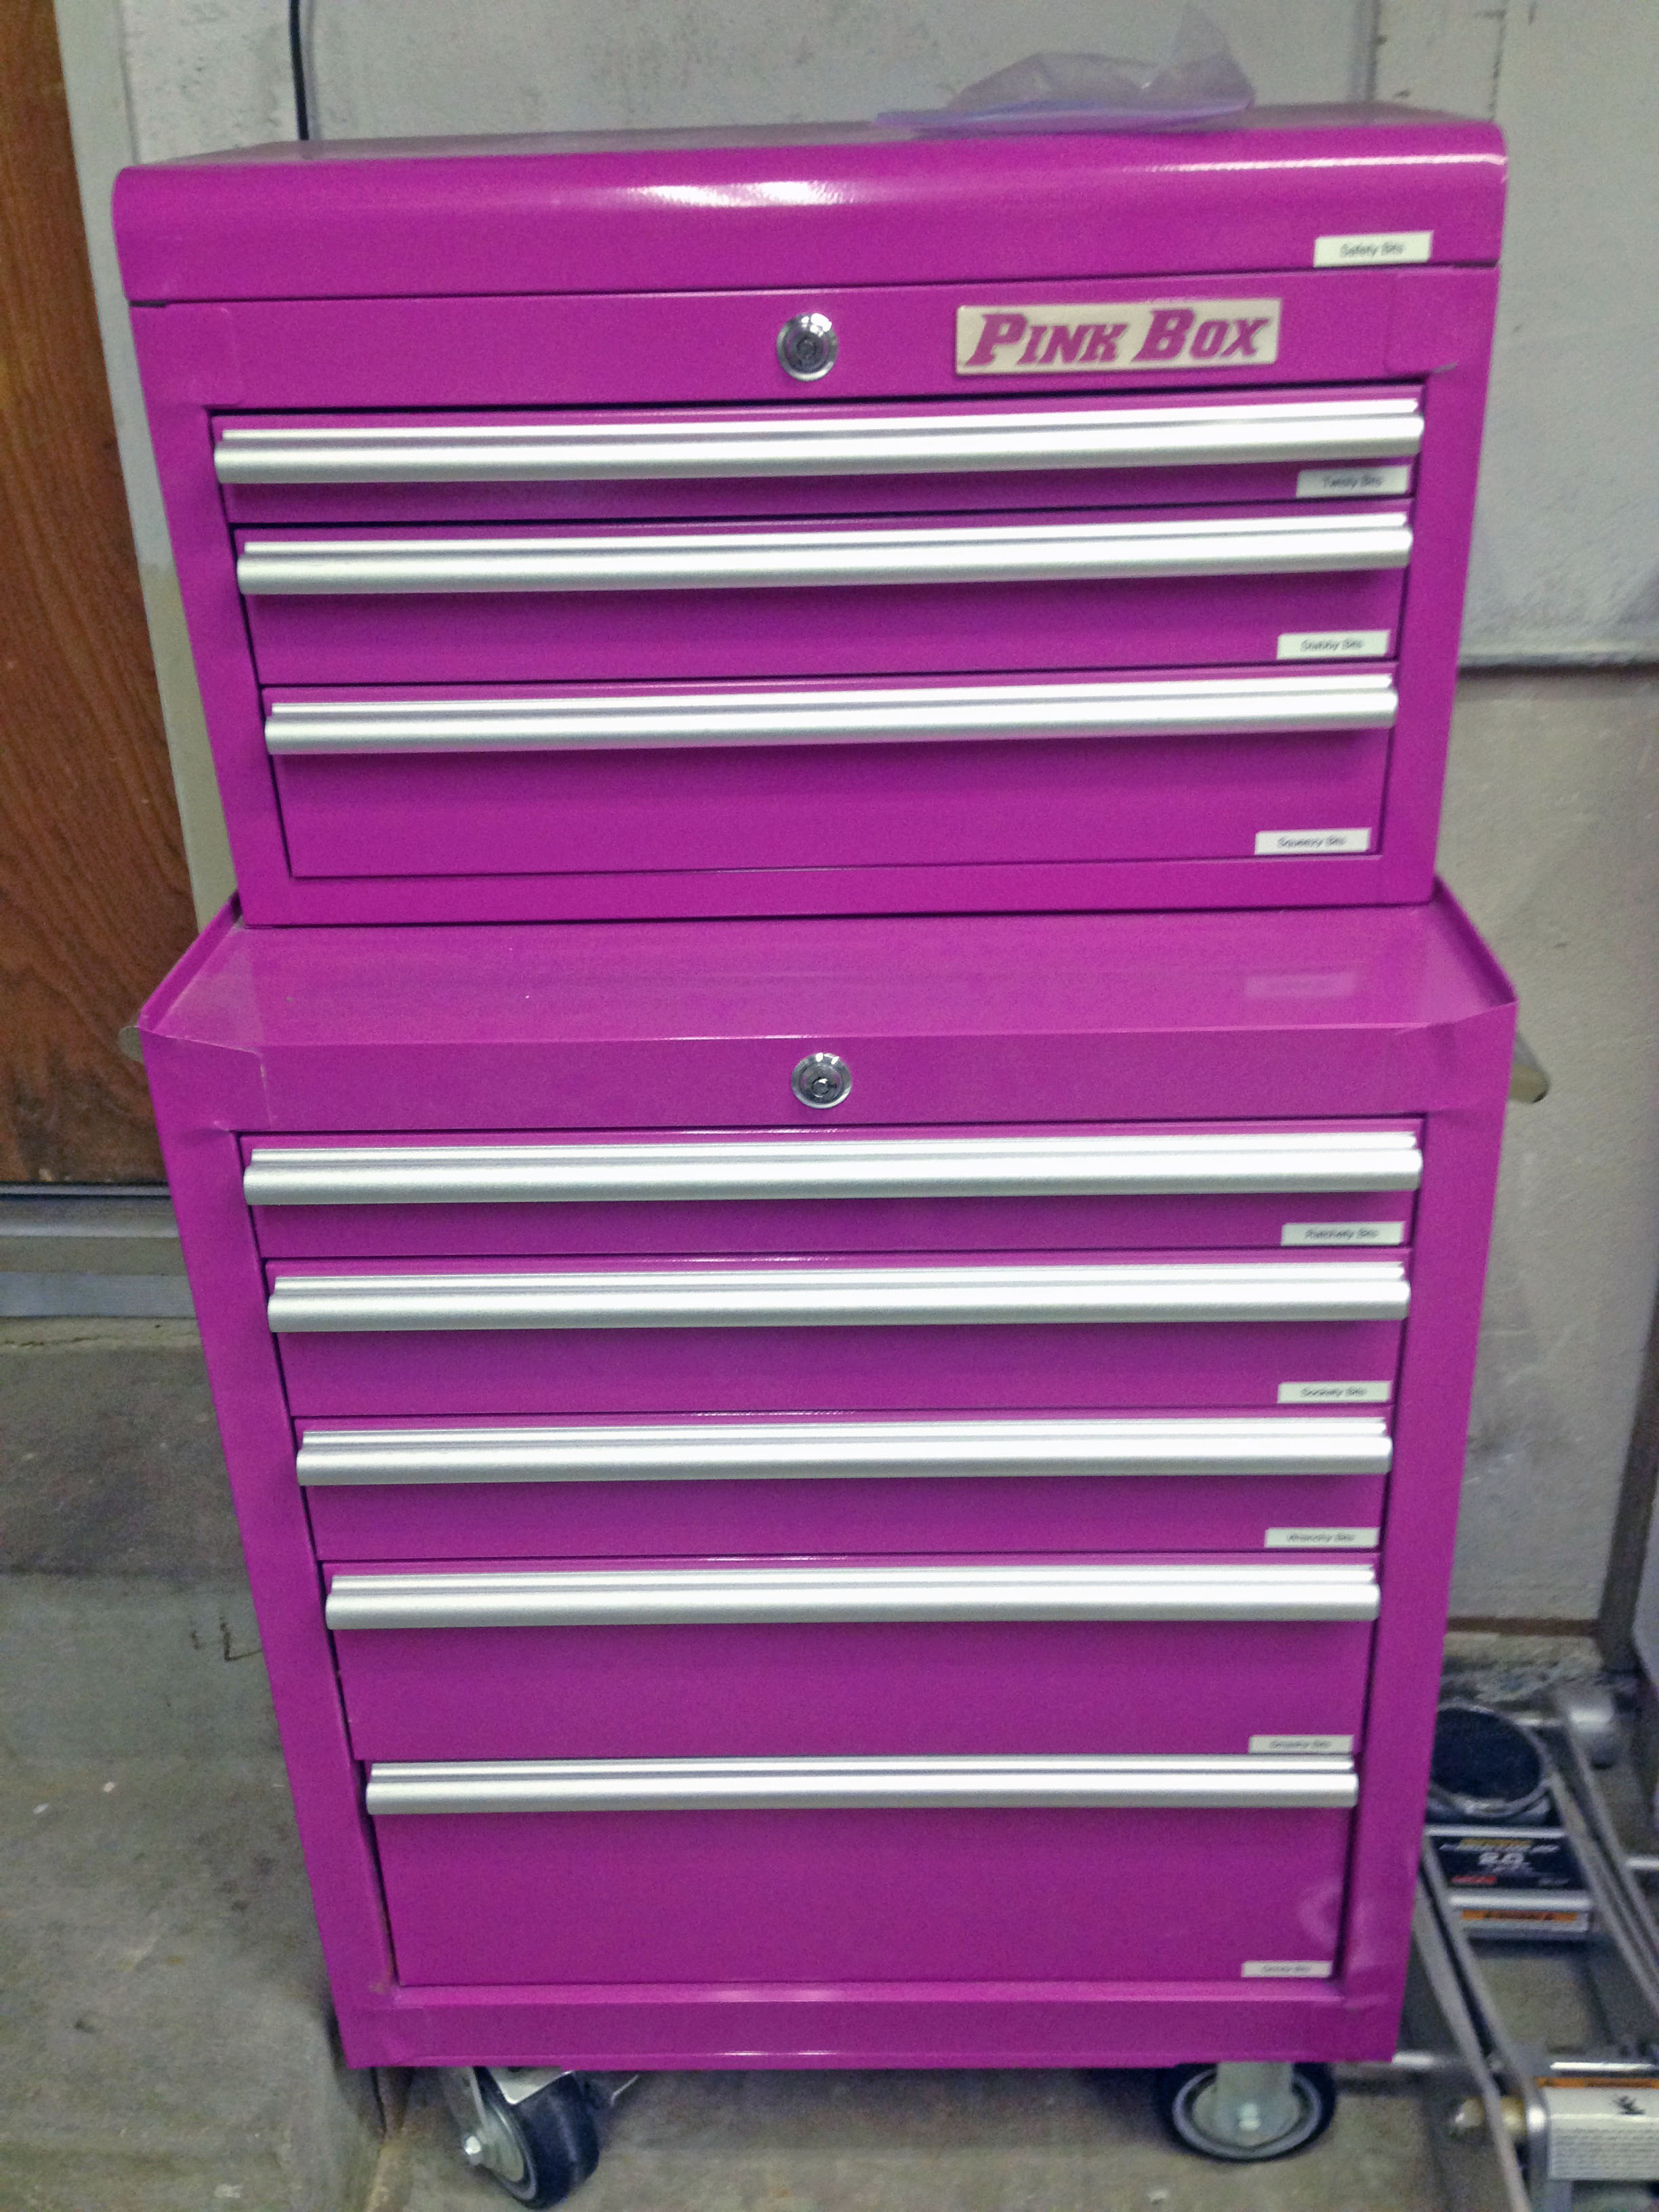
This tool chest has all manner of social and psychological issues wrapped up in it. For starters, I’m generally very opposed to the whole “let’s make things pink and then women will buy them” school of product design. Aside from demonstrating a total obliviousness to the history of pink in gender dynamics, it’s really insulting to womens’ intelligence. Not to mention being a deeply cynical marketing ploy. Having said all that, I bought it, didn’t I? Well, I don’t particularly like pink, frankly. However it also happens to be a well made tool chest with steel ball bearing drawer slides, and all the proper accouterments. Furthermore, the setup you see here was on sale on Amazon Prime at the time I bought it. Yes, Prime- that means shipping was free. This is way too big and heavy for UPS, so it was delivered by freight, to my door, in two days, for free. On sale. It was taken down shortly thereafter, so I can only assume it was a mistake. Someone who isn’t me took a real bath on shipping this baby, I can tell you. On top of all that, it’s just SO pink. It’s as though the Stay Puft Marshmallow Man was made of Double Bubble, ate the Barbie aisle of a Toys R Us, threw it back up, then died and decomposed on the same spot. Something about it just amuses me. I guess that means I own it ironically. I dunno. Anyways, it’s a conversation starter, to be sure.
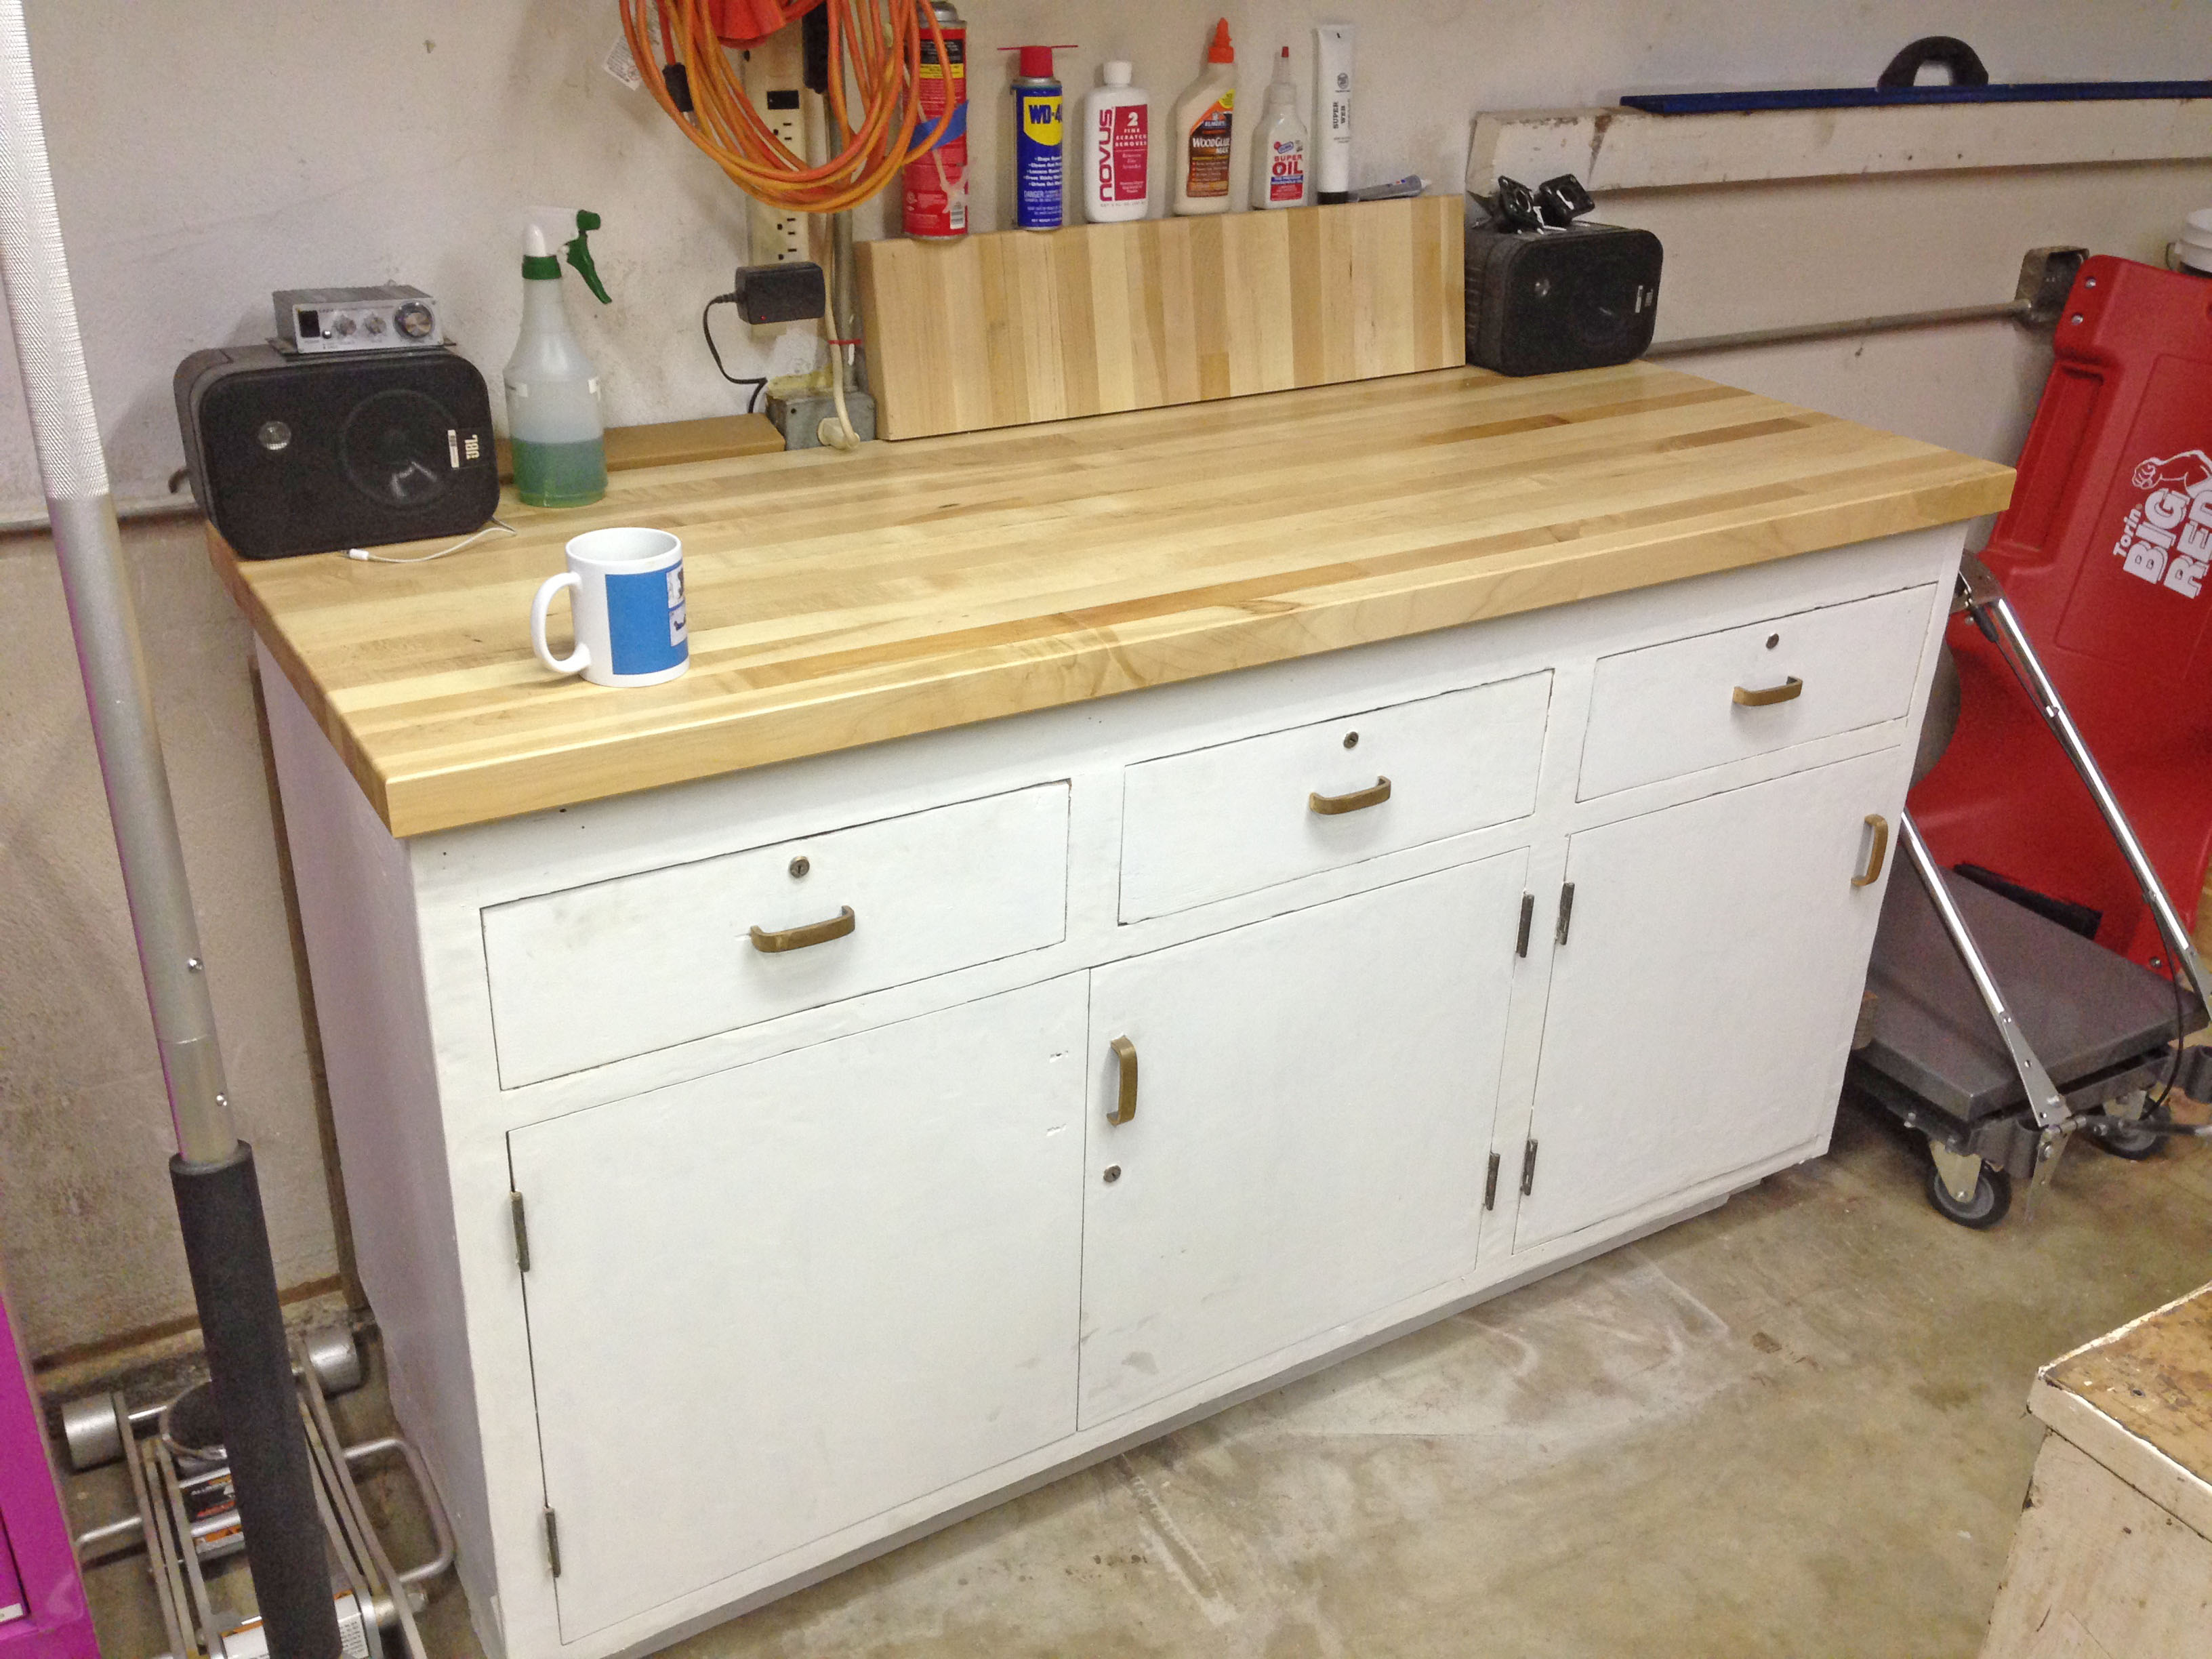
Opposite the work bench, I have a sort of “kitchen island”.
That little gem is a rolling steel chest of drawers. It was also left behind in the house, and appears to date from the same period (1940s, maybe) as the workbench. I’d guess it came out of a machine shop, originally. It has the marks of being used in and around machine tools and parts. The quality of this thing is amazing. Decades old, and every drawer still glides and latches like butter. The whole thing is on spring-loaded casters, so you can roll it around, but when you lean on it to do something, it squats down imperceptibly and won’t move, rather like a library stool. Brilliant. It needs a refinishing treatment, like the workbench received. One of these days I will get to that.
As much as I like the maple top on my workbench, a strong metal surface is really desirable sometimes. When you need to hammer metal into shape, for example, or do a little welding. Having a mobile metal surface is very useful. The drawers are perfect for the Sterlite containers you see holding all my hardware and such. I love Sterlite bins. Almost everything I own is in them. They come in every size imaginable, and they are really nicely made.
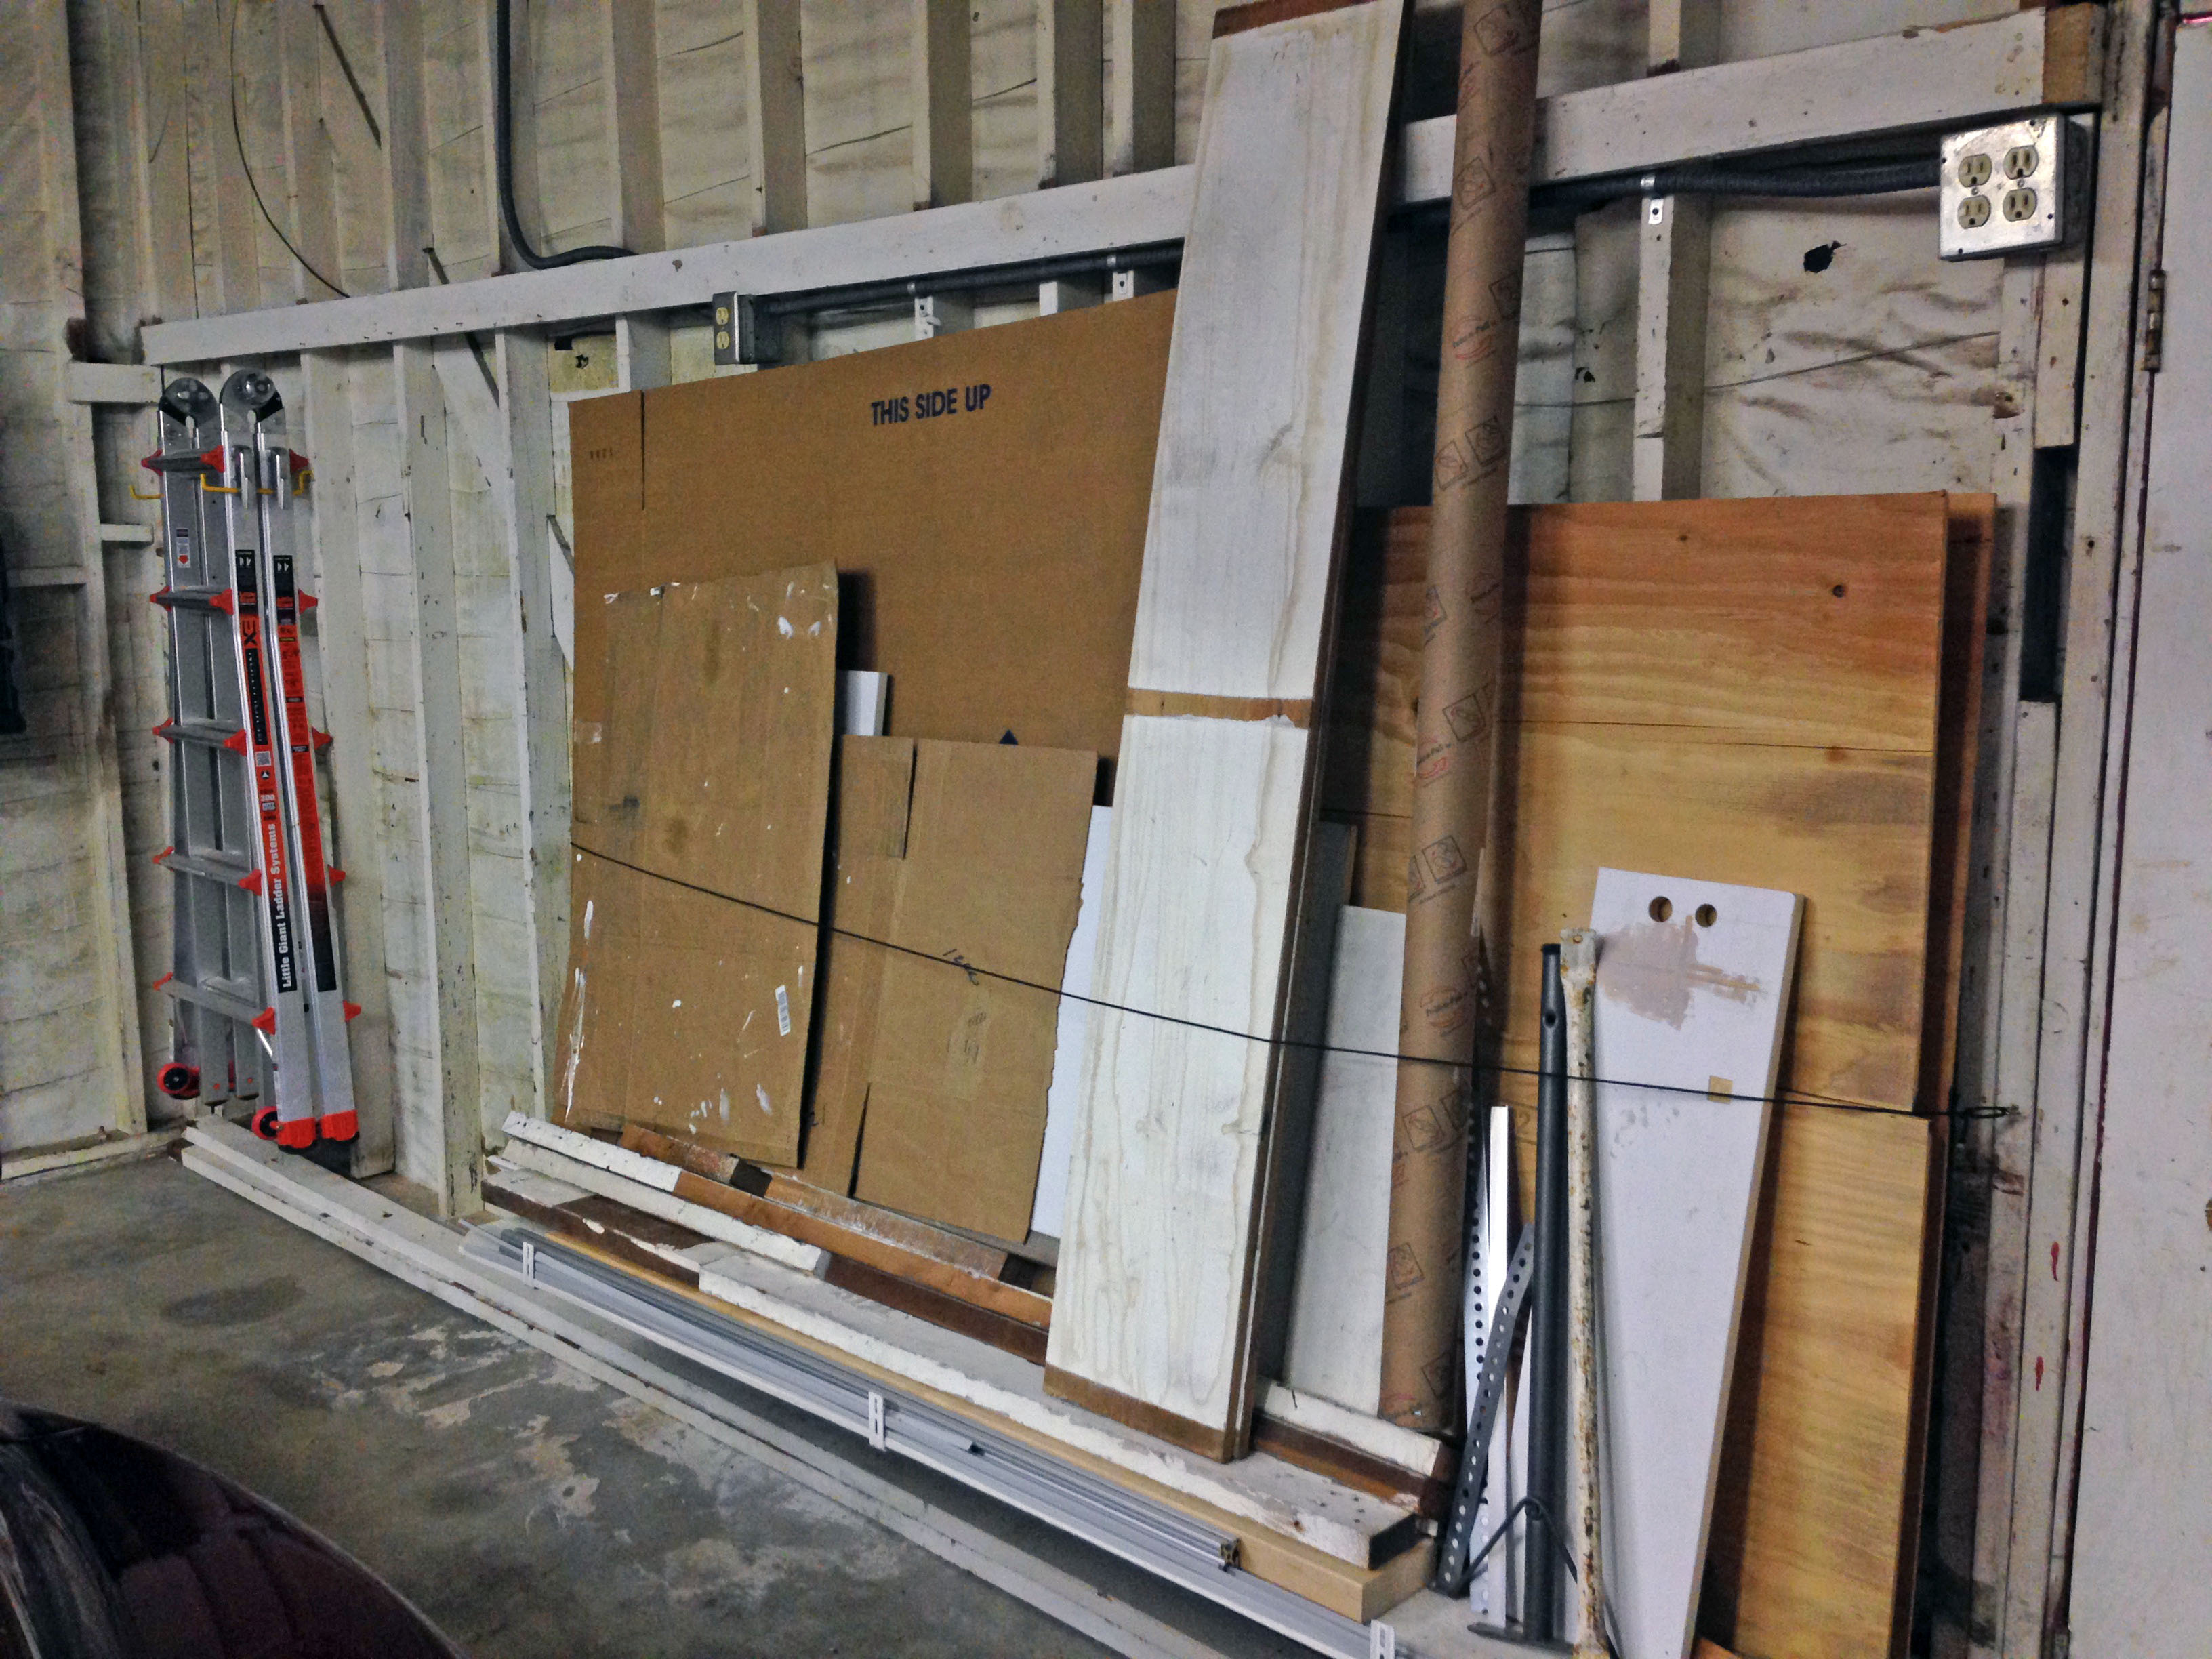
Lastly, we have the large material scrap area. Not much to look at, but if you’re going to work on larger projects, you’re going to need something like this.
That’s about it! I’ve done everything from designing a computer to remodeling a house to restoring a pinball machine to building a race car in these two spaces. With a little creativity, a smidgen patience, a splash of anal retentiveness, and a deep desire to death-grip your dollar bills as though they are giving you life eternal, you can put together a nice personal workshop.
So… as a budding electronics hobbyist…
What, exactly, is a logic probe, how does it function, and how is it used?
Something tells me that I will want one someday for debugging *something*, and it will be handy to know what I’m getting into at that point 😉
Glad you asked! Most basically, it connects to ground and +V, then you touch the probe to points in your circuit. If the level at that point is a logic low (near ground), it beeps in a low tone. If the level is logic high (near +V), it beeps in a high tone. That’s enough to debug lots of simple logic circuits. If the data is changing, the high and low tones combine into a kind of “music” that can be interpreted to some degree. For example, you can tell from the pitch of this “music” what the approximate frequency of the pulses is. That can tell you (for example) which end of an address bus is A0 and which is A15 (lower address bits will be changing more frequently). Changes in frequency (the music pitching up and down) can give you a sense of a higher level protocol. In Veronica’s video board, for example, I learned what normal operation sounds like for the video command buffer. I could tell when it was getting corrupted in response to code bugs.
The probe has some other more advanced features like a memory and CMOS/TTL modes, but you get the idea. It does a lot for such a simple tool. You can even build one yourself without much difficulty. There are kits available.
Some other examples- if the logic level is Z-state (high impedance), the probe will be silent. This is tremendously useful as well. For example, it can tell you if you’ve forgotten to configure an I/O pin on a microcontroller correctly.
The probe can also help find noise problems in a circuit. It will “squawk and squabble” like an old CB radio if a line should be high impedence, but the circuit has noise in it.
I can see how that would be super useful — and super easy to learn how to use! I might have to get one. I’ve got my own Veronica-scale project (well, approximately) in mind, and although it will be very different in nature, I can already anticipate a need to debug a rather large pile of ornery electronic parts…
I suppose I should ask, how much should I expect to pay for one, typically? I see in your article, you say that they’re quite cheap — but quite cheap for a magnifying glass, and quite cheap for a scanning electron microscope, are two very very different things 😉
This is the one I bought:
http://www.amazon.com/Elenco-Electronics-LP-560-Logic-Probe/dp/B000Z9HAP4/ref=sr_1_1?ie=UTF8&qid=1403622496&sr=8-1&keywords=logic+probe
… so $18 is reasonable, I guess. There are fancier ones and you can pay up to $100, but the $18 one has worked great for me.
Jameco has a kit version that has fewer features, but I think it’s only $11.
You should be able to even use a microphone on your laptop to decode what’ going on with the logic probe. You’ll need to use a spectrogram view of the audio but once you do you should be able to use it just like the output of a fancy logic analyzer that way.
To a point, yah, that might work. There are some oscilloscope apps for mobile devices that use the audio input in this way. I’m sure it’s limited sample-rate wise, but it’s a neat idea.
Quinn,
Awesome write-up as usual – thanks for sharing. Some neat ideas there. I have a fluorescent bulbed magnifier lens on a Luxo armed base. Portable light and eye help when needed (it’s not just me, SMT parts are Small). The mag had those tiny plastic wing nuts like your Panavise. I upgraded with monster wing nuts which are 3/8 or 1/2 aluminum rod, tapped in one end to the bolt size, and cross drilled for a 1/4 steel handle, so it’s T shaped. This gives a lot of leverage. Mag doesn’t move unless *I* say so!
Good recycling with the cabinets, too. If it’s well built, keep using it (I guess that was a theme, as well as fixing stuff and being .. Err. Thrifty)
At least partial OCD is what allows one to have the level of concentration to create, code, troubleshoot, etc. and stick with it to the end. Say it loud, I’m OCD and proud!
– Crawford
BTW – that tool box, with that name… Not even going to go there. Needless to say no one will ever steal that thing, unless ironic feminist biker gangs are rampant in your neighborhood.
Oh yes, all my idiot friends have had a good laugh at the name as well. It’s one of those branding moves that makes you wonder if they’re really that clever and edgy, or if they don’t realize what they’ve done.
My beef with the Panavise adjusters is that they don’t seem to have a middle setting. They are either tight or completely loose. Other similar products I’ve used, like the Helping Hands, have a way to make things stiff but still moveable. That’s very convenient.
The makers of the toolbox were both colorblind, gender clueless and lost in translation as well. No offense meant. I’ll even grow a handlebar in penance.
?;-{
I’m going to have to play with my Panavise and see if it has the same problem… That would be annoying. Maybe some tuning is in order.
I think the vise has a number of niggling issues. In addition to the screws not staying put, the clamping bars that slide on the horizontal rail are a really loose fit. As soon as you loosen a screw to move a bar, everything kind of collapses in a heap because of how much play there is in everything.
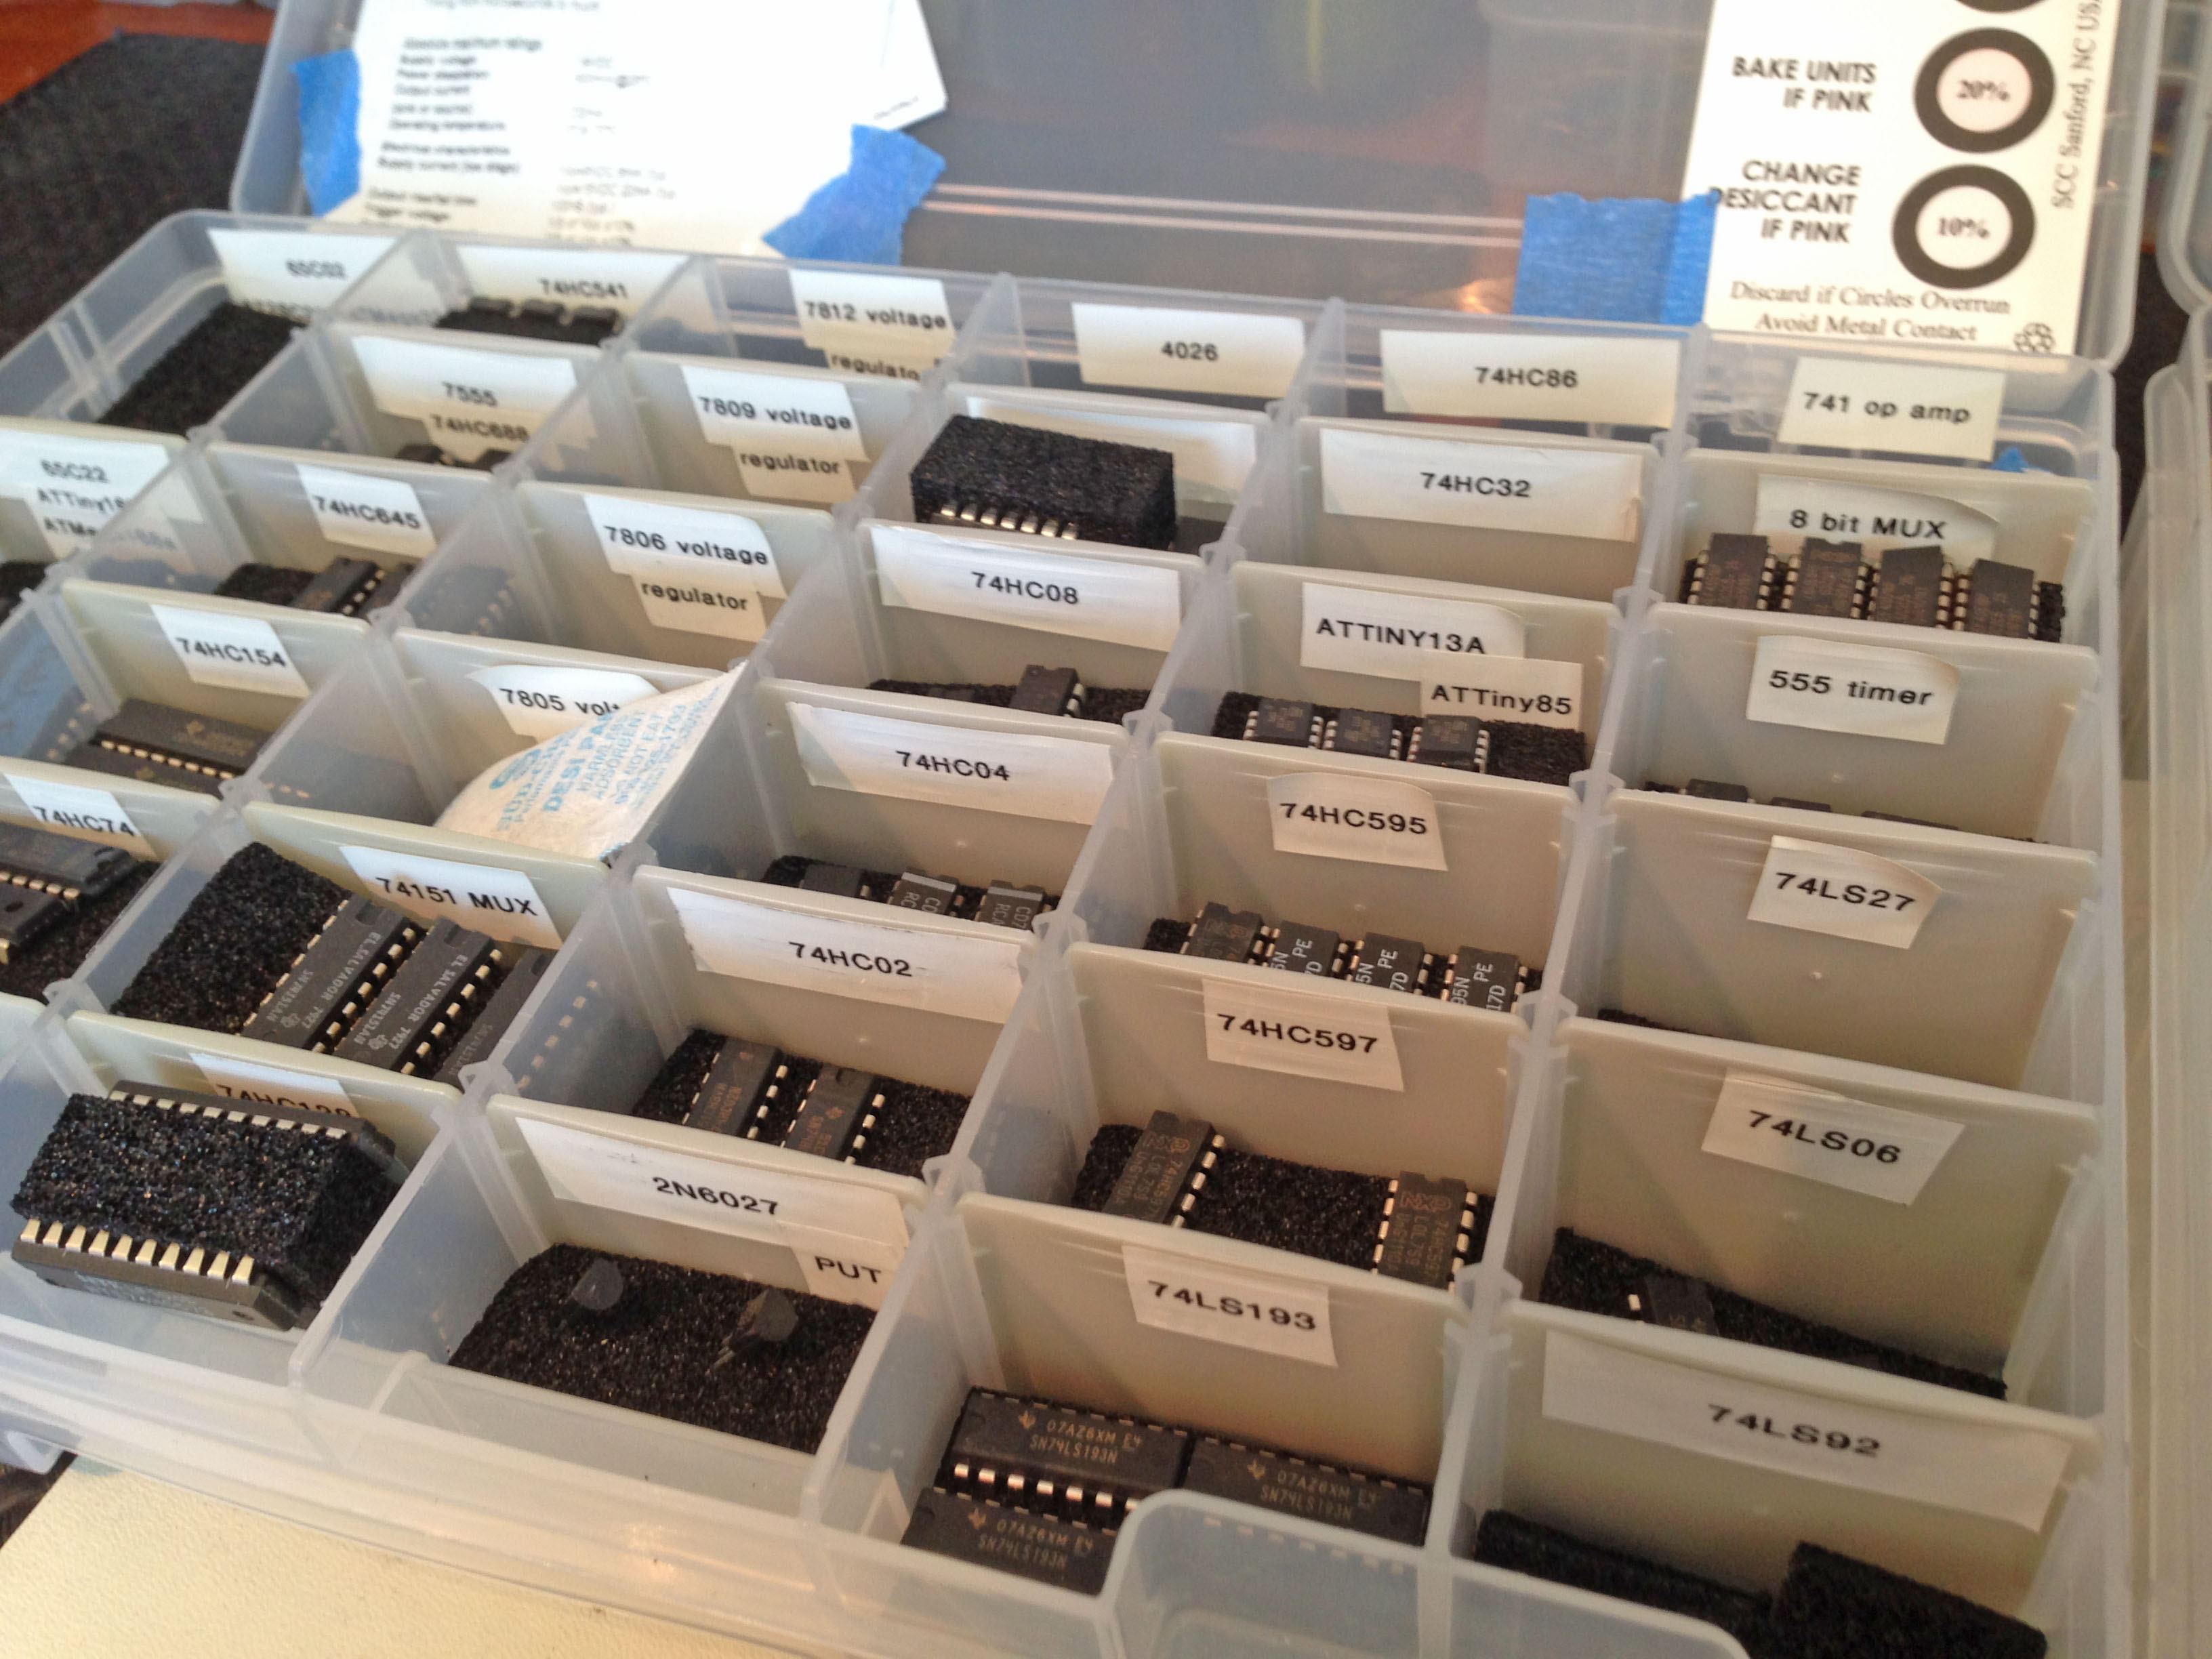
Great writeup, this had me laughing multiple times. One of your photos made me think of an article I’d like to see. Your picture of the container with an assortment of ICs triggered me to think “Why did she pick THOSE ICs?” Could you wite an article detailing what ICs someone starting out should buy for their bench? Also, you have alot more 74XX than I would have thought and I’m curious as to if you prototype only with them or if you use them in your final designs.
Thanks, glad you liked it! As the for the ICs, honestly I just buy what stuff when I need it. My first few projects we really slow because I had to keep stopping to wait for new stuff to arrive that had been ordered. As I did more and more projects, however, I started to already have things I needed.
I actually wish I had more 74xx. 🙂 Even when building with microcontrollers or other more modern stuff, 74xx TTL is still incredibly useful. It’s the glue that holds everything else together, and allows you to multiply effectiveness of other chips. I use a lot of this stuff in my final designs, as evidenced by things like HexOut and Veronica. In Hex Out, for example, there are a lot of shift registers for adding I/O to the ATTiny. In Veronica, all the address decoding is done with basic TTL stuff, and there is some other stuff in there as well.
It’s also good to have around if you own a pinball machine. 🙂 Johnny is basically entirely built from 74xx TTL. It’s like the 1980s threw up in there. Those chips are all driven quite hard and the power supplies are old, so they do have a tendency to fail from time to time.
My rule with cheap stuff like 74 series chips is “if you need one, buy ten”. After a few projects, you’ll find you’re using the same familiar chips over and over, and you’ll already have them.
It’s hard to advise on what chips to start off with, as it depends so much on the sort of projects you’re making. Some of my favourites: 00, 14, 74, 123, 138, 139, 541, 574, 595.
Yes, exactly! Especially when something is inexpensive per unit, like chips, wire, connectors, etc. Plus, it helps amortize shipping costs when ordering online. My minimum order of a chip is always five. If I have a quantity in mind for a project, double or triple it.
I can’t count how many times this has saved my bacon on a project. A solution that I think will work doesn’t, but another solution will, and the second solution requires more of a chip I didn’t think I’d need many of.
For chips, basic logic gates are a great start. Shift registers are always useful. Flip flops, MUXes, and comparitors, as well. If you’re planning computer-like stuff, then tri-state buffers are a must.
Jameco sells 74xx starter kits that look quite good, though I haven’t tried one. Also, think about what type of chips to get- personally I buy all HC stuff unless I specifically need an LS or other flavor for a situation. Older stuff is less robust, and newer stuff doesn’t have as many options.
This. Totally this. I couldn’t agree more.
“Yes, exactly! Especially when something is inexpensive per unit, like chips, wire, connectors, etc. Plus, it helps amortize shipping costs when ordering online. My minimum order of a chip is always five. If I have a quantity in mind for a project, double or triple it.
I can’t count how many times this has saved my bacon on a project. A solution that I think will work doesn’t, but another solution will, and the second solution requires more of a chip I didn’t think I’d need many of.”
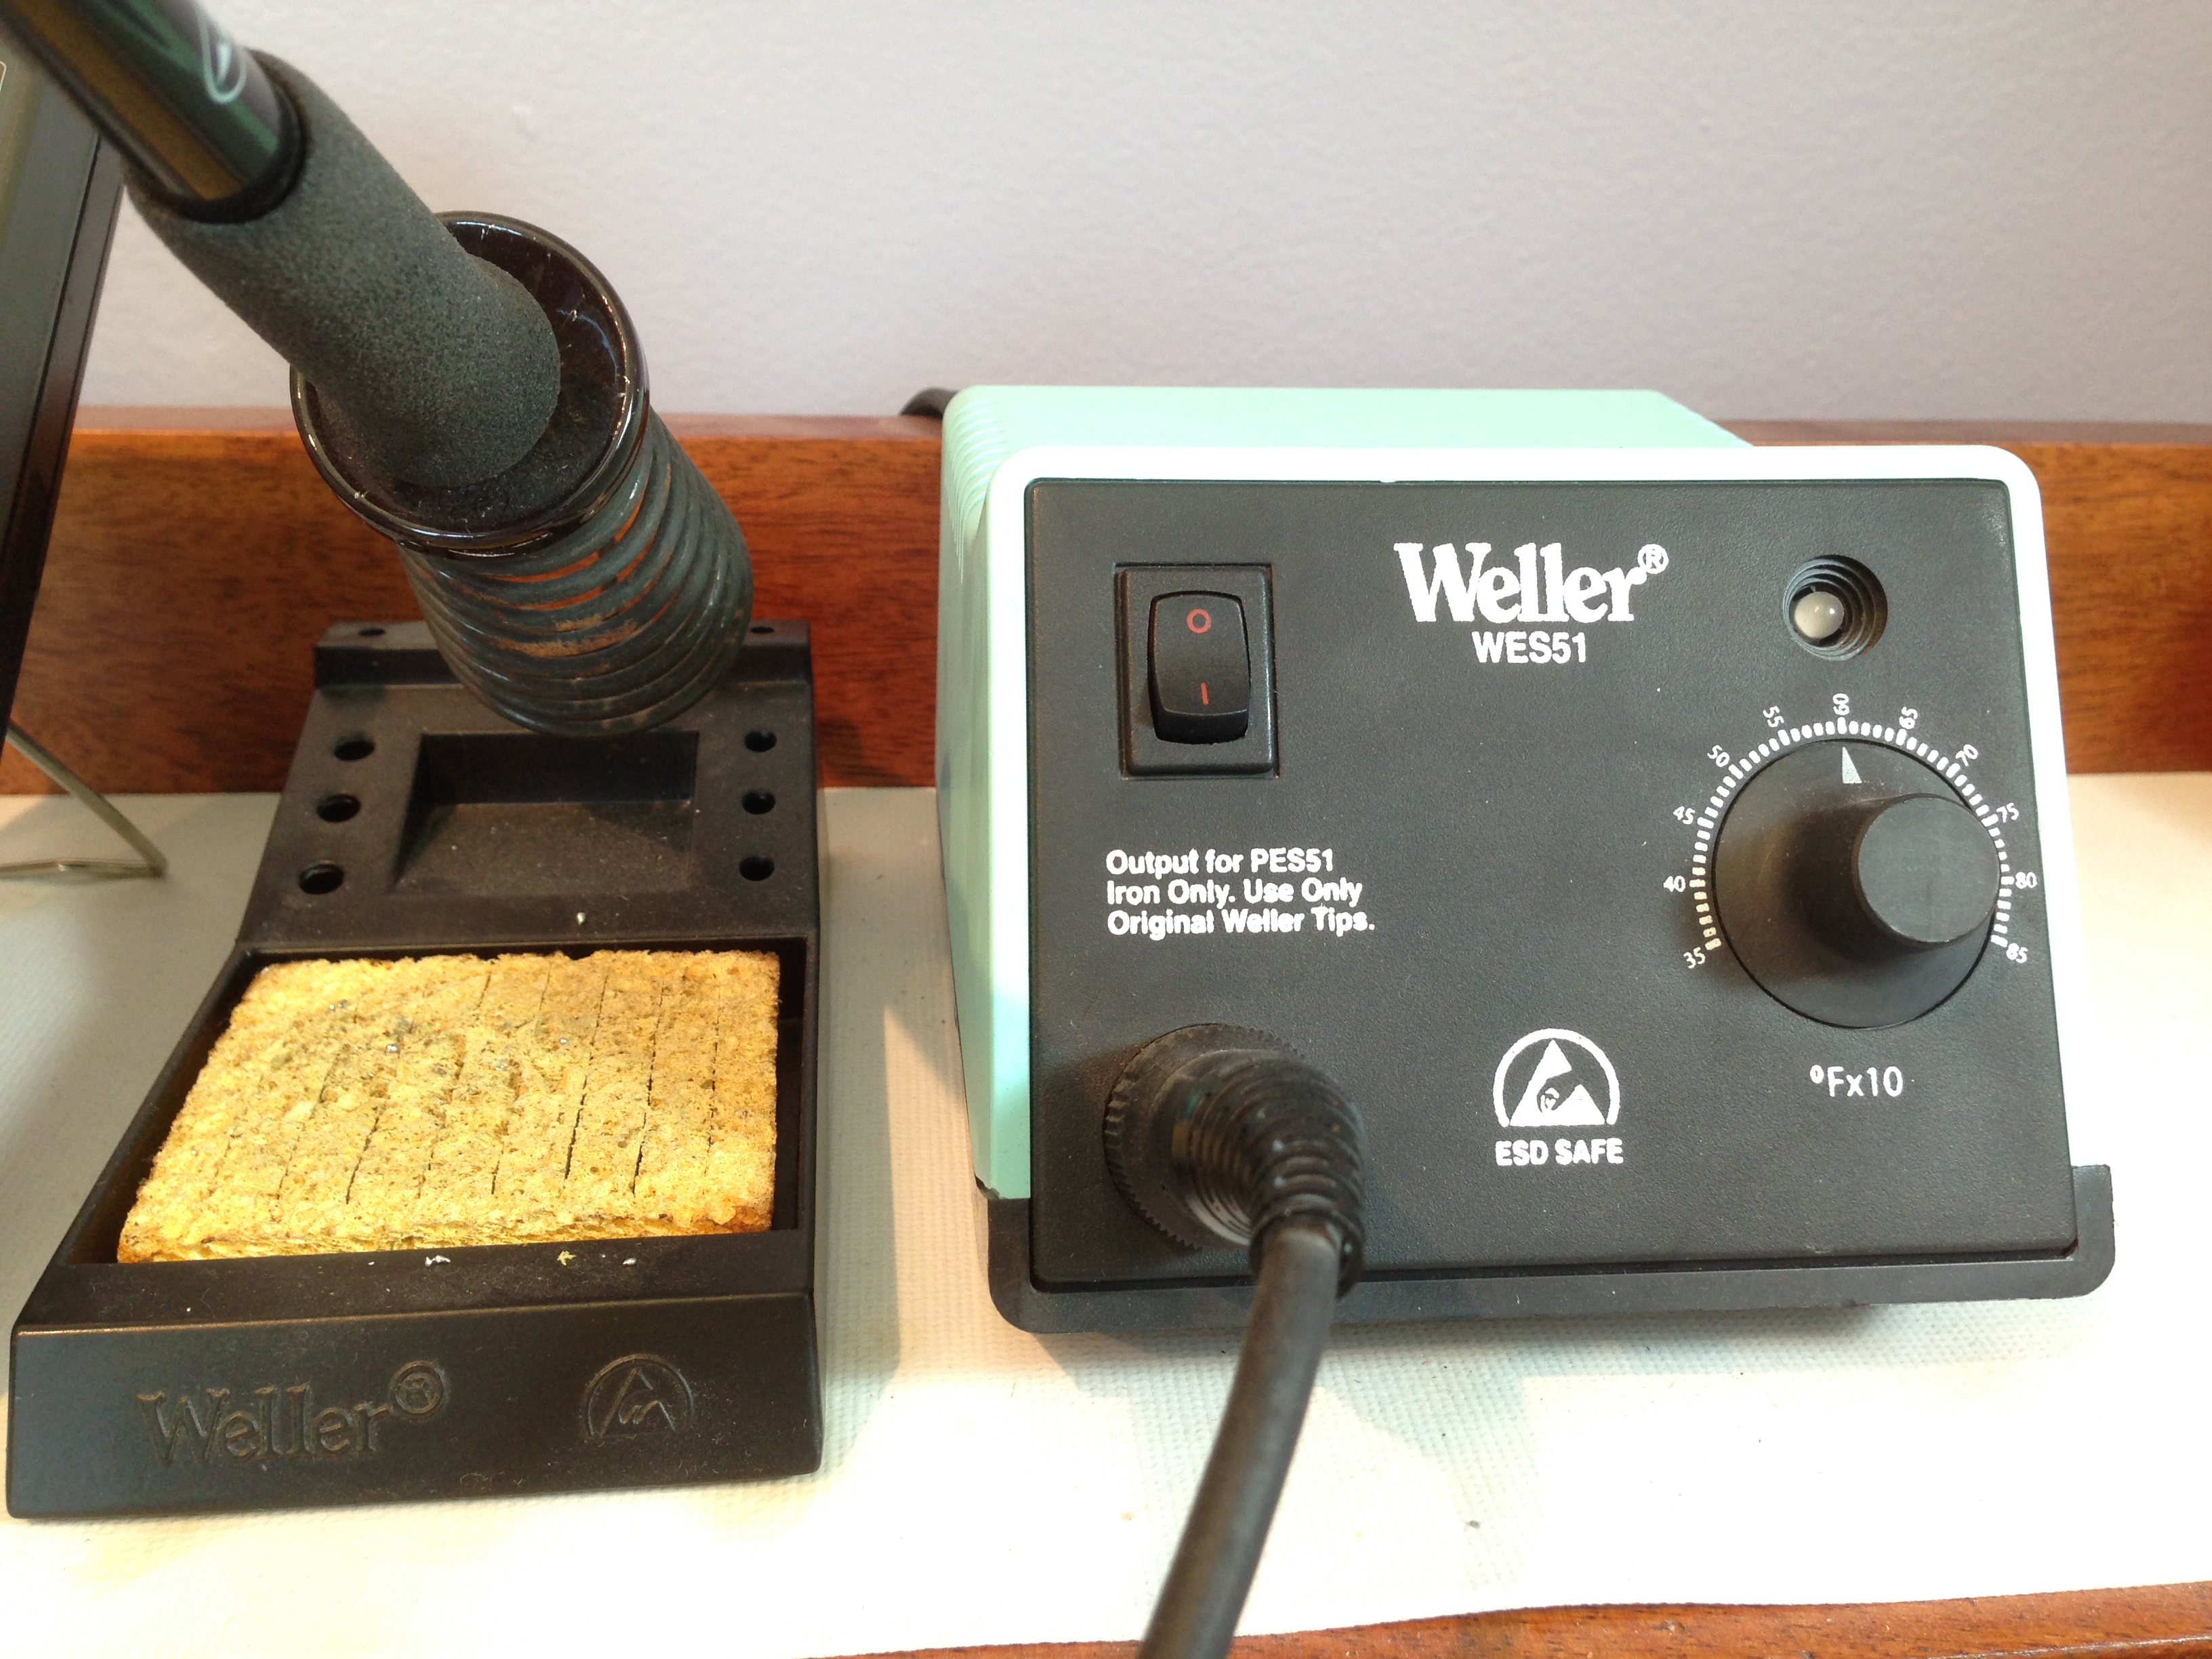
I have the same soldering station. Awhile ago I had to replace the iron as the heating element went bad. Not knowing which part was gone I actually bought an entierly new station. Eventually, I’ll get a spare iron so as to have an extra soldering station. Have you ever had the heating element in the iron go bad? Also what tips do you have? I bought a small selection from the smallest for SMT (wish it were a tiny bit smaller) to a good sized chisel tip for heaver work.
I have two 100mhz analog oscilloscopes that are probaby older than you are. They were state of the art when I started my career as an engineer. The older one, a Tektronix 453 was purchased from a former employer’s employee auction, and came with three probes, a manual, a viewing hood, and a scope cart! The newer unit, a Tek 465 was an ebay purchase where I was a lucky bidder with little competition. While not quite a bright as the older unit, the 465 is a bit smaller and lighter. I paid less for both of these combined than a new digital scope (< $450), which I would like to buy one of these days.
That lower pink toolchest on wheels looks just like my old Craftsman except for the color! I also have a new Craftsman 5 drawer toolbox sitting on top of the chest like you do, only it's black (the chest is red and black).
The one thing I DON'T see in your workshop is your laptop computer. Where is the "one girl, one laptop" PC?
Power tools? I have an old Chinese floor standing drillpress, a table saw (I'm an old New Yankee Workshop fan), scroll saw, mini wood lathe, el-cheapo band saw, and quite a few power hand tools. The one thing I really want is a metal turning lathe. (CNC controled of course!) One of these days.
Right now I'm building a RepStrap 3D printer!
I haven’t had any trouble with that iron, nope. I actually only have the tip that came with it. It has served me well.
I do have some power tools, yep. Nothing very fancy- a Skil saw, a couple of drills, a grinder. The usual. All pretty budget stuff, honestly. I’ll spend more on a tool if I know I’m going to use it a lot. Otherwise I get something cheap.
Oh, and regarding my laptop, I use a very abused eight year old Macbook Pro. It’s way overdue for an upgrade. Maybe this is the year. It keeps trucking along, though.
When you finally do replace that macbook (especially if it is an Intel based one) don’t get rid of it, put Linux on it. Both of my daughters have 13″ Macbooks, one of the Mac’s is now 3 years old and the other 2. The older one has no problems, but Apple has replaced the system board twice under warranty on the newer one. I don’t know if this is typical, or if Apple’s quality control has gotten worse.
“Something about it just amuses me. I guess that means I own it ironically.”
Oh, GOD.
You’re a hipster. 😯
I have a strict handlebar mustache punching policy. If you have a handlebar mustache, you get punched.
I think my record on hipsters is both consistent and morally sound.
the elenco lp560 is so the most under appreciated tool around! for $15, so so awesome. Love my hakko 808 and my chinese hot air thing for when i had to lift a tonne of chips of a donor amiga motherboard where the whole freaking board is a ground plane.
kinda crazy the stuff collected. I have box of nothing but programers (avr programers, pic programmers, propeller programmers, official ones, sparkfun ones, ebay ones)
two things I bought myself ‘nice’ were a proper hugeass metric/american socket set and good changeable head screwdriver set
When you use that lamp for exposing UV sensitive PCBs do you put a UV bulb in it or is the warmwhite/daylight bulb enough? I tried using a UV CFL bulb to expose the spray on photo-positive mask and the exposure times were silly, about 12 minutes a side. I wonder if the UV bulbs have more or less the same phosphor but just an additional coating to block visible light.
It’s a regular daylight-spectrum CFL bulb. My exposure times are in line with that, actually. I don’t have my notes in front of me, but I believe I expose the boards for 12-15 minutes. I buy the presensitized boards from Jameco, and they have come with a chart for exposure times for various types of light sources. The daylight CFL bulbs make a little more UV than other kinds, but I think some are as high as 20 minutes.
While that’s certainly longer than a dedicated UV exposure box, it’s all relative. In the overall process of laying out and etching a PCB at home, 15 minutes to expose the board is nothing, really. It’s also still noticeably quicker than waiting weeks for a board from a fab shop. 🙂 I use the 15 minutes to gather and set up my etching supplies, so it’s not wasted time in any case.
Belated reply.
Glad to see that you promoted the idea of using a logic probe for debugging. I debugged all the hardware issues in my POC unit with a logic probe…no ‘scope, even though I have one. Digital circuits are just that, and a two-state indicating device fast enough to work with sub-microsecond state changes is all that is needed for most debugging activities.
Also amused to see the Micronta DVM. I too have one of these contraptions, which has been around here for at least 25 years. The probe jacks started getting flaky but were readily fixed. The manual ranging feature is why I hang on to this meter.
Hooray for logic probes! So under-appreciated.
I think I mentioned in the article, but the only trouble my Micronta has given me was the continuity beeper became flaky. That was trivial to fix. It’s otherwise been inexplicably reliable. I don’t know if all their stuff from back then was this good, or if we’re just lucky?
Re: your fetish for Snap-On tools: I completely understand that! That lifetime guarantee is my favorite. An anecdote:
When I was younger and lived with my parents, my mechanic (and exclusively mechanically inclined, in thought and action, if you catch my drift) father had a small collection of rusted out Fiats from the late ’70s and early ’80s. They gave me a predilection for small, inexpensive Italian sport coupes, but they were eyesores to everyone else. He was convinced to start disposing of them, and I was enlisted to help. Naturally, when you leave a car in one place for a decade, the tires decay and the wheels get bent and the grass starts growing through the floor pan and the holes in the seats and the lug nuts rust solid. So my father, lacking an air wrench, hands me a three-foot Snap-On breaker bar and tells me to start torquing. I get all but one lug nut off of the first tire, but the last one gets tricky. After about five minutes of torquing, finally, a huge metal creak! I am thrilled, until I realize the lug nut is still firmly in place on the car, along with the socket, and the joint at the end of the breaker bar, and… about three inches of the breaker bar. The rest of the handle’s span is in my hand. I sheared a Snap-On breaker bar by hand.
Luckily, my father worked at a motorcycle garage that the Snap-On van frequented. He handed the breaker bar to the representative, who swore that he had never seen such a thing. He then handed a new breaker bar to my father, free of charge.
So, Snap-On tools are the best, even when they break.
Your post about your workspace is, like, efficiency porn. Sorry to be crass.
No, wait, let me guess: you were REALLY angry with that last recalcitrant nut, and had had a gamma radiation incident previously in life.
Well, the car /was/ the perfect shade of Hulk green…
Great writeup on the shops Quinn. So many good tips about auto-ranging meters, keeping crap off the work area and cutting boards too… Those who have used a good cutting board with a steel ruler and decent blade know exactly what you’re talking about.
After reading this, I’m suffering slightly from shop envy now. My shop is in transition so hopefully I’ll resurrect it soon enough. It’s all very organized and labeled but most of it is living boxed away, waiting for a permanent spot in the house to exist. Repairing appliances on the dining room table grabbing the necessary tools is loosing it’s charm (sigh).
I’m with you about the logic probes… The handiest tool since the 12v automotive test light. I’ve never bought a logic probe but I’ve made dozens of them and sometimes included them in projects with a spare LED or two so I could diagnose on the fly.
Also, nice JBL Control 1 speakers; I have a set of those bad boys too.
This writeup about your workspaces is really nice!
Though the subject matter of this writeup is easy as pie of course, you always write in a clear and funny way.
I can especially relate to the efficiency-thing, as my time is at a premium and want to get as much done in as short amount of time possible.
It doesn’t help that I’ve got to many hobby’s though….
The tool-wall of my workbench for instance, is also ordered by frequency of use. The most used tools are low and to the middle of the wall, easy to reach.
With your tips, I’m sure I can crank up the efficiency even higher!