Making RAM and EEPROM play nice together.
If you had told me ahead of time how much trouble the RAM board would cause, I would not have believed you. It’s the simplest Veronica board by an order of magnitude, yet it seems to be punching well above its weight class in terms of causing grief.
After sorting out the connector alignment issue, I was finally ready to get back to making forward progress. Well, not so fast. I started working on the ROM code, but it didn’t seem to be flashing properly. As you may recall, Veronica has an onboard EEPROM programmer, so I can change ROM code with my AVR programming dongle. The code upload from my assembly toolchain seemed to be proceeding normally, but the code wasn’t sticking. Then I noticed something very alarming- on the bench supply, the current was spiking over an amp when programming ROM. Yikes! Luckily, I seem to have to have noticed in time, and no damage was done.
This time around, it’s not a case of struggling to figure out what’s wrong, but rather how to fix it with the least hassle. The problem was obvious, and it’s a design flaw on my ROM board that I’ve known about for a long time. It was never a huge issue, until now. Let’s quickly review my ROM board schematic:

See the problem? The ATtiny uses those shift registers on either side to write into the EEPROM when the ROM board is in programming mode. The problem is those shift registers are sitting right on the system bus (note the direct connections out to the edge connector). What’s needed there are some 74HC541 tri-state buffers, so that the EEPROM can be isolated from the system bus during programming. This has never really been a problem before, because during ROM programming, the CPU is isolated from the bus, and nothing else in Veronica drives the address or data lines. Until now.
Yep, the shiny new RAM board is driving the data lines any time an address within the decoded range is found. Because of how the EEPROM programmer shifts addresses serially on to the bus, virtually the entire range is being hit, even though the ROM only occupies the top 4K of the address space. So during the programming operation, there’s all kinds of bus contention going on between RAM and the EEPROM programmer, which leads to some near-shorts and subsequent very high current draw. Not to mention, all that contention utterly ruins the EEPROM writing process, so code uploading doesn’t work.
To fix this, I have a few options. The simplest is to simply pull the RAM board out of the backplane during programming. However, that’s tedious, hurts iteration time on ROM code, and is likely to damage the board sooner or later. The most correct fix would be to add those missing buffers to the ROM board. The ROM board should not depend on any knowledge about the state of the system bus to do its job of injecting code into the EEPROM. However, that’s a difficult fix. It’s a complex board that is already packed full, and it would need a complete redesign to accommodate three buffer chips. I’d like to do that at some point, but it’s way more effort than I want to put into this problem right now.
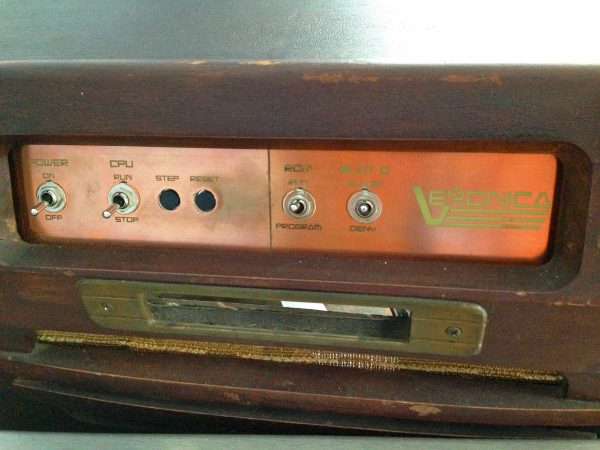
Luckily, I have another way. To explain it, let’s back up a bit and explain how I program the ROM on Veronica. Take a look at her front panel:

We’re interested in the toggle switches here. Left to right, they are Main Power, CPU Run/Stop, ROM Run/Program, and Slot 0 Allow/Deny. These all play a role in programming the ROM. When the AVR dongle is plugged into the ROM board, and I’m ready to upload code, I do the following:
- Flip Slot 0 to Deny (fourth switch). This switch is tied to a line on the main bus called Bus Master. When flipped to Deny, the Bus Master line goes low. The CPU board uses this line to deactivate a set of tri-state buffers that isolate it from the address and data buses. That way the CPU isn’t trying to drive anything during ROM programming.
- Flip ROM to Program mode (third switch). This disables the EEPROM, and enables the ATtiny on the ROM board to start writing.
Within that procedure lies my workaround. I have the Bus Master line which is kicking the CPU off the bus during programming. I can use the same line to kick the RAM board off the bus. This is less elegant than having the ROM board isolate itself from the rest of the system, but it will be much much easier to implement.
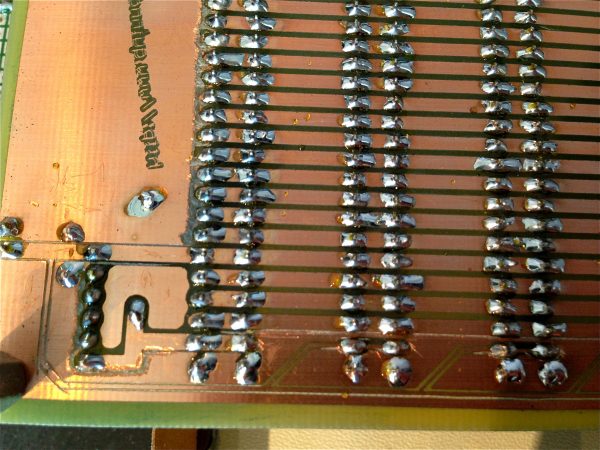
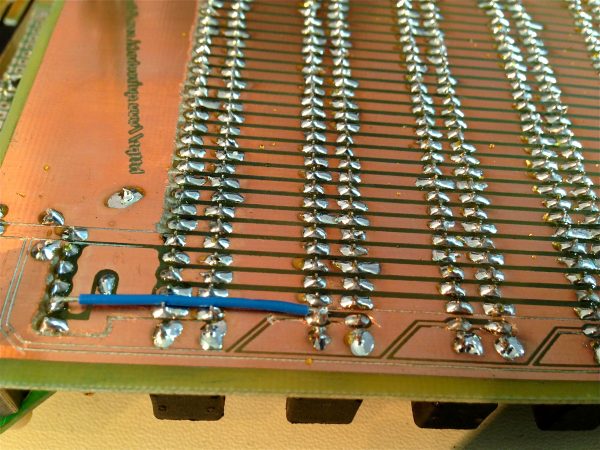
Here’s where planning ahead a bit can really pay off. When I made a new Backplane recently, I tied all the Bus Master lines on each slot together, and tied them High. This line was originally intended for use by an active backplane arbitration circuit, but I’ve since dropped that feature. However, I felt it may still come in handy one day to be able to kick cards off the bus. That day is today. In anticipation of this, I left those traces thin on the backplane so they would be easy to cut and repurpose.

So, it was a simple matter to cut the Bus Master trace on one of the slots, and patch it into the five pin header at the end of the backplane where the arbitration circuit connects. The “arbitration circuit” was supposed to be something smart, but is now just the Slot 0 Allow/Deny switch.

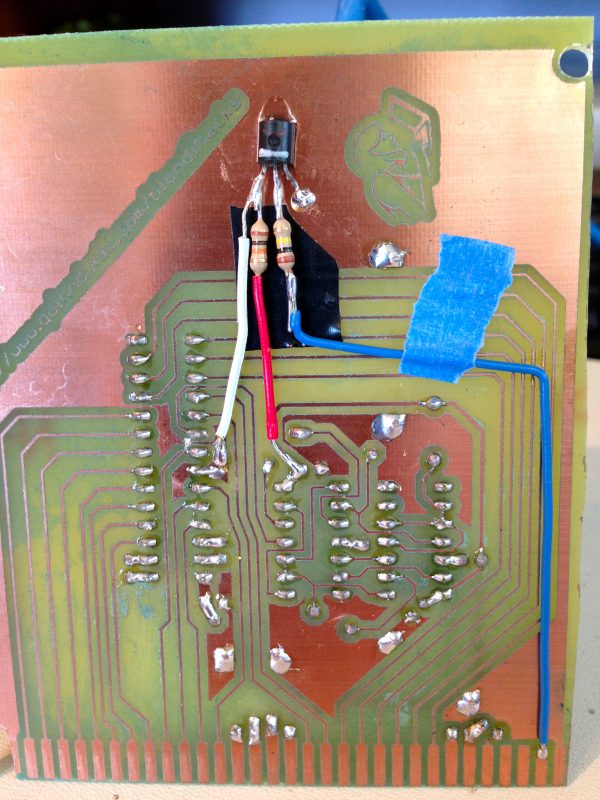
The last piece of the puzzle is to hack the RAM board to respond to this Bus Master signal, and pull itself off the bus. This could be done with tri-state buffers again, but that would require a rebuild of the RAM board. Instead, I can use the Output Enable lines on the RAM chips, which weren’t previously needed (and were tied low). The only catch is, this Output Enable is active-low, and my Bus Master signal is active-high. D’oh! Normally I can find a spare inverter or NAND gate somewhere on the board and pilfer it for a hack like this. However, this board has no such spare bits. I need one single inverter, dammit!
Well, my mom always said, if in doubt, superglue a transistor to the ground plane*.
*my mom has never said this. She has more sense than that.

Clunky, yes. Ugly, yep. Way more power rating than needed, yup. But, it works, and it was all parts I had in the junk bin.
And now, yes, finally, I really can get back to business. I mean it. For reals this time. *fingers crossed*.
I always assumed you weren’t asserting OE_REG until there was a valid address on the bus. But perhaps you can’t do that and keep up the speed needed for page write mode.
Ah, no. Now that I look closely, it’s wired to your switches. The AVR doesn’t have any spare pins to drive it.
Indeed. In hindsight, I could have used a slightly bigger AVR (ATTiny 2313 maybe) and automated more of this process (and thus built in better safeguards against contention and such). I really like the ATtiny 13 and 85, though, so I tend to throw them at every problem. I love solving a hard problem with something the size of a 555.
It’s so much more satisfying when the design only just fits, with nothing left over. And it’s a great way to fight the temptation of “I could do that too! And that! And that!”
Wait a minute… The RAM already pulls itself off the data bus during Phi1 (the low half of each clock cycle) thanks to AND-port IC3D on the RAM board. The RAM (and hopefully all other devices)
So if you pull CLK0 on the CPU (also known as CPUCLK) LOW when you halt the CPU, and deactivate the ‘541s on the CPU board by pulling the Bus Master pin low, you can let the ROM board play on the data bus and address bus all by itself without removing it. You would just have to make sure that the EEPROM chip is active even though SYSCLK is low.
The only problem with pulling CLK0/CPUCLK low is that the R6502 loses its register values over time if I remember correctly; you have to stop in CLK0=HIGH state to be able to continue executing later. But if you’re programming the ROM, you’ll probably want to reset the system afterwards anyway. If you would have a WDC 65C02S, you could stop it in both LOW and HIGH clock states without losing register values.
Oh well, I reckon my solution would also make for some clunky patching just like yours 🙂
===Jac
*The RAM (and hopefully all other devices) should all be off the data bus during the first half of each clock cycle.
Excellent analysis, and you are exactly right about the clock. It’s held high when stopped in a (mostly pointless) effort to preserve the 6502’s state. It turns out that restarting the 6502 intact is much more complex than the data sheet implies. Holding the clock high is not really enough.
Steve Wozniak published a really slick single-cycle and single-step circuit for the 6502 in the documentation that came with the Apple I (and readily available online). My plan was to implement that at some point. My 555-based single stepper stopped working as soon as I had more than a trivial amount of stuff connected to the 6502. I’ll likely never get around to it though, because I haven’t needed a CPU-level single-step for debugging for a long time now. The system is well past where that has much value.
As you surmised, this current situation makes it so the RAM is driving the data bus with the CPU stopped. And as you also surmised, any fix was going to involve a bit of hacking around somewhere, so it was kinda six of one and half a dozen of the other. I preferred to hack on the RAM board and backplane, because they are simple.
Hmm, well why not. I once added a diode when a gate needed one more input!
Hello
First off I would just like to say that your work on Veronica is amazing and makes for a fascinating read so much so that you have inspired me to start on my own 8-bit project. I was wondering if you had the eagle files available for revision E or possible F (with the addition of the transistor) for the ROM board? I apologies if there is already a link for it that I have missed.
Thank you, and keep up the good work 🙂
My mistake the transistor wasn’t for the ROM board.