Wherein we shave yaks.
This post has an exclusive companion video for Patrons. Sign up now to see it! It shows detailed construction steps for this entire project.
There’s an expression in software engineering- “yak shaving”. This refers to a common rabbit hole that software engineers fall down. You’ll be working on a problem, and realize you could do this a lot more efficiently if you built a tool to use for part of the problem. Then, while building that tool, you realize part of this tool would be a lot easier to make if you had a different tool to assist. Pretty soon you’ve pushed so many sub-projects on to your stack that you lose track of what the original problem was that you’re trying to solve. This comes from the innate obsession with efficiency that all software engineers seem to have. You imagine doing this process hundreds of times, and thus all these tools are perfectly justified from a time return-on-investment standpoint. This is yak-shaving.
Working in the shop, I think the opposite happens. We tend to procrastinate on doing things that would make us more efficient, because in the shop, “efficiency” feels like “getting this one thing done as quickly as possible”. We don’t think in terms of the related tasks across disparate projects that we could be optimizing. I think shop people could benefit from doing a little more yak shaving.
An example of this is shop organization. My workbench has been a disaster zone for years, all because I set it up somewhat hastily, then procrastinated improving it, then got used to the state of it, then gradually got less and less efficient over time because of it. One day, my inner software engineer kicked in again and I needed to do something about the situation.
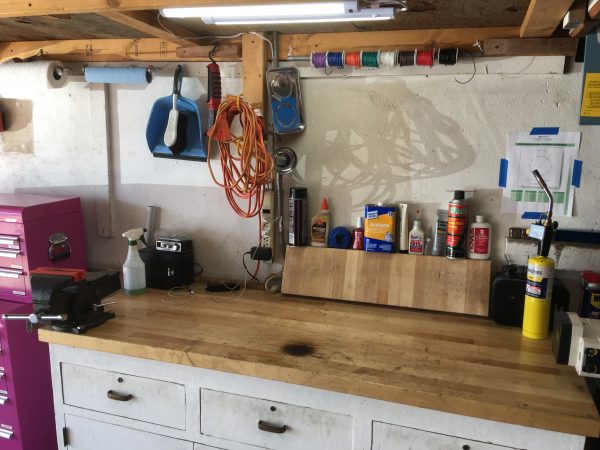
This workbench was an abandoned husk in the building when I began squatting here, and I fixed it up into what you see. The hardware is all brass, and the carcass is solid hardwood. I’d say it dates to the 1940s, based on what I know about the previous owner of this structure. Anyways, I refinished it and put that Grizzly top on it. The top needed to be cut down to size, and I had some leftover chunks. One of those chunks ended up leaning against the wall temporarily for five years. Then it started acquiring stuff on top of it. Also, there’s an electrical box behind the workbench that, for various reasons, I can’t move. So there’s a gap between the bench top and the wall. To prevent losing small items behind the bench, I have blocked some of that gap with speakers. However they eat into the work surface and require wiring lying everywhere for the iPod. The remaining gaps are plugged with scraps of cardboard. It’s chaos.
Contrary to what that bench would indicate, I’m a big believer in keeping horizontal surfaces clear. I like to use vertical space for storage. All the space above and below my workbenches and large tools are all organized storage. Going vertical is the secret to finding space in a small shop, and this little project is a microcosm of that.
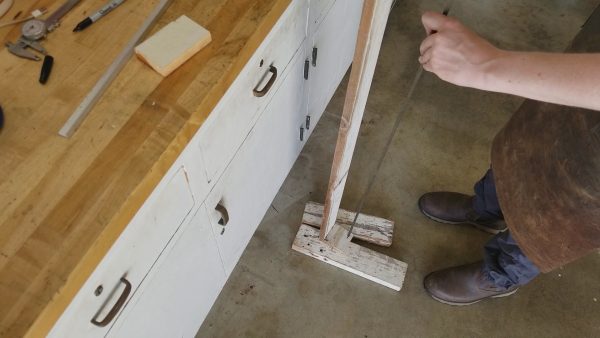
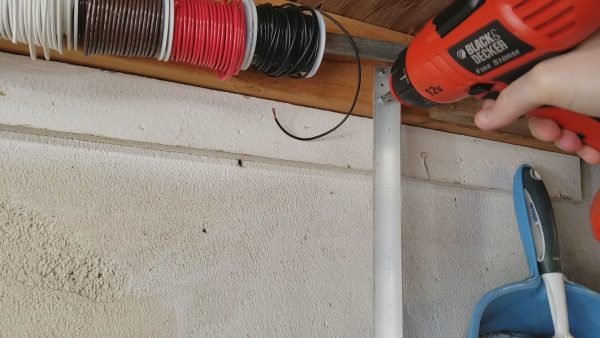
In the spirit of going vertical then, the goal is to get everything up off that workbench surface. The wall behind the workbench is kind of a crazy morass of support posts, electrical, and various things I can’t move. It’s also a firewall, so it’d be nice not to put any more holes in it. I’m going to build a suspended shelf that hangs from one of the existing stringers for the shelving above. Being cheap and lazy, I’d also like to do this entirely with stuff I have lying around.
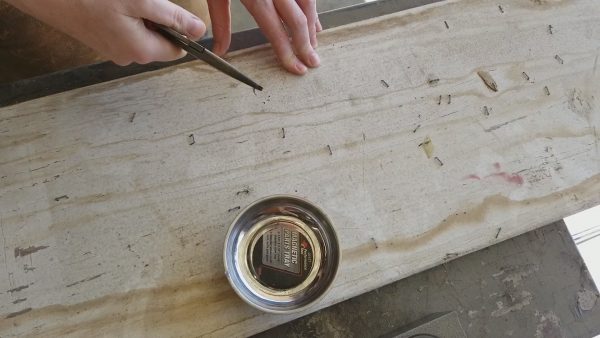
I don’t fancy hitting staples with my circular saw, so I spent some quality time with pliers and a magnetic tray fishing all the staples out of the wood.

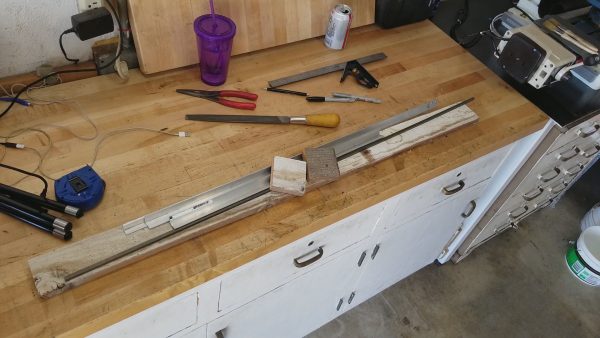
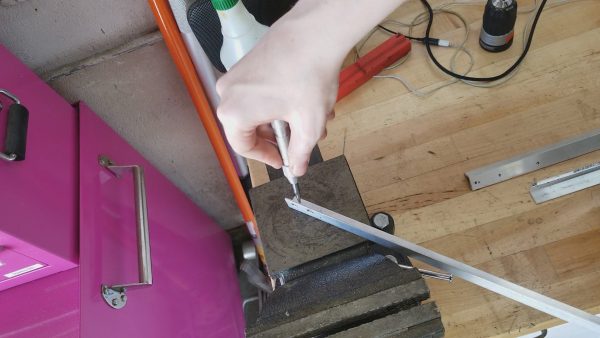
My basic design is to make the shelf from wood, suspended with aluminum angle stock. The front will be a retaining bar of 1/4″ steel which allows me to see the shelf’s contents easily but still keeps things secure. This very careful selection of materials has nothing to do with the fact that those are exactly the bits of scrap I had lying around.
I’m a pretty lousy carpenter, and an even worse woodworker, but luckily this project is so simple that I think my cat Sprocket could probably handle it (in between 22-hour naps). Even with a project this simple, however, there are multitude ways to bork it up. And bork it up I did. But I’m getting ahead of myself.
The shelf has high wooden sides, and the retaining bar presses into them. I thought this would look nice, and requires no fasteners.

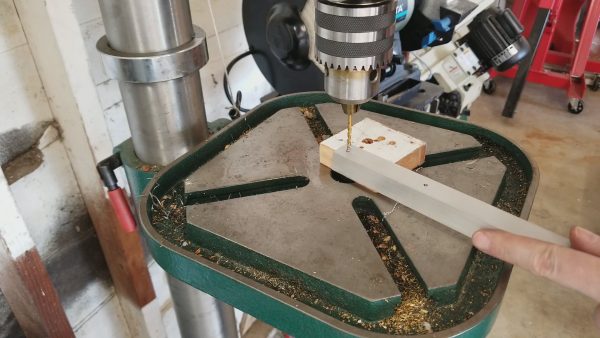
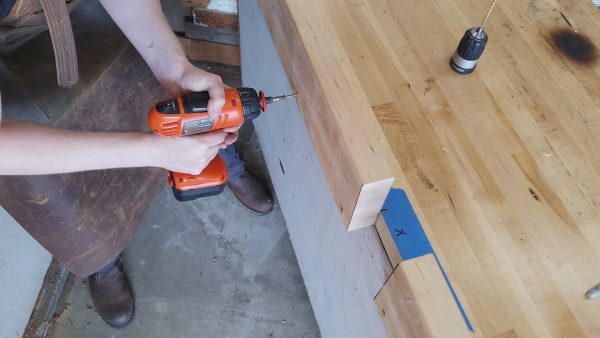
The metal retaining bar is square, but drill bits make round holes. At least, the cheap bits that I have do. Maybe fancier drill bits have a square option. This is all part of my secret genius* though. By choosing a diameter of drill that is the same as the horizontal dimension of the square bar, the corners of the bar will be a light press-fit into the wood and squarify the hole as they go in. Apologies if the word “squarify” is new for you. I try to avoid dense jargon (especially the made-up kind) here on Blondihacks, but sometimes I forget.
*Actual genius levels may vary

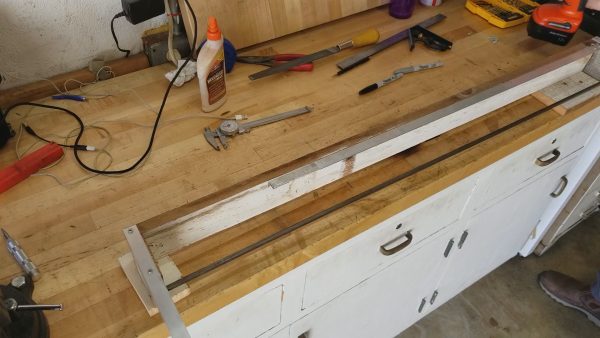
The next logical operation would be to attach the shelf sides to the metal bar, then attach that whole assembly to the shelf. I opted for the wrong way to do it instead, which is often the case. I attached the sides to the shelf next.
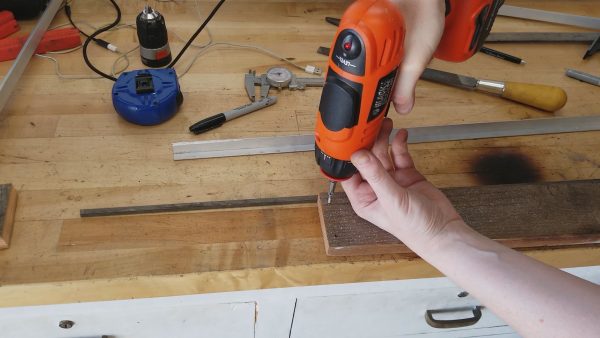
These screws are now acting as their own transfer screws. The nice thing about this method is that it doesn’t much matter where you put the screws, because you can still square up the wood pieces independently. It’s very quick for a joint like this where appearance is not a concern. This method saves you needing to use right-angle clamps or other elaborate methods to hold the parts square prior to pilot drilling and screwing.

This method also eliminates clamping and waiting for glue to dry before installing screws, because the screws are doing all that for us.
At this point, I realized I should have installed my retaining bar before attaching the sides, because it needs to press into both sides from the inside. Whoops!
That metal retaining bar is my favorite feature of the shelf, but it would wind up causing the most problems, by far. We’re not done with that bar yet.
Next I moved on to the aluminum hangers. I made two of those to suspend the shelf, and I had a scrap left over. I though it would be nice to create a lip on the back of the shelf to retain small items like tubes of Loctite and my dignity. Since the shelf is necessarily suspended away from the wall to clear electrical conduits and such, this seemed like a good plan.
Next I attached the hangers to the shelf. I was actually planning some sort of triangulation for the front edge of the shelf, but honestly with screws mounted a few inches apart on the back of the shelf, it was plenty strong enough and didn’t need any additional support. This was a pleasant surprise, as it simplified the project considerably.
At this point I realized another mistake I made with that retaining bar. I had measured the depth of the shelf to accommodate the largest item I wanted to store, my handheld torch. However I didn’t account for the 1″ of real estate that the inset retaining bar eats up. The usable depth of the shelf ended up being about 20% less than expected, which threw a wrench into things. I considered mounting the bar to the front of the shelf sides instead, and I may still do that. However, the shelf being suspended away from the wall actually buys me some space behind for deeper objects, so it still worked out for the most part. It’s not perfect, but this may be a yak to shave another day.
We’re not done yet, though. I needed to get those speakers off the bench as well. I suspended them from the ceiling, and I installed an iPod dock on the shelf with a compact Class D amplifier and concealed wiring running to the speakers. This eliminated all the wiring clutter.
The next challenge was dealing with the gap between the bench top and the wall. As I mentioned, I had been dealing with this by stuffing cardboard and scrap wood back there to keep small items from getting lost. Instead, I dug out the spare Grizzly bench top material that I had on the junk pile and used it to make a backsplash. The gap with the wall exists partly because of how the floor slab meets the foundation, and partly because of an electrical box that I can’t move (because reasons). However, I was able to make a gap in my backsplash that absorbs much of the space used by the electrical box to get the bench another inch closer to the wall.
This trick with the electrical box worked pretty well, but it did mean there was a gap in my backsplash where small items could still be lost. To fix that, I grabbed some sheet metal off the junk pile and made a small cover over that gap which is flush with the backsplash.
Everything was going well, so I thought I would try one more stunt- leveling the bench. This bench is set on a long wall parallel with the direction that the slab is angled for drainage. This is worst-case scenario for leveling, because it means one end is a lot higher than the other. With a bench on legs, this is no biggie- you shim up a couple of the legs and you’re done. However, this is a solid bench built like furniture with no feet on the bottom. I wanted to take a shot at leveling it anyway, because I was tired of things rolling around on it.
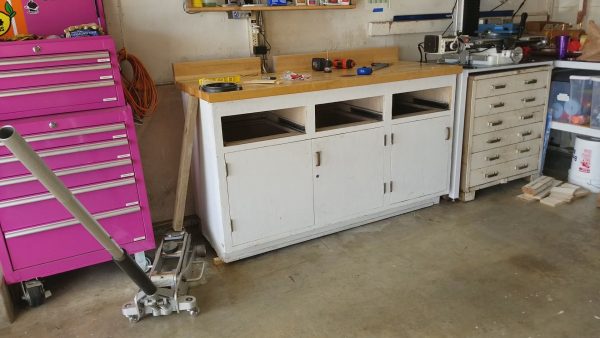
Unfortunately, this didn’t work well. The gap ended up being over an inch (the angle of the floor is substantial) and filling that much with shims wasn’t very stable. The shimmed bench didn’t stand up to activities like hammering on the anvil or yanking on material in the vise. I gave up on this and decided to continue living with the slight slope to the top, but with the bench stable and secure on the floor. I lived with it for this long, what’s a little more.
Well, after all that work, what did we end up with?
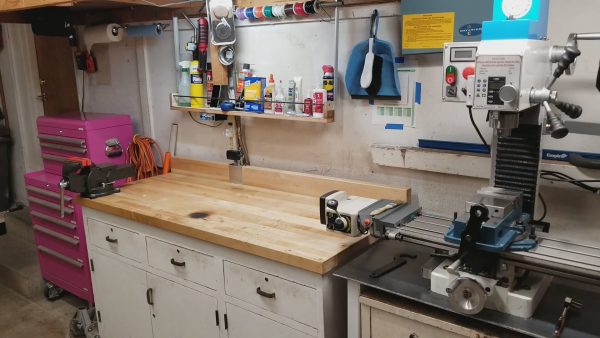
The retaining bar on my little shelf came back to bite me one last time. With the iPod installed in the dock, the bar means you can’t access a small strip in the middle of the screen. For now I’m working around that, but the bar clearly needs to be revisited.
Arguably more went wrong on this project than went right, but I got it done and the end result achieved the goal I was hoping for. That’s a positive outcome in my book! One yak shaved, 452 to go.
Your solution to the square peg in round hole is excellent: quick and effective.
This is total overkill, but it’s fun to make square broaches for wood. Take a chunk of square stock the size of the square hole you want, mount it in the lathe and cut about 3cm of cylinder on the tailstock end the diameter of the hole you want to drill, then offset the tailstock just a couple of mm and proceed to thread the section between the guide cylinder end and the square end. Instead of putting the threading tool perpendicular, to cut a 30/30 thread, cant it way off so it’s cutting a -10/70 thread.
They’re fun to use. A helical broach continuously loads as it cuts. It makes this nifty graunching noise. And in wood you can use cheap hardware store hot rolled steel, because it’ll do just fine.
Totally unnecessary but I thought it was a lot of fun to learn the technique.
Oh, that is cool! Thanks for sharing! I want to get into making broaches soon. I have a lot of square holes I’d like to make in things. 🙂
This is a fun post. Something tells me more whiskies were consumed when writing this one compared to some of your other posts.
I just moved and now have a small space for a dedicated workshop. My workbench has a backsplash but I think I’m going to install pegboard behind it instead of shelves. I have a small matching cabinet and I think I’m going to add some shelves like yours above it. But maybe I should use the space as is first to understand my needs before I add shelves that may not be ideal.
I love these kind of posts. You keep a very efficient and orderly shop, by the way.
Right now I am building a “studio” to start YouTube and Twitch streaming/production. So this project inspired me to get my work area organized and it is impressive what some shelving on the back splash can do. I also have some plans to optimize ceiling use also.
If I could make a request or offer an idea, I would love for you to give us a tour of your work shop, computer area, soldering table/indoor work area. You actually kind of did this at one point but it was long ago after you finished some project, and you also did it when you set up your garage with some of your first machine tools. Not a stalker request I swear, I just find you make a lot of very smart decisions when it comes to organization and in the past I have gained inspiration from your projects and the way you layout your work areas.
Thanks very much! I like organizing projects, though it can be hard to justify the time to do them.
I will definitely do another shop tour at some point, probably over on the YouTube channel (once the audience gets big enough for there to be a critical mass of people who might be interested in that).
There are a few drills that will cut (very nearly) square holes: https://www.tool-rank.com/tool-blog/cool-tools/how-to-drill-a-square-hole-201203141140/