Or Possibly An Artisan Solar Bird Oven
Every so often I get the urge to make something ridiculous. During a conversation with a regionally famous goat-herder, the notion of a birdhouse made of steel popped into my head. For some reason, it made me laugh. I couldn’t get the idea out of my head- it seemed so absurd, that the world would be a more interesting place if it existed. I decided to make it exist.
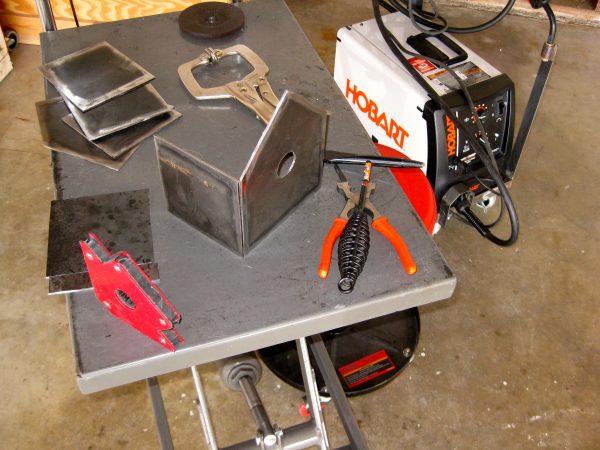
I don’t talk a lot about metalworking on this blog, but it is a secret passion of mine. If it’s something you’d like to see more of here, by all means let me know in the comments. If you’re mostly here for the electronics, I’d encourage you to try something like this. It’s good to get out of the lab and get your hands dirty making something for the ages. This birdhouse, coincidentally, turns out to be an excellent starter project if this is something you think you want to try. It’s easily built with a $20 grinder and a cheapo 110V wire-feed MIG welder from the hardware store. There’s nothing structural, so it doesn’t matter if your welds are terrible. There’s pretty much no way to screw this up. Watch a few YouTube videos, then give it a shot!
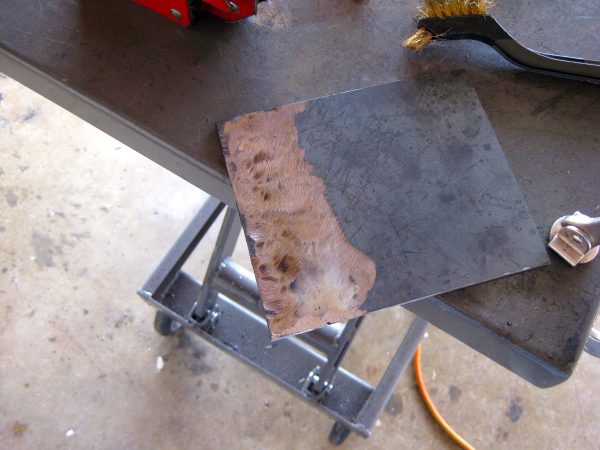
The steel shown here is 1/4″ steel plate from a local recycler. Go make friends with your local recycler or scrap yard. They are probably in a terrifying part of town, but they’ll have an off-cuts and remnants area where you can get small pieces for projects like this very inexpensively. It’s at least four times cheaper than what you’ll get at Home Depot, and there are way, way more options. I got a 4×8 sheet of 1/4″ steel plate for about $50, and for an extra few bucks they sheared it in half so it would fit in my car (and so that a mere mortal could lift it). The industrial shear they used was the size of a small building. I’m pretty sure I would vote for it if it ran for public office, based solely on the terror of what it might do to me if I didn’t. I, for one, welcome our new industrial metal shear overlords. A working metal recycler is the closest preview you’ll get of a Mad-Max-esque dystopian future, and it’s always a fun trip.
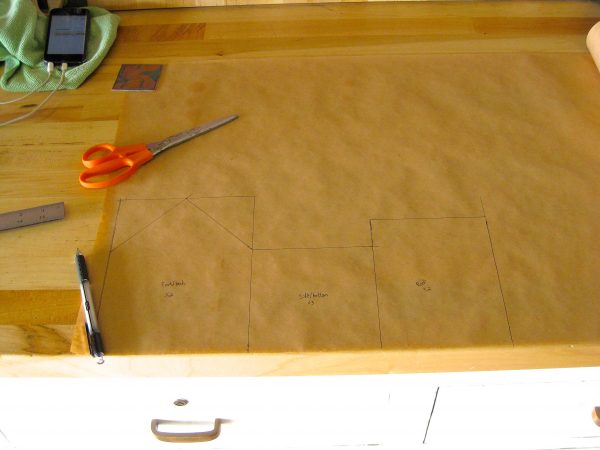
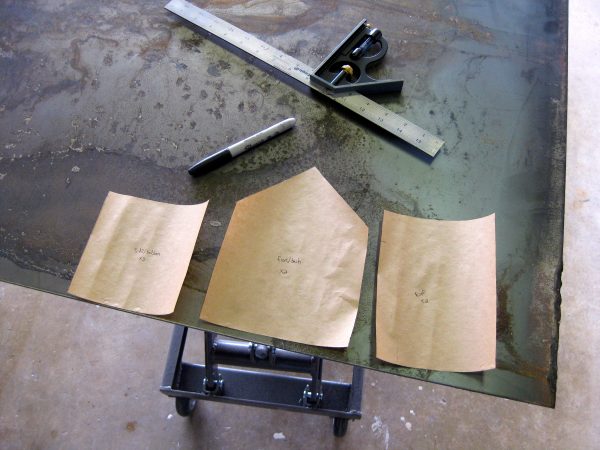
When laying these pieces out on the steel, consider your cutting method. You can cut steel with a cut-off wheel on a grinder, a plasma torch, a hacksaw, a bandsaw, a water jet, a shear, or various other fancy ways. Each method has a different precision and kerf (the amount of material converted to a giant black mess in the cutting process). A cutting disc on a grinder has quite a large kerf, so I tend to cut one piece at a time and lay them out in sequence. A standard Sharpie, conveniently, has about the same line thickness as a cutting disc kerf, but the end result won’t be very precise if you cut everything at once. The more precision you achieve here, the easier welding will be later. You want all your joints tight and square.

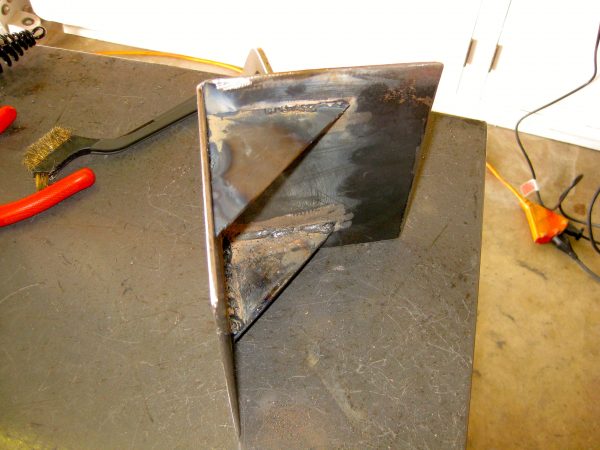
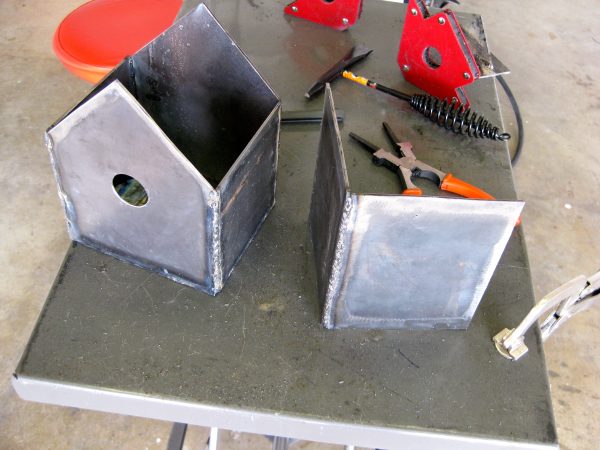
Note that the floor of the house is in two pieces there. That’s because I accidentally used the wrong template when I laid out the floor, and it was a bit too small. The great thing about metal is that everything is fixable and recoverable. Much more so than wood, plastic, or other materials. In this case, I can weld a piece on the end, grind it smooth, and it’s a solid piece of metal again. What really separates metalworking from other fabrication is that the joinery method (welding) actually creates the same material you are working with. It’s as though wood glue dried into actual wood. That’s why you can fix mistakes like this, and it really is as though the mistake never happened.
There was one unknown for me when I started this project- how to drill the hole for the bird? That’s a larger hole than I’ve ever needed to make in steel before, and this is pretty hefty plate. I don’t have a drill press (someday) or a plasma cutter (someday), so what to do? Well, the junk pile coughed up a Milwaukee general-purpose hole saw, and it claimed to be usable on metal. I was highly skeptical, but I had nothing to lose, since I didn’t particularly need the hole saw. I was pleasantly surprised to find out how well it worked.
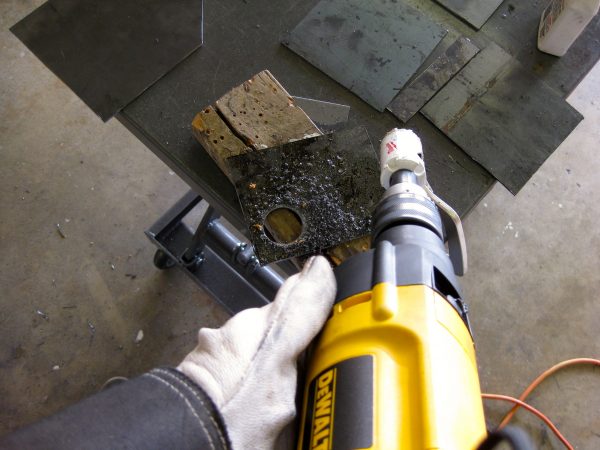
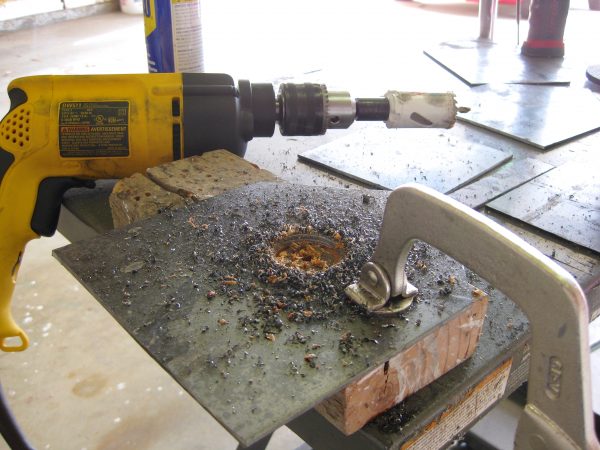
Also note that I’m using a corded drill for this. Cordless tools have come a very long way in the last 20 years. However, for really tough jobs, especially those needing low speeds and high torque, I think there’s still no substitute for being plugged in.
Welding is one of those skills that is easy to do poorly. There is a very large experience gap between what you see here and what a professional weldor can do, but with a MIG and flux-core wire, anyone can weld well enough to patch up things around the house or make little toys like this. You won’t be repairing undersea pipelines or building bridges anytime soon, but a comical birdhouse is easily attainable with a weekend of practice. Definitely RTFM for your welder. Half the battle is getting the power level, polarity, and feed rate set right for your material and situation. You’ll get frustrated in a hurry if you’re trying to learn and the welder is burning holes in the floor because you have it cranked up to 11.
The basic process of welding up an object like this is to arrange all your parts first, get the joints as tight and clean as you can, then tack things in place. Right-angle magnets are the bees’ knees for this. Tacking is important because welding puts a lot of heat into the material, and it will deform unless you are very careful. You may weld up the first joint all pretty, only to find the others don’t line up anymore. Good insurance against that is tacking things before welding up the full seams. This also gives you a chance to change your mind easily, because tacks are pretty strong, but still easily removed by grinding or flexing.
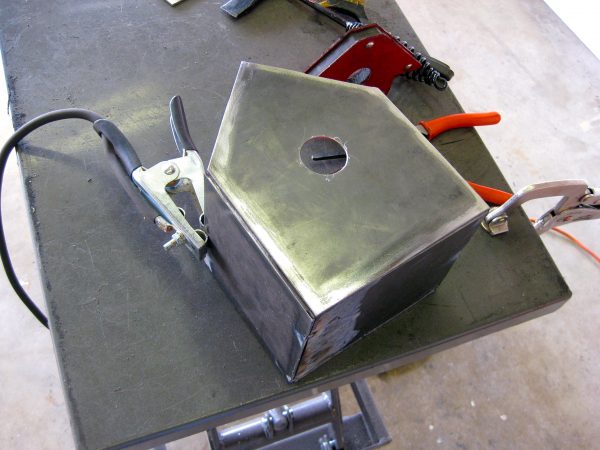
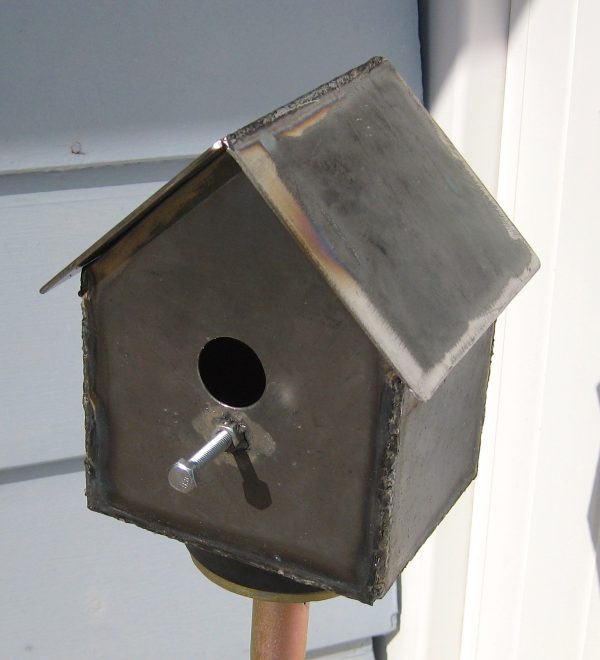
Note that I’ve used a galvanized bolt there. Technically, welding galvanized metals is a big no-no. The zinc coating vaporizes, and you might breath it in. Breathing in zinc fumes is super turbo bad for you. There are a couple of approaches you can use to get around this:
- Buy mild steel unfinished hardware. There are bolts on the market intended for welding and such. They are kinda hard to find though.
- Grind the zinc off the area before welding. This is a good option for welding larger pieces, although it’s probably easier not to buy galvanized material in the first place.
- Use a P100 respirator. This is not a bad idea anyway, because welding and grinding make a lot of kinda nasty fumes and dust. I wear one while metalworking and find myself feeling much better at the end of the day as a result. Also keeps your Kleenex from turning black next time you blow your nose. #RealWorkProblems
- Hold your breath. You laugh, but this is honestly what most casual fabricators do. Unless you’re doing this a lot on big pieces every day, the exposure to the zinc can be minimized by simply not breathing it in. For the occasional nut and bolt like we’re doing here, just make like Clinton and don’t inhale.
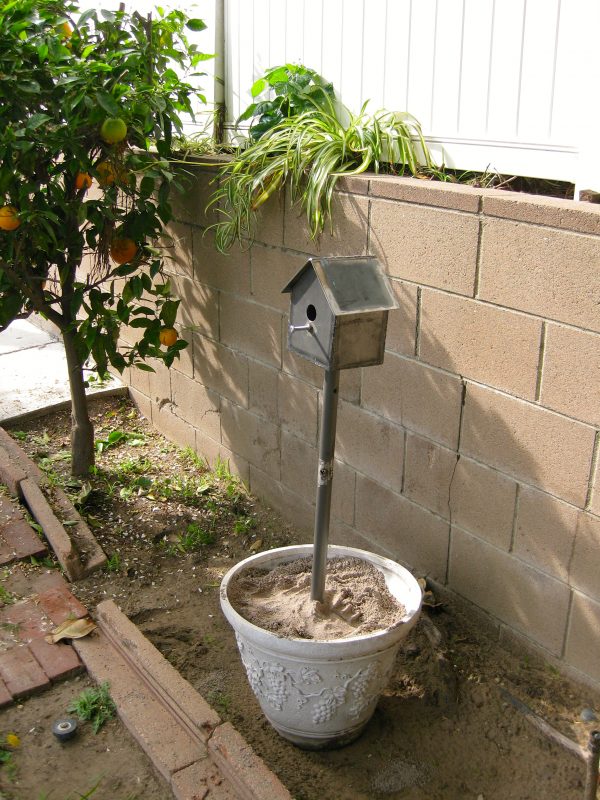
For installation, location was pretty important. As alluded to in the by-line, a metal box sitting in the sun is going to be more bird-oven than bird-house. I have a nice all-day shady spot in my garden that I thought would work well. I didn’t want to commit to a location though, so I opted to mount it on a pole in a big planter with some sand and rocks. It’s easy to move, but still stable.
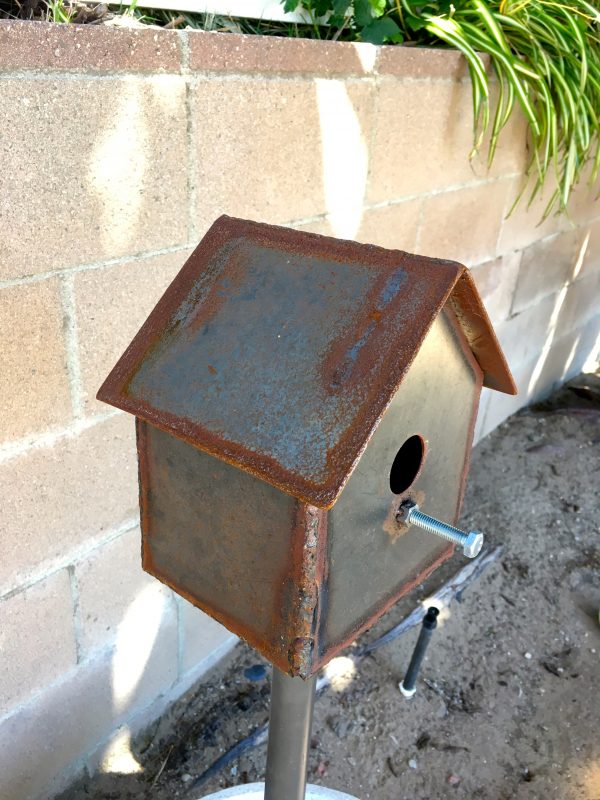
You may have noticed I opted not to paint it or finish it in any way. That’s sorta the point. If you’re going to make something like this out of steel (a ridiculous choice of material), I say embrace it. I wanted it to rust naturally and acquire a patina all its own.
I’ll keep you posted if anyone moves into the new bird-centric wing of Dunki Freehold. Until then, I have plenty of sweeping to do.
I hope you enjoyed this side-quest from our usual Blondihacks content. If you’d like more, let me know! Until next time, when stuff starts flying, do your safety squint*!
*Just kidding- please use proper and eye and ear protection when doing this stuff. I’m not your mom, but I shouldn’t need to be either.
Nice to something a bit more ‘metal’, as I am a CNC metalworker myself. I haven’t welded anything for years, but I used to enjoy it. Maybe hang one of those ‘fat balls’ on the nut n screw to entice the birdies in. Maybe some hay inside for comfort, too?
Next Project – Z80 or 6502 Avian detect/monitor system
I would love to see more metalwork, yes.
Very interesting build! I for one like metalwork. It’s an interesting diversion from electronics.
Maybe you can do a Blondihack on your race car next. 😉
One of the very first Blondihacks was on that very subject.
http://blondihacks.com/?p=18
What a coincidence. Just a few weeks ago, I was renovating and modifying an old bird table for me dear ol’ mum. I don’t work much with dead tree carcasses except for as a template for the thing I’m *actually* building and, struggling as I was with the sheer inflexibility of the stuff, I suggested to her that this would be a lot better if we did in 1mm galv. She laughed it off and so I finished the job. She now has a bird feeder with doors. Don’t ask.
And yes, please, do post more metalwork stuff. I love metalwork as much as I love electronics. You know the old saying “Find a job you love to do, and you’ll never work a day in your life”…? Well, it’s not exactly true, but I am still sometimes amazed that I get to spend my days playing with copper bars, steel boxes and miles and miles of cable, getting all arty with my looming, AND THEY GIVE ME MONEY!
Dang, hit “Submit” too soon.
Forgot to mention, we use hole saws all the time at work (Starrett brand, so commonly used here most people just call all hole saws “Starretts”. Just like how crush-fit threaded inserts are called “Avdels”, but I digress) and they’re a right royal pain the the you-know-what, but they do the job. Like you say, low and slow gets it done.
I do have a really cool tip for cleaning the cut edges of stuff like that though. A pipefitter I was working with saw me cleaning a circular hole with a half-round file. He handed me a 10mm diameter conical pipe reamer and said “Stick that in yer spinny thing, lad. Go a might quicker’n what you’m doing.” Yeah, they speak like that in Cornwall, but I’ll tell you what I’ve been using that thing for fifteen years now, and it’s still going strong. Wrecked a couple of drills before I learned not to lean on it at all, but it’s easily my favourite tool.
That is a great tip! We may have to have a sidebar for metalworking tips here.
More metalwork, I would love to see that! Also a tutorial, maybe, that one could use to teach oneself arc-welding…?
Well, I’m a pretty lousy weldor, but I could probably do a reasonably coherent post on how to get started for the absolute beginner. It might not make the real weldors laugh TOO hard.
That would be cool! Also — have you ever heard of or tried the technique I have, where you can “weld” aluminum etc by melting welding rod on with a blowtorch? I personally startle very easily, so that method appeals to me more than the it-throws-sparks types of stuff — doubly so because, even though I’m on a budget, I do have a torch…
That’s called braizing, or sometimes silver-soldering, depending on the material. It’s a fine to join very thin metals, or joints that don’t need to be as strong. You apply a special flux to the pieces, lay braizing rod in the join, and heat it with a torch. It’s easy to do. Braizing rod is more like solder, which is different than welding rod or welding wire.
Found the product I was looking for, about this. It’s called “Alumiweld”. Took me long enough to find it!
It doesn’t actually sound from their (not that great) website like it’s brazing — it really does sound (and look, from the photos) more like actual low-temperature welding. That said, I am absolutely not an expert.
Their ‘howto’ page is here –> http://www.alumiweld.com/h2uaw.html
Someone on Instructables talked about brazing, using the process I described… /that/ page is here –> http://www.instructables.com/id/How-to-weld-aluminum/
Both are pretty handy to know about, I’d say.
Birds in metal houses shouldn’t throw…magnets I guess.
Probably also not batteries or flint.
I would love to see more like this.
Quinn,
Soundtrack for this entry goes:
Say I’m the only bee in your bonnet
Make a little birdhouse in your soul…
Yeah, I went there. Awesome build. Strong enough for a Norwegian blue parrot!
And yes please more metalworking!