From a dream to first chips
If you’re interested in making things, and particularly metal things, you’re on a road that eventually leads to machine tools. Machine tools have a special place in history, because they are basically the difference between subsistence farming and modern civilization. A bold statement, I realize, but the ability to make very precise things is what gave us the industrial revolution, and everything that snowballed afterward. If you want to build a modern life filled with jet airplanes and inexpensive chocolate, start here.
I have recently arrived at the “I need machine tools” stop on the road, and it’s a place I expect I will hang out for a while. When I was getting interested in the topic, however, I couldn’t find any good references for absolute beginners. I hope to write a series of blog posts here to plug that hole in the internet. I am not an experienced machinist, but I hope that will work to our advantage for these posts. Very experienced folks often forget how little a beginner knows, and machining is an enormous and bewildering topic. There’s a reason people spend their entire lives getting good at it. It’s a huge base of knowledge and skill to dip your toe into. That said, this series will not really be a machining lesson (see below for resources on that). This is intended to be more like a roadmap for how to get involved in this hobby.
A quick word on safety is in order before we proceed. Lots of things in the shop can be a bit dangerous, but machine tools are unique in that they are actively trying to murder you at all times. Always wear safety glasses, and never have long sleeves, long hair, or gloves. These machines are powerful and will hurt you badly before you know what has happened. Respect the lathe. Always be thinking about that spinning chuck and what a strong taste for human meat it has.
Let’s start very conceptually. What makes something a machine tool? A good working definition would be a machine that cuts metal with high precision in a very repeatable way. The word “cuts” is the key there. Unlike stone-based tools such as grinders (which make dust), a machine tool removes shavings from metal stock with a cutting edge made of a harder metal. It’s just like shaving cheese with a grater, but several times more bad-ass. You cut mild steel with tool steel, tool steel with tungsten carbide, and tungsten carbide with space lasers. Portions of that sentence were fictional, but you get the idea.
The universally agreed-upon place to start with machine tools is the mighty lathe. It was the very first one, and you can’t build most things without it. People like to say that the lathe is the only machine tool that can make itself. I suppose that’s true in some very particular sense, but it’s a bit disingenuous. It would be more accurate to say that no machine tool can be made without a lathe. If you’ve read the Gingery lathe series, you know that a hand-scraper and a reference surface is what makes most of a lathe, but you certainly need the lathe you are building to make many of its own parts. It gets pretty lathe-ception, but you should read the Gingery books if you’re interested in that.
At this point, you might be thinking, “that’s all great in the abstract, but what am I going to make with a lathe? What’s the point of owning one?”. Well, these things are called “machine tools” for a reason. They are tools for making machines. Anything with moving parts will need a component made by a lathe somewhere in it. You might want to make model steam engines, RC car parts, clocks, or wind chimes. You might be restoring an old car, designing custom bicycles, making metal furniture, or building robots. Just about any object involving moving or round parts probably involved a lathe in its production. Making that mental leap from what a lathe does to how you might personally use it is one of the objectives of this blog series.
As a starting point, you can try looking around you at the metal parts in your world. If it’s something round, or especially if it’s something that moves, odds are a lathe was involved. You can look closely at the surface of the part (assuming it isn’t painted). If you see what looks very fine stratification in the surface, those are machine tool marks. The more professionally done the part is, the smaller these marks will be. Of course, nowadays many things are also made with cheaper processes, such as sintering or precision casting. When it really matters, though, there’s still no substitute for machining.
My goal in this first post is to walk you through every step from “I want a lathe” to hitting yourself in the face with hot chips (not recommended, but let’s face it- it’s going to happen).
Sooner or later, you will need to some basic education on lathe operation and machining. Here are some starting points that I recommend:
- Tubalcain’s YouTube channel. Tubalcain (aka MrPete) is the internet’s shop teacher. His “How to run a Southbend lathe” series is an excellent resource for operational basics of these machines, and binge watching his entire channel is time well spent. If you want to get a nice organized video course on the lathe, he sells that here.
- Machining Fundamentals. If you’re like me, you like to do some hardcore research on any new hobby. For that, I recommend this textbook. It’s not as hands-on useful as Tubalcain’s videos, but it will give you a basis in machining vocabulary, reading engineering plans, basic metallurgy, the physics of how machining works, and so on.
- Metal Lathe. I include this with some caveats. It’s often recommended as the place to start, because it is project-based. However, I found this book assumes a fair bit of knowledge and ownership of other machine shop equipment. The very first project in the book turns out to be quite difficult for a true beginner, and I didn’t find it to be the best place to start. One of my goals for these blog posts is to build you up to the point where this book starts, and to save you some of my missteps.
Okay, enough reading. Time to spend some money!
The obvious first question is- which lathe to buy? This is a doozy of course, but it largely comes down to what you want to make and how much space you have. The traditional wisdom says to buy the biggest machine you can, because you can make small parts on a big lathe, but you can’t make big parts on a small lathe. This is true to a point, but if your goal is clock-making, I wouldn’t buy the 20″ engine lathe that you found on craigslist. A machine roughly suited in size to the task at hand will make life easier. That said, try and buy a bigger machine than you think you need, because larger machines are more precise, easier to get good results with, and more versatile.
A quick sidebar on units- I’m going to be using Imperial (aka SAE) units here- inches. That will no doubt enrage readers outside North America. Don’t get me wrong, I love metric stuff. However, in America, all the metal stock, hardware, plans, etc, are in Imperial units. Using metric in this environment is swimming upstream. Truth be told, I find Imperial units to be easier for machining, because you’re doing everything in a single flat integer number space: thousandths (aka “mils”). With metric, you’re dealing with fractions of a millimeter all the time, and that’s much more annoying to my primitive brain. In any case, a good machine tool sold in North America will do both, so pick your poison.
Lathes are measured primarily by “swing”, which is the size of material that you can swing around in the chuck without it destroying the furniture. Typical floor-standing lathes are 10″ and up. Typical bench-top lathes are 9″ and smaller. They are also measured by “distance between centers”. This is the longest piece of material you can turn. For the average hobbyist wanting to make gadget-scale machine parts, steam engine models, etc, something in the 9″x 20″ range is a good place to start (9″ swing, 20″ between centers).
The second major question for any machine tool purchase is: Do you buy used American stuff, or new Asian-made stuff? Old American iron is generally considered to be better made and more precise. The modern Asian tools aimed at hobbyists, however, will be brand-new and ready to use. Beautiful pre-1980s American machines can be found on craigslist and such, but probably need work to get them in good shape again. You are likely buying a project. Furthermore, if you want a smaller bench-top machine, Asian is the way to go, because the older American machines are, as a rule, large. These newfangled Asian machines can also do some neat electronic tricks that the old stuff can’t, as we’ll see in a bit.
For me, power cross-feed was something I really wanted. Pretty much all lathes have power feed on the main axis, because that’s the secret sauce that makes cutting threads possible. The motion of the cutting can be synchronized with the turning. Power feed also serves to make nice surface finishes and saves you effort when a lot of material needs removing. The same is true of cross-feeding, so I wanted power-feed on both axes.
At small bench-top machine sizes, power cross-feed is uncommon. There’s pretty much two choices- the variants of the Sieg SC4, and the Precision Matthews line. My favorite of the former is the 8.5×20 HiTorque from Little Machine Shop. It’s a great machine that I came very very close to buying. In the end, I opted for the Precision Matthews PM1022V. It is slightly larger and comes with a great selection of accessories. The PM folks were terrific to deal with, and the machine was well shipped.
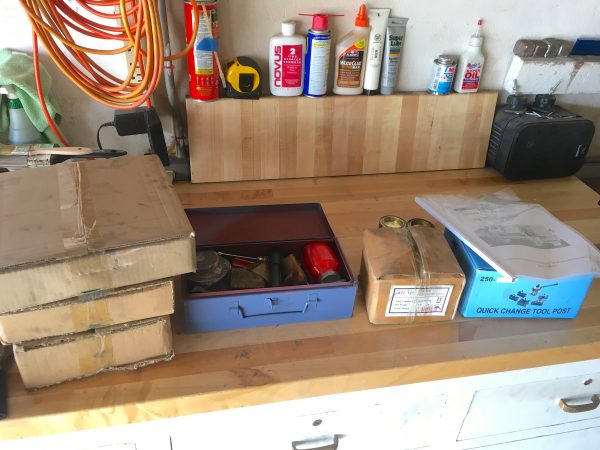
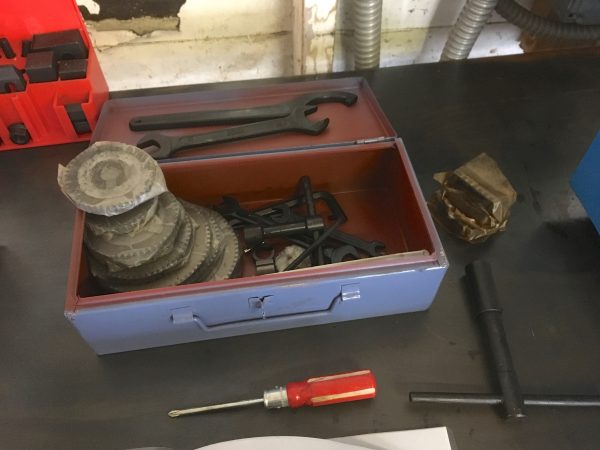
The next question is what tools and accessories you might need. The rule of thumb is that you will spend at least the cost of the lathe again on other related fiddly bits. This is true enough, however this money can be spent gradually over time. To get started, the bare minimum I would suggest is:
- Way oil for lubricating the machine. “Way oil” is basically any ISO 68 grade oil. There are lots of names for it, but if it says ISO 68, you’re good. You can buy it locally at machine shop suppliers, or online.
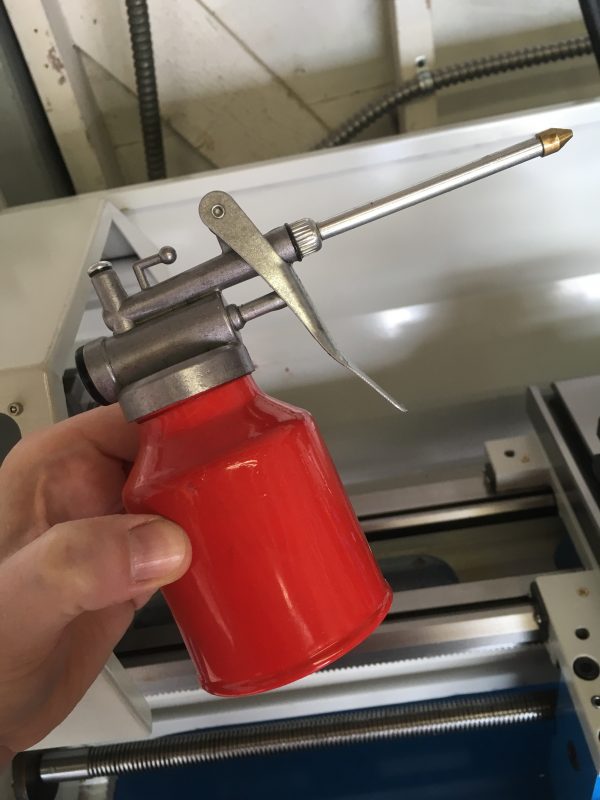
- Cutting fluid for cooling your cuts. Something like Tap Magic works well.
- Mechanical Caliper. You need to be able to measure diameters and depths precisely, and a caliper is also handy for scribing lines. Get a decent mechanical dial caliper. Those ubiquitous digital ones go through batteries like a new parent goes through booze. Eventually you will need a micrometer set, but a quality caliper is sufficient for the levels of precision that a beginner can achieve.
- Drills. Really high quality drills are worth every penny, and can be resharpened for a lifetime. Cheap drills are more annoying than a radio announcer chewing gum. Splurge and get a nice full index like this great set from Little Machine Shop. You will not be sorry. Make sure to get a set of center drills as well.
- Jacob’s chuck. You need to be able to mount drills in your tail stock, and this is how you do it. Make sure the chuck you buy includes the right morse taper for your lathe. It’s likely MT2 or MT1 for small bench-tops.
- Quick-change tool post. I’m going to go ahead and call this a requirement, because the improvement in workflow is tremendous. It will save you a lot of grief and learning curve, because you can set tool heights precisely and repeatably with minimal effort. Whoever sells your lathe will offer this as an option. Take it.
- Stock! It’s easy to forget, but you need metal to work on! Go to your local supplier and get some round bar in varying dimensions from 1/4″ to 2″ or so. I strongly recommend getting 12L14 free-machining steel. This is a high-lead-content steel that machines really nicely, and will help you have a good first experience. If you buy who-knows-what alloy from the off-cuts area, you may have a bad time indeed.
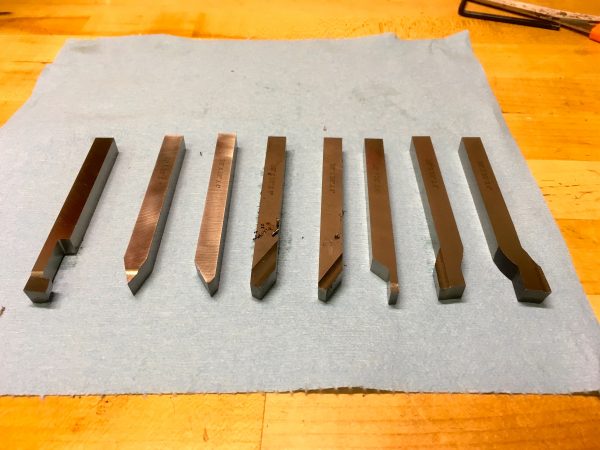
- Tool bits. Here’s where I’m going to get crap from the curmudgeons. I recommend buying one set of pre-ground High Speed Steel tool bits, such as these for 3/8″ or these for 1/4″ bits. Yes, these pre-ground sets are way overpriced and they are preying on beginners. However, this saves you the learning curve of grinding bits until you are comfortable with how a lathe works. This is the best advice that nobody gave me, and it’s my gift to you. Also, avoid the siren song of carbide insert tooling. It looks like a way to bypass the traditional HSS skill set, but it isn’t, really. Carbide inserts need high speeds and feeds to work properly, and there are minimums below-which they don’t cut properly at all. As you can see here, surface speeds for carbide are 2-3 times higher than HSS. A typical hobby machine doesn’t have the horsepower to turn material at the RPMs needed, nor the torque for the depths of cut needed to get good results with carbide. You will also need HSS sooner or later for more creative and interesting cuts, so get comfortable with it now.
That’s enough to get started. You’ll acquire a lot more tools and accessories as time goes on, but you can make some fun stuff with little more than that. The financial pain of tooling can be lessened by buying stuff gradually as you need it. You can pick up random lots of stuff on craigslist, eBay, or local machine shop auctions. Quality tools can be refurbished almost indefinitely, so don’t be afraid to buy old stuff if you’re willing to put in elbow grease to clean it up.
So, you’ve pulled the trigger, your credit card is steaming, and the machine is en-route to your home. Now what? First of all, I hope you have a place to put it. Machine tools are, of course, all about precision. Precision is all about rigidity. Rigidity is all about mass. Thus for a bench-top machine, the more massive a bench you can bolt it to, the better. If the bench shifts, warps, or becomes unlevel over time, the machine tools sitting on it will become less and less precise. Precision is the game, and mass is the way you play it. In my case, I opted to build a really silly steel bench, but do whatever works for you. It’s also worth double-checking your electrical. While these smaller machines are mostly plug-in 110V (for North America), they do sometimes require a 20A circuit. You may only have 15A circuits, as is typical in older North American homes.
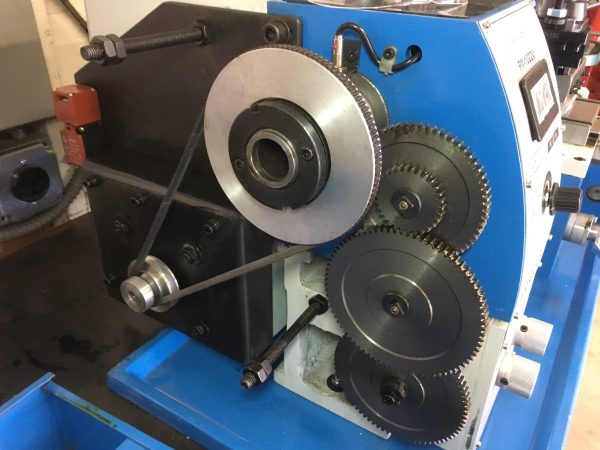
Speaking of electricity, these bench-top Asian lathes have some neat tricks that old American iron can’t perform. They often use an electronically controlled brushless DC motor, instead of AC. This means you can change (and even reverse!) the spindle speed with the turn of a knob- no gears, no belts. You don’t even have to shut the machine off. That’s a really really nice feature, especially when you’re learning about feeds and speeds. Being able to easily experiment with spindle speed shortens the learning curve of lathe turning considerably. On some machines, you can even reset a threading pass without losing your place on the threading dial, simply by reversing the motor instantly.
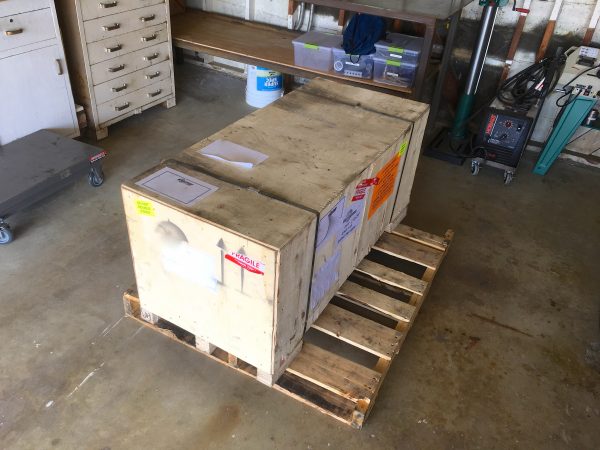
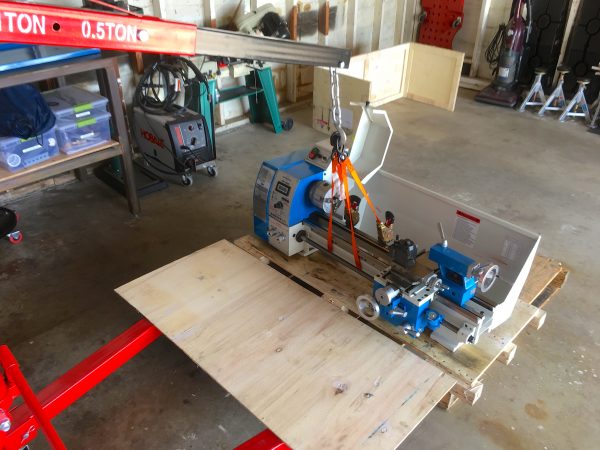
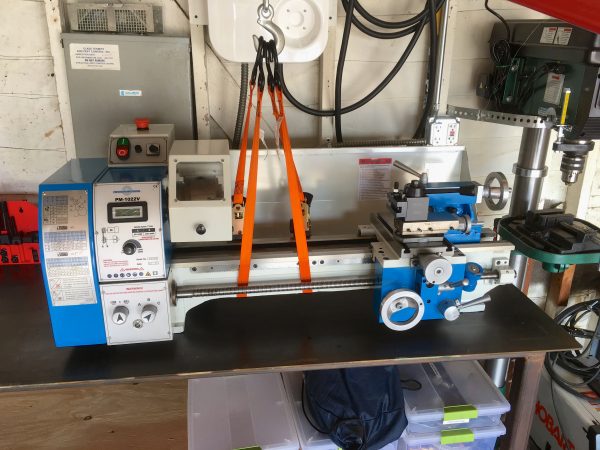
Okay, the big truck came and went, and our machine is here! All the best things in life arrive on a pallet, and a lathe is no different. Make sure you budget time to set up the machine. If your shop is your garage, you may not get the car(s) back in for a couple of days while you’re getting everything going. It takes time to get the crate open, separate the machine from the pallet, prepare the bench area, hoist the machine into place, and so on.
I ordered the quick-change tool post (as previously recommended), and they installed it for me. That was a very nice surprise.
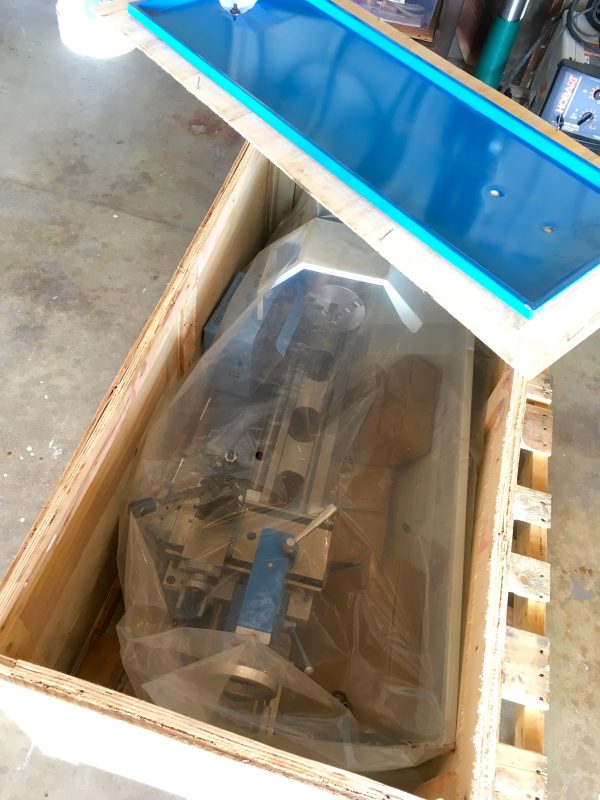
The Precision Matthews machine comes with a lot of accessories, which I really appreciate. These are all carefully stacked in the crate with the machine.
After carefully removing the crate from around the machine, the next step is to prepare your bench. The drip tray acts as a handy drilling pattern for the mounting holes in the lathe’s feet.
Now the moment of truth- lifting the machine into place! The PM1022V is relatively light as machine tools go, weighing in at 360lbs. A group of strong folks could lift it by hand, or use a shop crane as I am doing here. Make sure to consult with your manual on the proper lifting points. Usually, “straps around the ways” is the correct method, but check your manual to be sure. Also make sure your straps aren’t going to pull on the lead screw, or anything that isn’t a casting. Take your time to find the balance point. Lifting a machine like this is a lot less exciting if it is well balanced, and lowering excitement is the goal when you have thousands of dollars hanging four feet in the air.
The manual will have a first startup and break-in procedure. Make sure you check the oil in the head. Some manufacturers fill it for you, and some don’t.
You’ll want to clean up all the unpainted surfaces with some brake cleaner to get rid of any cosmoline (packing grease). Then wipe everything with way oil to lubricate and protect it.

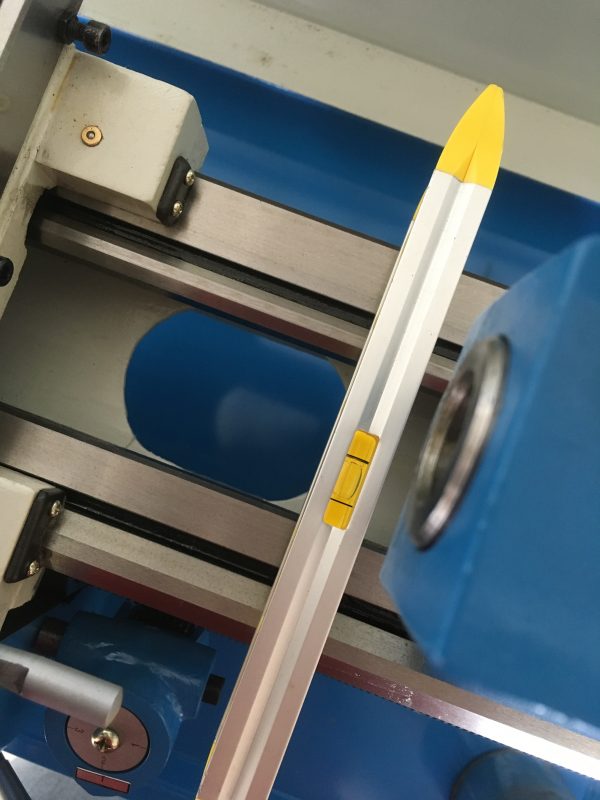
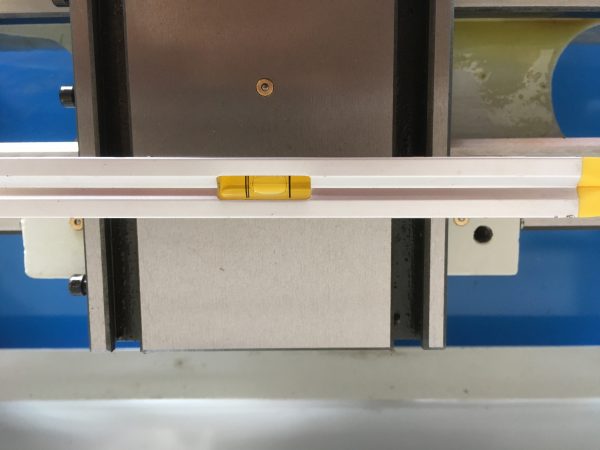
It’s also important to make sure your machine is level along its entire length. If part of the lathe isn’t level, it will cut tapers because the bed is slightly twisted. You can level it by shimming the machine, or using adjusting feet on the bench. In the pictures below, I’m using a bubble level. Really, you’re supposed to do this with a properly calibrated machinist’s level, but for our rookie purposes, this suffices for now.
Okay, the machine is bolted down, cleaned up, lubricated, leveled, and you’ve followed all the pre-startup instructions in the manual. Time to turn it on for the first time! This is pretty exciting.
You can see the digital speed control in action there, and it’s pretty sweet. You’ll also notice there’s a large interlocked safety guard over the chuck. I normally take guards like that with a grain of salt, and often defeat them because they are more trouble than they are worth. However, I have been surprised to find this guard is not in the way at all, and it even protected me from shrapnel once when a cut-off blade exploded in the tool post (as they have an annoying tendency to do). I’m leaving it in place for now, but it would be easy to remove if you so desire.
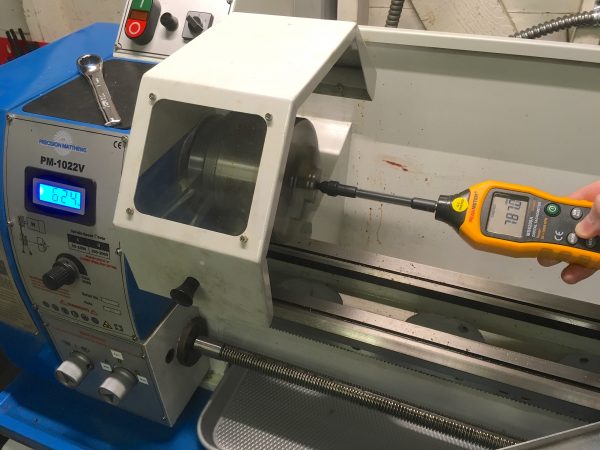
There’s one other thing worth checking with these DC lathes- the tachometer. Mine didn’t seem to read correctly for what the rating of the machine is supposed to be, so I checked with a hand-held digital tachometer. Sure enough, the built-in tach has a lot of error in it for some reason. I don’t know if mine is faulty or if this is typical, but it’s worth doing a bit of calibration rather than trusting the numbers implicitly.
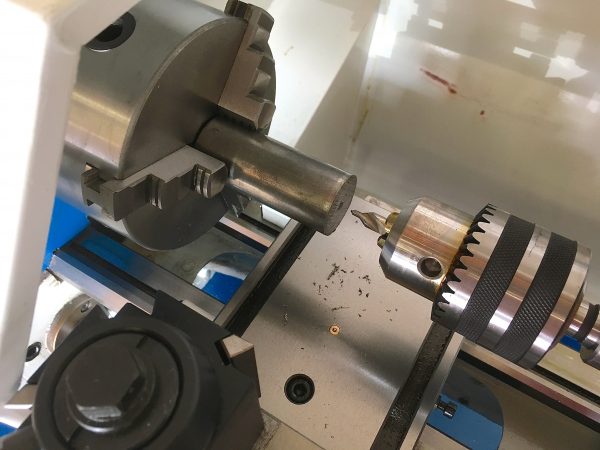
Okay, I promised chips, so let’s make chips! This might sound like an anticlimax, but I think the best way to make your first chips is by center-drilling some stock. This is something you will do many many times, so it’s a good thing to get comfortable with. I should preface this by saying you would normally face a piece of stock before center-drilling it. However, we’re just trying to get our feet wet here, not make something precise.
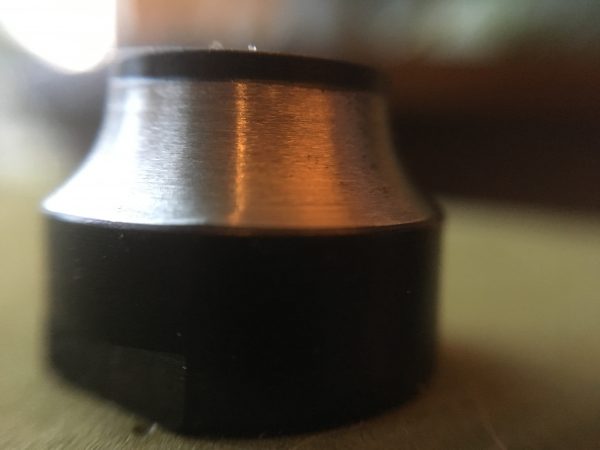
Slap your Jacob’s chuck in the tailstock, chuck a center drill, set your RPM to around 500, apply some cutting fluid to the drill, and ease it into the work until it is 2/3rds of the way up the angled portion. Congrats! You’re a lathe user.
Okay, that’s where we’ll leave it for now. The next installment will involve actually making something! Let me know in the comments if this series is something you’d like to see more of, or if I should just go back to building computers and outsmarting cats.
Wait. You mean you’re not using this to build a computer to outsmart a cat? I don’t understand.
“… just go back to building computers and outsmarting cats.”
No, Quinn. Keep doing all the things!
You’ve probably seen this but if not it’s worth checking out.
https://www.youtube.com/user/oxtoolco
I learned a ton from his videos (and book).
“The Amateur’s Lathe” by Lawrence H. Sparey is a good book for learning basic and less-intuitive machining with amateur kit.
Keep going! Moar lathe!
Agreed, looking forward to more of this content. It’s an area I’ve been interested in for a while, but I’m without the time and space to pursue for now, and your approach to projects is very much in line with how I like to learn/work. I absolutely love Mr. Pete; Also make sure you watch everything recorded by This Old Tony. Beautiful video, great sense of humor, and he does a great job of explaining concepts. His latest on grinding HSS Tools was brilliant – having not ground one myself or had one in my hands, I never quite fully got my head around all the angles involved, until I watched that video. He’s only got a few dozen videos; you’ll go through them in no time (I did).
You got a large! And it’s so much better & bigger than the toy I have in my inferior workshop! I didn’t know you could really get lathes that size, especially in 110v – usually they step up to 3 phase. You don’t even get that many over here at 240v. I’ll be watching future hacks for this!
You may want to invest in some carbide tip turning tools – so much quicker / better finish than the hss ones you got with the lathe.
I’m concerned that carbide-tip tooling will have the same problem as carbide insert tooling- namely that the required speeds and feeds are too high for a small machine. I initially bought a nice set of insert cutters, and could not get good results at all. First try with HSS gave a beautiful finish and much nicer chips. These small low power machines want HSS, I think.
As for the 110V, that’s down to brushless DC. They can get a lot more horsepower for the voltage. This machine has a 1HP motor, which is impressive for 110V and a mere 10 amps.
Most carbide-tipped tools need sharpening. That makes a big difference.
Great post! Gotta say, these machine tool posts are doing a good job of making me jealous. Not much room in a condo for machine tools, even if I have converted the 2nd bedroom into a workshop.
Hi Quinn: Is way oil normal oil? In my digging on the subject (I have my own teeny lathe project, presently stalled) I was led to believe way oil has specific properties, not least of which is stickiness. I wound up with a gallon of Mobil Vactra #2 way oil, which is more than a lifetime’s supply. It certainly is //sticky//. I got mine from mscdirect.com, formerly known as Enco. It was only slightly more expensive to buy and ship the full gallon than to buy and ship pint bottles of it on ebay.
Well,”normal oil” is hard to pin down. There are a million types of oil, all the with different properties. What you bought is the right thing for this application, and yes, way oil is sticky. Its ability to stay roughly where you put it (without containment) in an environment where everything is sliding and moving around is what makes it a good fit for the application.
Great article as usual.
You might want to mention that the danger in lathes doesn’t come just from the rotating parts, but comes from the swarf getting grabbed by the chuck and then grabbing body parts.
This was great, I’ve been watching ClickSpring on youtube, and looking longingly toward the day when I’ll have room for a garage full of tools, but this will provide a much gentler start than “Here’s how to make a clock after you’ve manufactured your own power file!”
Clickspring is amazing, and the more I learn about machining, the more I appreciate the skill and experience demonstrated on his channel.
More lathe stuff, please! As much as I love This Old Tony and AvE, the crazy uncles of the internet, your thoroughness and sensible attitude are no doubt going to make a fine machining series. Having seen your birdhouse and whisky table I’m curious to see what goodies are going to come off the lathe…
Ahahahaha, you win this thread for the characterization “the crazy uncles of the Internet”. Yes, I love This Old Tony and AvE as well. AvE’s channel is a bit heavy on the misogynist language, but entertaining nonetheless.
Your comment touches on the problem I had with most YouTube machining channels- they’re all about the money shots of chips flying, but thin on the actual work of machining, which is mostly work-holding setups, changing bits and dies around, etc. That’s where all the knowledge is. The machine does the work once you spend 20 minutes setting it up properly for the operation. Everyone skips that part. I scour Tubalcain videos for details like the angle of the compound for a facing operation, or how to drill a deep hole with a short tail stock without the carriage getting in the way. Simple things like that get glossed over, but stump a beginner.
“thin on the actual work of machining, which is mostly work-holding setups, changing bits and dies around, etc.” – that’s exactly what I’m looking forward to, that I’m guessing you’ll try to cover. As a mostly self-taught latheist (on other people’s lathes) you’ve already covered lots of machine ownership stuff I would never have thought of.
Sadly I can’t claim credit for the “crazy uncle” phrase, that’s one of AvE’s (crazy uncle bumblef***, to be precise). Agreed about his colourful language, too, though I assume there’s some degree of playing a character in that too.
I hope I can oblige!
On AvE, I’m actually rather fond of colorful language. I swear like a drunken sailor in my daily life, but there’s a way to do it that is inclusive and doesn’t reinforce hurtful social constructs. I’ll leave it at that.
Try german or russian guys for the gory details… like Stefan Gotteswinter @ https://m.youtube.com/user/syyl
Just in case you want to know, this lathe is sold in China by Weiss, http://www.weiss.com.cn/
great little unit. Cheers
Yup, that’s where Precision Matthews sources these from, much like Little Machine Shop sources theirs from Sieg. The quality of both is actually quite good for the money. Not perfect, but a great value, to be sure.
I doubt that the bicycle hub was turned. It looks ground to me. Which can be done on a lathe with a toolpost grinder, but would not be in a production environment.
Looks to be a nice machine.
Suggested first project:
Turn a bar between centers like this =[]=[]=[]=[]= taking care to make the collars precisely the same dimension. You’ll need to take heating into account to get the last 0.0001″ you should try for. So it’s make the initial attempt. Let it cool down to room temperature, measure and take a finish pass with a very light cut and sharp tool.
This will provide a means of testing for taper caused by tailstock misalignment and bed warpage from not being properly leveled.
If they all have the same diameter, then a dial indicator on the carriage will read the amount of taper.
Consider getting “Machine Shop Practice” by Moltrecht. “Workshop Technology” by Chapman is also very good if you can find a copy.
This article hits the spot. Many years of programming led me to start learning hardware related stuff like board layout and designing FPGA-based projects, and 3D printing turns into a gateway drug for building mechanical things and led me to take up welding and I hope to eventually acquire the tools and know-how to move from machines made from plastic and off-the-shelf parts to being able to fabricate the occasional custom gear, screw, linkage, etc…
In short, it is really helpful to read about the experiences and observations of somebody else on a similar software->electronics->mechanical track but a good several strides ahead.
Disillusionment with 3D printing is part of what lead me to traditional metal fabrication as well. The state of that technology at the consumer level is really disappointing.
Nice article and blog.
Banggood.com has exceptional prices on lathe tooling. Check it out.
Matt
Neat! I have the slightly bigger brother lathe, PM1127, and have been very happy with it so far. Sometimes I run into issues with the belt slipping when parting steel or other hard alloys, but that may be due to my tools not being sharp enough.
Looking forward to seeing what you create!
You might try some belt dresssing as well. There might be oil on the belt. Doesn’t take much to cause a belt to slip. I’ve also snagged parting tools, but the machine shatters the tool rather than slipping. I take that as a good sign. A slipping belt is kind of a nice safety valve in the case of crashing the chuck into the carriage (something I have avoided so far, but it’ll probably happen some day)
Great article, and spot-on. I look forward to the next installments. I’m retired from a career in tool and die, and teetering on the brink of buying the same lathe you’ve selected. I’m basically self-trained, originally drawing knowledge from the British “Model engineering”. Most European tradesmen look with some distain on North American trained people. Thanks to my acqiuired Brit vocabulary (…offer up and centre pop…) they assumed I was trained elsewhere, and the bluff worked for decades!! For those young enough to care, I think there is still room in the professional world for the enthused amateur. Read, learn, practice, then take your samples in to a real shop…you might get a pleasant surprise. And Dunki’s article might be the starting point!
Great info for starting out. Can’t wait for the next post. Don’t go back to building puters machine shop work is really fun and really puts your Brian to the test. And as far as out smarting the cat my moneys on putter…
Do what’s interesting to you.
I started following for Veronica and have yet to be disappointed with an article.
Unfortunately.., while I find it interesting, I doubt highly that metal working is a hobby I am going to be able to afford.
You mentioned disappointment in consumer 3d printing, and this is true. However, the entry point into prosumer and light professional machines is dropping pretty rapidly. A few more generations and they likely could have the beginnings what put a 2d printer in every home.
The guard over the chuck is there to disencoruage you from starting the machine with the chuck key in the chuck. If this happens the chuck key gets ejected at lethal speed. I reccomend that you don’t remove it. When I was learning Basic Engineering, trainees that left the chuck key in the chuck got to sling a novelty over size chuck key over their shoulder and go for a run around the hangar. They’re not allowed to do that any more, something about self esteem and hurting people feelings, shame, trainees that got to take the chuck key for a run only ever did it once.
Yes, great point. This machine also came with a spring-loaded chuck key so that it can’t be left in by mistake. That’s a nice safety feature.