Thoughts on the first nine months.
It’s been nine months since the Precision Matthews PM1022V lathe was brought into my shop, so I’m starting to feel qualified to write a fair review of it.
The 1022V is a 10×22 lathe that I would consider to be a large bench-top size. You’re not going to stash it in a cupboard, but it doesn’t need dedicated floor space with a custom stand. This is the sort of mid-to-high end hobbyist machine that you see everywhere now. You know the formula- Asian-made, imported, rebranded, possibly repainted, possibly tuned up a bit, and resold as an American product. No snark intended- the fact is these machines are rapidly improving in quality, and while they may not be your grandparent’s 3000lb Southbend, they still represent a lot of value for your machine tool dollar. This particular machine appears to be based on the Weiss WBL250–F from Weiss Machine & Tools in China. The lathe appears to be unaltered from how Weiss offers it, although Precision Matthews does include an excellent accessory package, and excellent customer support. They also provide a well-written English manual (a fairly rare thing with these Asian-import tools). A comparable machine would be the 8.5 x 20 HiTorque from LittleMachineShop, itself based on the Chinese Sieg SC4. I nearly pulled the trigger on the LMS lathe, but in the end PM got me with a slightly more powerful motor and a total package that includes more accessories for about the same price (as of this writing). Both are great companies, however, and you can feel good about supporting either one. I have bought much of my tooling from LMS, as they put together nice packages, and have a great selection.
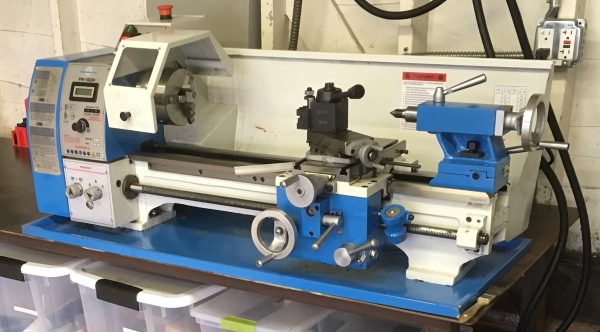
This is a very substantial machine for model making or other hobbyist use, but it’s probably too small for large car parts or agricultural-scale jobs. At 360lbs and 44” long, it’s hefty, but small enough to fit on the end of a workbench. It’s 22” between centers, but has a surprisingly generous 10” swing. That’s a lot for a lathe of this size. To be fair, though, if you’re swinging 10″ material, you’ll probably want more mass in the machine (or a very heavy bench anchoring it).
It’s powered by a 1HP brushless DC motor with a digital speed control. In addition to giving you a lot of torque for low mass, the DC motor allows you to change your feeds and speeds with the twist of a knob, even while the machine is running. This is something AC machines simply can’t do. On some DC lathes, you can even reverse direction under power, which is great for threading. I haven’t tried that on the PM1022V, and can’t say whether that is supported.
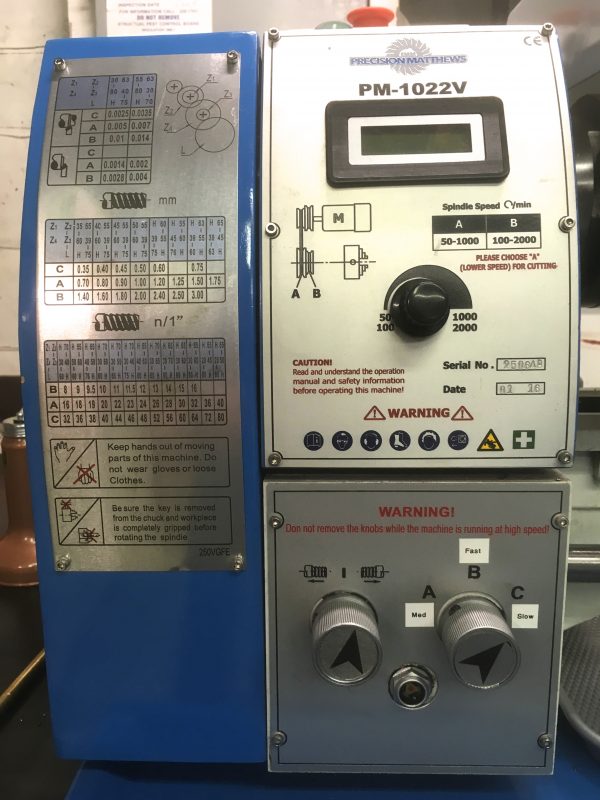
The tach is pretty and lights up blue, so you know it’s high-tech. Unfortunately, it also appears to be strictly decorative. I found it to be wildly inaccurate. So much so that I had to run the motor through its range with a hand-held tach attached to the spindle so I could mentally calibrate it myself. The digital tach on the unit I received is only about 80% accurate. Good odds for a stock broker. Not so nice for a speed controller. Eyeballing the position of the knob relative to the range of motion is good enough, though. In the low gears, the RPM range is 50-1000, so you can eyeball the speed sufficiently from there and ignore the pretty blue numbers. After a while, you set the speed mainly by feel and how the material is acting anyway.
The black knob in the middle controls the aforementioned speed. It’s fun to adjust while the machine is running. This is also quite useful. For example, I’ll adjust it on the fly during a facing operation, to keep surface speed at the tool roughly consistent as diameter changes.
At the bottom, you can see the quick-change gear box. This is a nice feature in a machine of this modest size. It can power feed in both directions (sweet), and the feed transmission has three gears. Combined with the variable motor speed, this is all the control you need for your feed. Lathe rhymes are fun.
There’s one little gotcha here. The machine claims a range of 50-2000 RPM. However, you actually only get half that range with the installed gear train. The dirty secret is that the machine includes a second set of change gears that must be swapped in to get the upper 1000-2000 RPM range. Furthermore, the manual very cryptically indicates that the high speed range is not suitable for cutting/turning, due to the loss of torque. That certainly begs the question of what the point is of the higher range, but for High Speed Steel tooling, the low RPM range is sufficient for anything you want to do. You won’t achieve the surface speeds needed for carbide tooling, but this machine doesn’t have the horsepower for carbide anyway. Stick to High Speed Steel and you’ll be a happy camper.
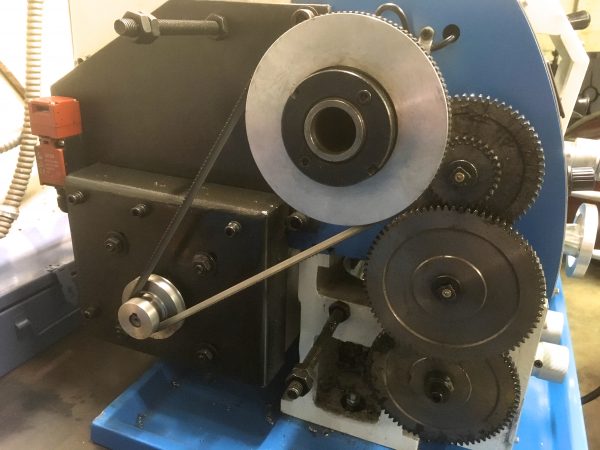
Note that I stated above that the V-belt might act as a safety valve. I recently learned that something else will give out first- the fuses. I had a parting tool jam up on me and stall the chuck. What actually died is one of the fuses in the motor controller. This was quite a nice failure mode, honestly. I swapped out the fuse and the machine was good as new. One caveat though- it doesn’t come with extra fuses, and they’re an odd size you won’t find at the local hardware store. Order some spares to keep around!
You can also see the 1” spindle bore in that last photo, which is frankly not as large as some machines in this class, but certainly workable. The drivetrain cover has a hatch in it to allow long stock to protrude out through there if needed. Also note the electrical interlock on the left edge of the cover (an orange cube). This actually works very well- it doesn’t interfere with quick removal and reinstallation of the cover, but might save your fingers someday.
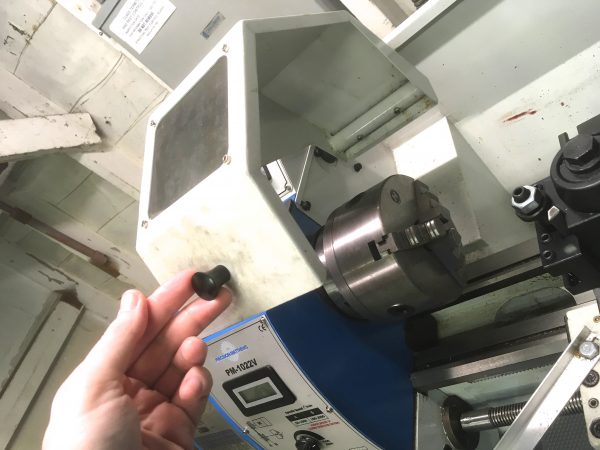
The included chuck key is spring loaded, making for two layers of safety in this important area. Caving in your face with a chuck-key-missile is no picnic. If safety devices like this raise your libertarian ire and you wish to fly free like a bird in a meat grinder, the shield is easily removed. This thing has already saved me from an exploding cut-off blade, and once prevented me from dropping my camera into the spinning chuck (the things I do for you people), so I’m happy to keep it. Maybe you’re more infallible than me and won’t need it.
Enough safety. Let’s get to the good stuff.
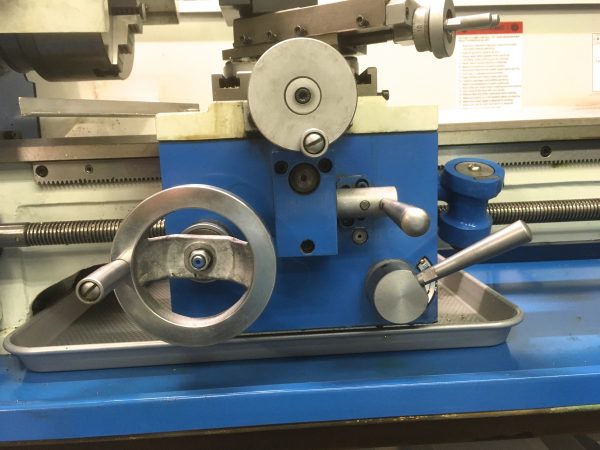
Bottom left is the main carriage hand wheel. It has a spinning crank and feels nice in your hands, like a cool margarita on a hot California day. This control has the most backlash in it (as expected), but not so much as to be alarming. Being in North America, the machine I received is calibrated in Imperial units, but it can cut both Imperial and Metric threads. The hand wheel scales are all in Imperial as well, and the main one measures in tens-of-thousandths. This is a fairly coarse, but convenient unit.
Top center, we have the cross-feed hand wheel, also with a spinner crank. This wheel measures in two-thousandths, which seems like a somewhat odd unit, until you understand that it’s direct-read. It’s telling you how much diameter you are removing, not the depth of your cut. This turns out to be very convenient in practice because you don’t have to do diameter/radius calculations in your head all the time. I have found myself tending to scale my projects to even-numbered dimensions, just to make it easier to do the math with these cross-feed units. If you are measuring distances (such as along an end face), you’ll need to halve these numbers. As I said, direct-read is very convenient for turning to a diameter, however.
On the far right is the half-nut lever and threading dial. This machine can turn all manner of metric and Imperial threads, so you needn’t worry about making anything that screws into anything else (aside from local laws, as applicable).
In the center of the carriage, I’ve saved the best for last. That’s the power feed clutch, and it has three positions, instead of the expected two. That’s because this machine has power feed on both the main axis and the cross-feed (both bi-directional). Power cross-feed on a small bench machine like this is extremely unusual, and it’s a terrific feature. If you have a lot of facing to do, or plan to do milling-like operations with big square pieces in the four-jaw chuck, power cross-feed is a real boon.
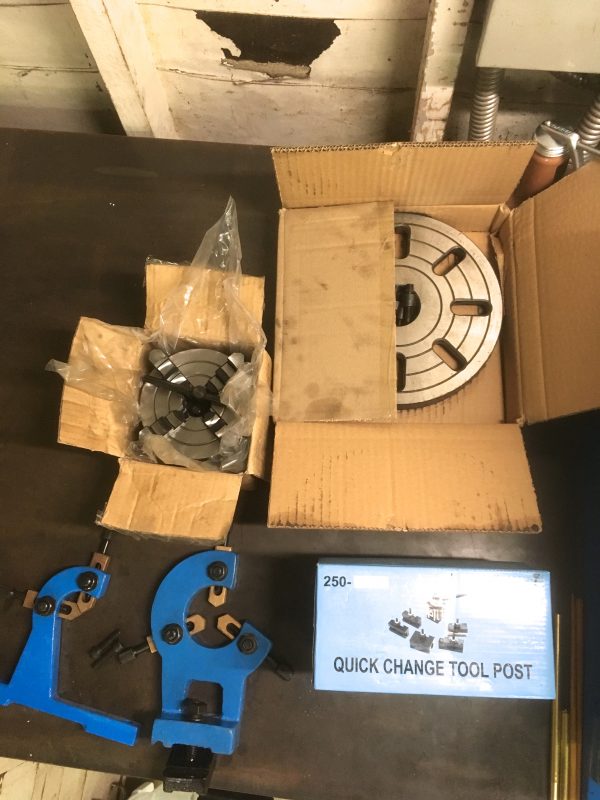
Included in the price, you get a 5” three-jaw chuck (with sets of normal and reverse jaws), a 5” four-jaw chuck, an 8” faceplate, a follow-rest, a steady-rest, and best of all, an Aloris-style quick change tool post (installed at the factory!). Throwing in the quick change tool post is a real selling point for PM, and it’s actually quite a nice unit. It’s wedge-locking, not the cheaper pressure-plate style. It comes with two regular tool holders, a cut-off blade holder, a knurling tool, and a boring-bar holder. This a real kick-start to your lathe tooling horde. The knurling tool is the bump-type, however, so immediately throw it in the sea and never use it. Scissor-type knurling tools of equivalent quality to this one can be had inexpensively. The quick-change tool post uses standard AXA tool holders, so you can stock up on those inexpensively online.
I’ll also note here that the chucks are easy to change. You simply loosen four bolts and rotate a retaining ring. It only takes a few moments. It’s easy enough that I find myself changing chucks for optimal setups, rather than compromising or jury-rigging to avoid an unpleasant chuck-change job.
The quality does suffer a bit in the accessory rest department. The chucks and faceplate seem very well made, but the rests are hastily-cast hunks of cast iron painted blue. They don’t fit the machine particularly well, and the adjustments are stiff and hard to set. These are certainly usable, but plan to spend some time tuning them up with a file (and oil, and possibly better hardware). The most maddening part of the steady rest is that you have to completely disassemble it to mount it. The base clamp doesn’t fit between the rails on the ways, so you have to thread it up from below. It can be modified to fit through from above, but this seems like an obvious oversight from the factory. No doubt these accessories are from the Weiss parts bin and no particular effort has been made to match them to this lathe.
The lathe also comes with a little metal tool box (nice touch) with all the tools you need to work with the machine (and some who’s purpose I still have not deduced).
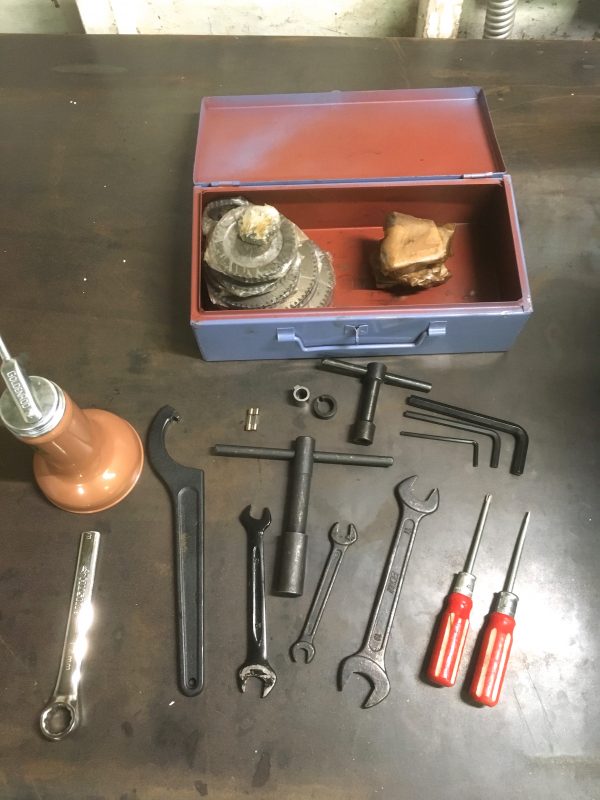
The chrome wrench on the left is not included. That’s a cheap 17mm wrench I bought at the hardware store and cut the end off of, to make a permanent tool-post wrench. The included open-end wrench gets tedious pretty quickly when making tool-post adjustments.
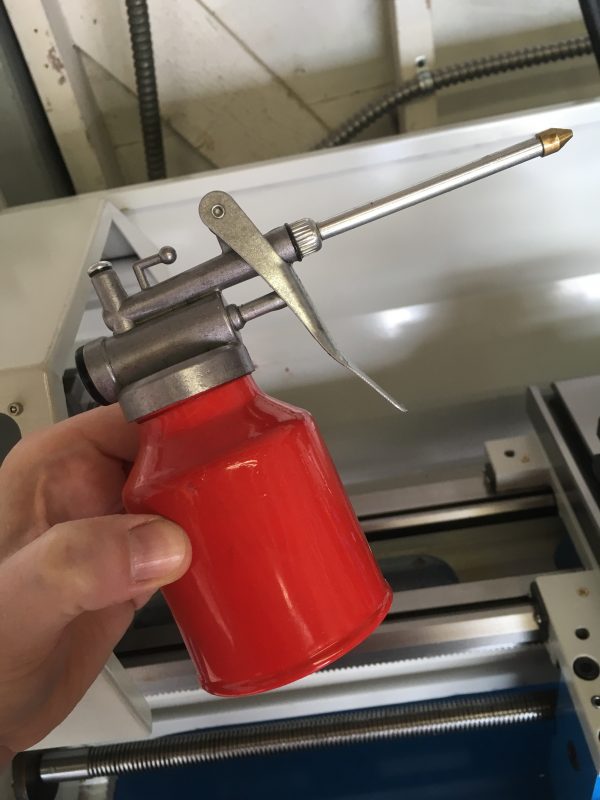
I replaced that included oil can with the quality Goldenrod can you see in the previous photo, and I wish I had done so sooner. Make sure you get a model of Goldenrod that has the flared tip- that works well with the GITS oilers on this machine. Some oilers have a purely conical tip with a pointed end that doesn’t work as well. Then throw that factory oil can as far as you can manage. Perhaps bury it in the yard and grind salt into the earth so nothing ever grows there again. Bury a stone tablet above it, warning future generations of the evils of this vile oil spewing contraption. Use pictograms, since language may have evolved to where people will no longer understand your words.
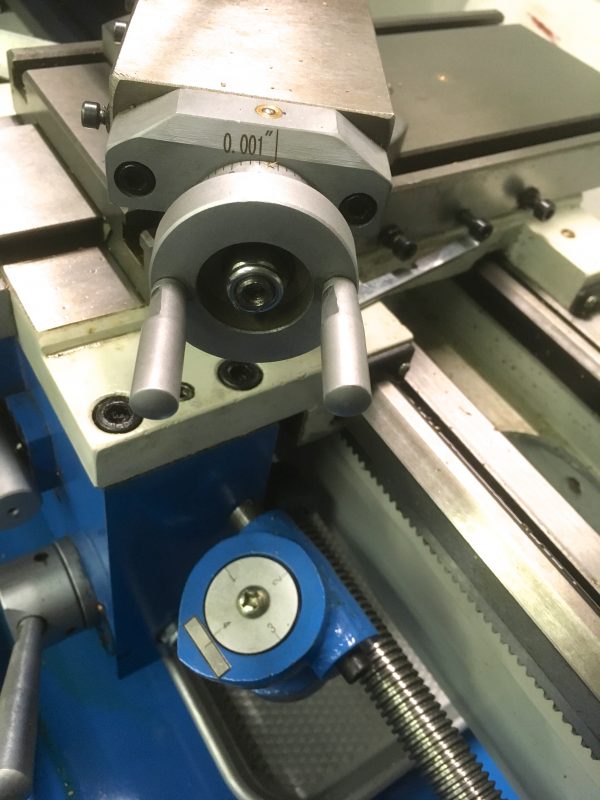
Lastly, we have the compound. It’s about what you’d expect from a compound- plenty of angle adjustment, and graduated in thousandths. The two-handle style crank is nice for turning tapers with both hands. The action on mine is not as smooth as I would like. It has a couple of stiff spots in the travel. One of these days I’ll try taking it apart and tuning things up a bit.
That photo has another view of the threading dial as well. It’s technically an option on the Weiss machine, but Precision Matthews wisely includes it.
Down beside the cross-slide, you can see a rough-cut piece of aluminum sticking out. That’s my homemade carriage locking wrench. They include an allen key for this purpose, since the lock is a simple cap screw. However, the allen key interferes with the gib screws on the cross-slide, making facing and parting operations a real pain in the ass. You have to keep removing and reinserting the allen key to lock the carriage for each pass. Instead, I cut the end off their key and pressed it into a hexagonal hole in a piece of aluminum scrap. This makes a low-profile wrench that slides neatly under the gib screws no matter what position the lock is in. The PM1022V has its share of little annoyances like this, but each one can be remedied.
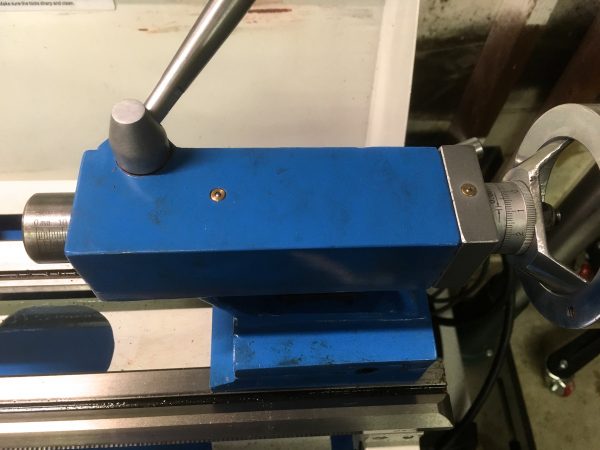
The tailstock is adjustable laterally, for turning long tapers with the offset-tailstock method. I’m not a fan of messing with the precision alignment of the tailstock and spindle, so I haven’t personally tried this. The markings on the ram are pretty coarse, and you’re no doubt expected to use the hand-wheel scale for precision depths. I’ve found it easier to put a dial indicator on the back of the drill chuck in these cases, though. I find that little scale on the tailstock crank kinda fiddly and hard to read.
Okay, you have all gory the details that the internet won’t tell you. Now let’s talk about the upsides and downsides of this lathe. I will say that it’s surprisingly well made for a machine of this price point. All the controls are smooth and precise, and I find cuts to be accurate and repeatable. In the 10-12” range that I’ve been working, I have not detected any taper. Alignment from the factory seems very good. It’s possible that Precision Matthews does some tuning on these machines before shipping them out. They did, for example, install the quick-change tool post for me and included the Weiss four-way post in a box.
The ways are a double-prismatic design and induction-hardened, which is certainly nice at this price point. The finish on them is flawless, as far as my primitive brain can tell.
The working area is where we start to see the cost-cutting. 22” between centers is not going to win any awards, especially for a machine that is more than twice that in overall length. You also start to see the limits of travel on things pretty quickly. For example, the cross-slide travel of 5” is adequate, but you will hit that limit when facing if you don’t set your tool post angle to maximize reach on the face of the part. The meager 3” travel on the compound will also limit the tapers you can cut using the convenient compound-feed method. You won’t be turning new morse tapers for your tailstock with this compound. There are other methods, of course, such as the aforementioned offsettable tailstock. Still, even an extra inch of compound and cross-feed travel would go a long way here. Facing and turning tapers require a moment of planning to make sure you don’t run out of travel partway through.
The controls are mostly smooth, but as I mentioned, the compound has sticky spots in the travel on my machine, and the backlash on the carriage feels higher than necessary. At some point I may disassemble all this to see what can be improved. The carriage backlash is probably irrelevant, since you’ll want to put a dial indicator on the carriage when precision matters anyway. The 0.01″ scale on the carriage hand wheel is only sufficient for ballparking travel.
All of the dovetails have straight gibs, with a row of cap screws to adjust them. Single-point-adjustment wedge-type gibs would be a big improvement, but I suppose that’s a lot to ask at this price point. The gib style, I suspect, has much to do with the sticky feel of the compound. I’ve dismantled the gib assembly on the compound, and it has no obvious manufacturing flaws. It’s well made, just not as well designed as one might hope.
The included quick-change tool post is nice, but the locking handle interferes with the longitudinal mounting position. Mounting a boring bar or similar tool in that position requires a bit of a dance of jockeying the lever to get the tool holder past it. I’ve also found the rotation of the tool post on the top surface of the compound to be a bit sticky. There’s one spot in particular where the spring-loaded detent tends to snag. You notice it only when spinning the tool around 180° to check tool bit height against the tailstock. Some radiusing with a file on that detent would likely resolve this.
Horsepower-wise, I would describe this machine as “pretty good”. It handles 80 thou depths of cut in 1018 steel without complaining too much, but you are effectively limited to High Speed Steel tooling. I spent some time experimenting with carbide insert tooling, and I couldn’t get good finishes. Carbide demands high speeds and aggressive depths of cut that this machine doesn’t have the horsepower to achieve. The tradeoff is that electronically-controlled variable speed, however, which is a dream. I have built projects large and small on this machine, and have yet to touch the change gears. Short of very specific single-point thread-cutting jobs, I can’t see ever needing them.
The power cross-feed is an amazing feature, of course, but I will say that the clutch has a bit of room for improvement. It’s not clear what the clutching mechanism is, but it feels more like a half-nut than a friction clutch. The engagement is a bit rough, and I worry it may stress the leadscrew. Time will tell. The disengagement is nice, however. Very positive-feeling and confidence-inspiring when power-feeding towards the chuck and trying to disengage as late as possible.
My single biggest complaint is the terrible digital tachometer. I don’t know if they are all this poor, or if there’s something wrong with my unit. I’ve learned to adapt to it mentally, but it’s disappointing to say the least. A digital tach is not a difficult thing to build, so it’s mystifying why this one is so bad. The tach has a sensor that detects four magnets embedded in the spindle shaft. I have taken this sensor assembly apart and tried all manner of cleaning and adjusting it, to no avail. Precision Matthews’ customer support (hi Matt!) was quick to respond with some ideas, but none of them worked, unfortunately. They are a friendly and helpful bunch, however, and definitely a reason to buy an import machine from a local company.
Overall, I think this machine is a terrific value for the money, and a lot of lathe for the hobbyist. While it may not have the power and cachet of restoring a 16″ 1920 Hendey you found on craigslist, the fact is this machine is very capable, very precise, arrives ready to make chips, and is a great introduction to the mad science of machining.
FYI, it looks like the URL for the lathe has just been updated to http://www.precisionmatthews.com/shop/pm-1022v-pm-1030v/ instead of the old machinetoolsonline domain (the old page has a ginormous “We have a new website!!” link at the top. I’m not sure if I should email them and try to explain the concept of a redirect…).
Thanks for following up on your experience with this lathe! I’m constantly on the fence about buying one: I rent a house here in San Francisco, which makes having shop tooling a precarious gamble if I wind up having to move. My little OtherMill is pretty easy to find a home for in a new place, but a 400lb lathe is a bit different. But, if I do decide to get into making round things, this is definitely super helpful info to know!
Thanks for the tip! I updated the post. Nice to see PM is finally unifying their web presence. For ages they have inexplicably had their main site and a straight-outta-the-90s alternate universe version where ordering actually took place. Each had different slices of information on the products, and it was very confusing. The new site is a big improvement!