Getting magic smoke into your breadboard with style.
I have a basic low-end benchtop supply. It does the job just fine, but is a little light on features. I decided to put together a little bridge between my bench supply and my breadboard that would make development just a little bit nicer. I call it the Juice Bridge.
Here’s the feature set that I wanted in the Juice Bridge:
- Quick on/off switch for the board, separate from the bench supply
- Indicator light for when the breadboard is hot
- Switchable between unregulated supply and regulated 5V
- A place to patch in an ammeter for measuring the draw of the entire circuit
- A bunch of reference ground pins for scopes, meters, etc
- Supply to both sides of the breadboard
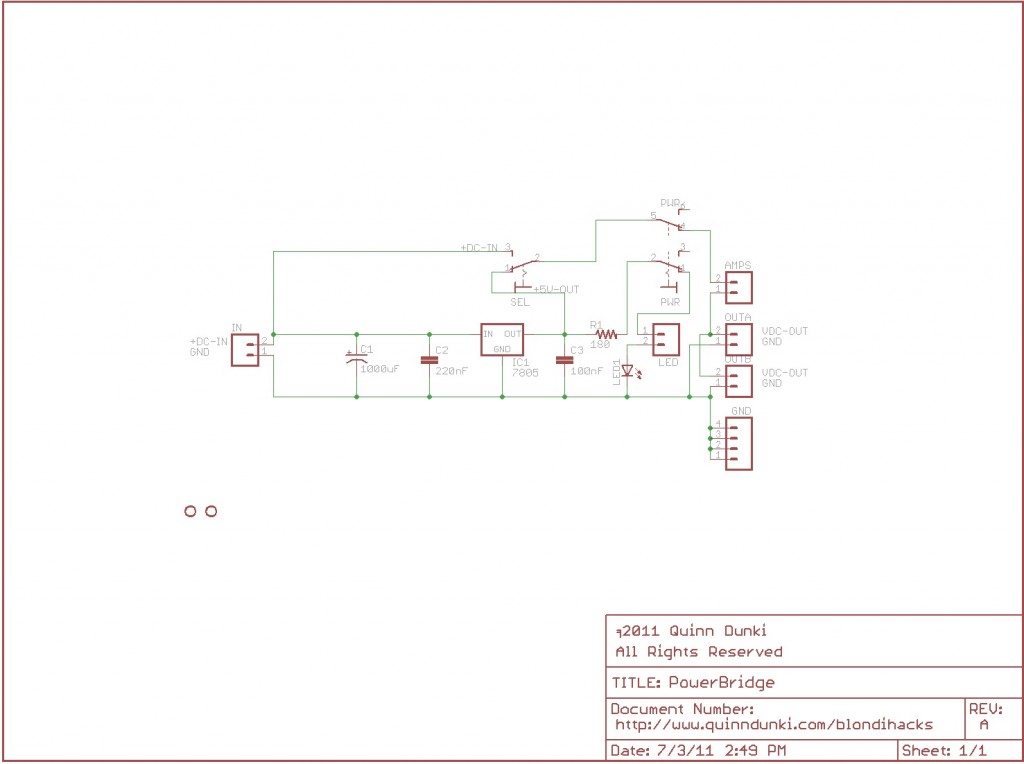
You can also download the eagle schematic file, for a better look.
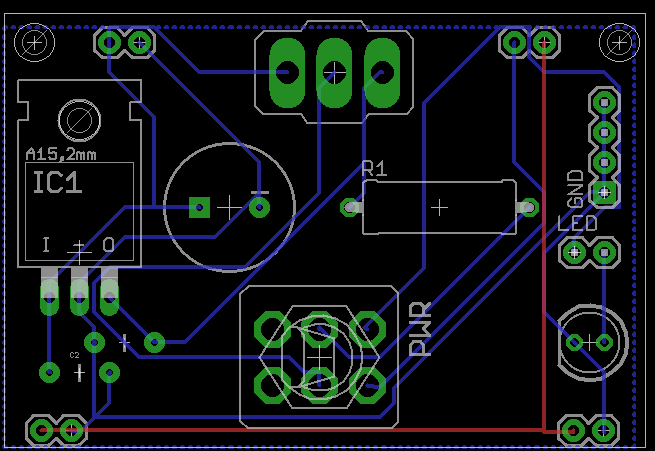
I wanted this to be something I can use reliably for a long time, so I etched a PCB for it using this process. My layout in Eagle looks like this:
Here’s the eagle PCB file if you want to etch your own.
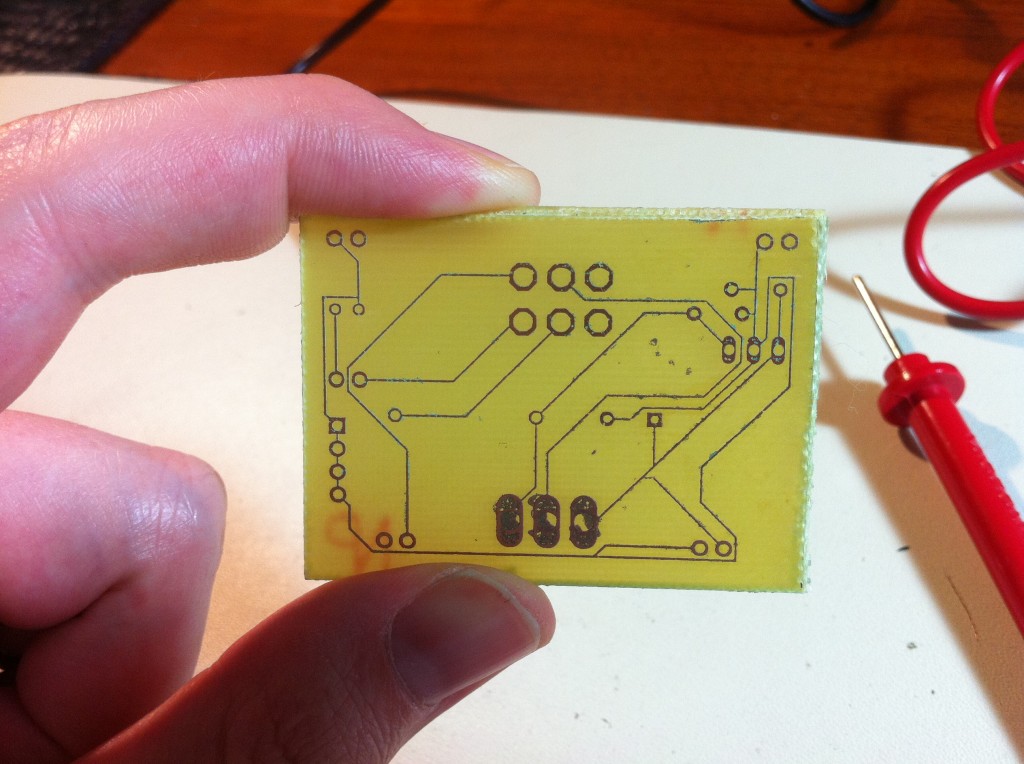
Using the aforementioned process, I etched the PCB:
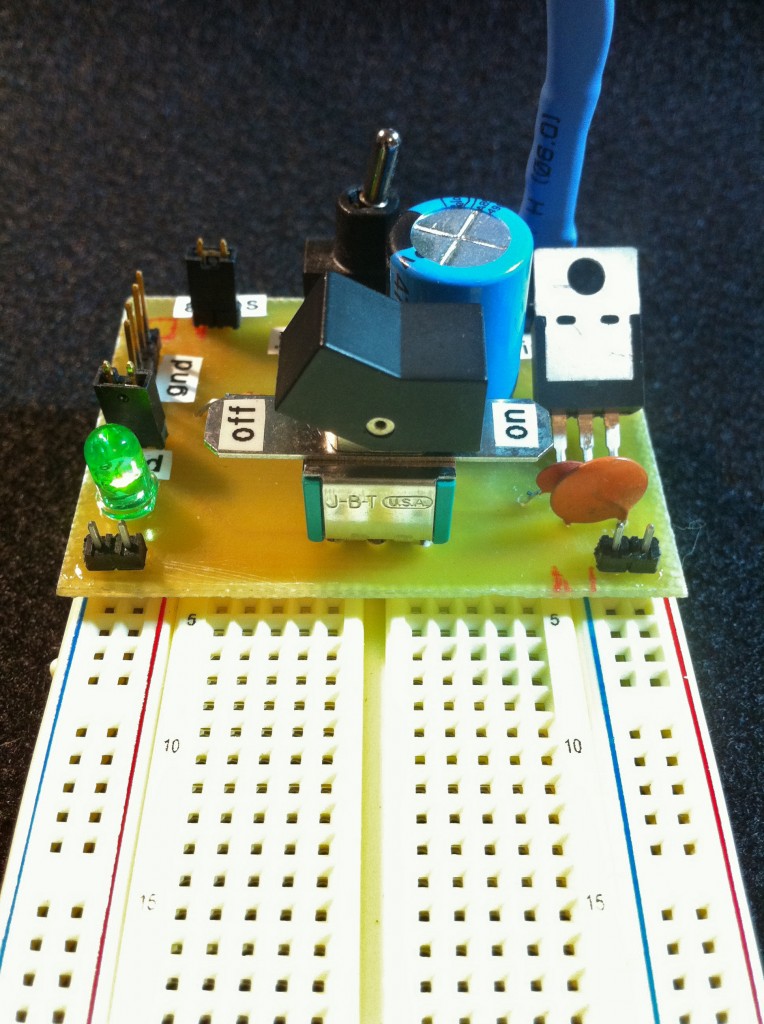
From there, it’s just drill, solder, and test! Here’s the final result.
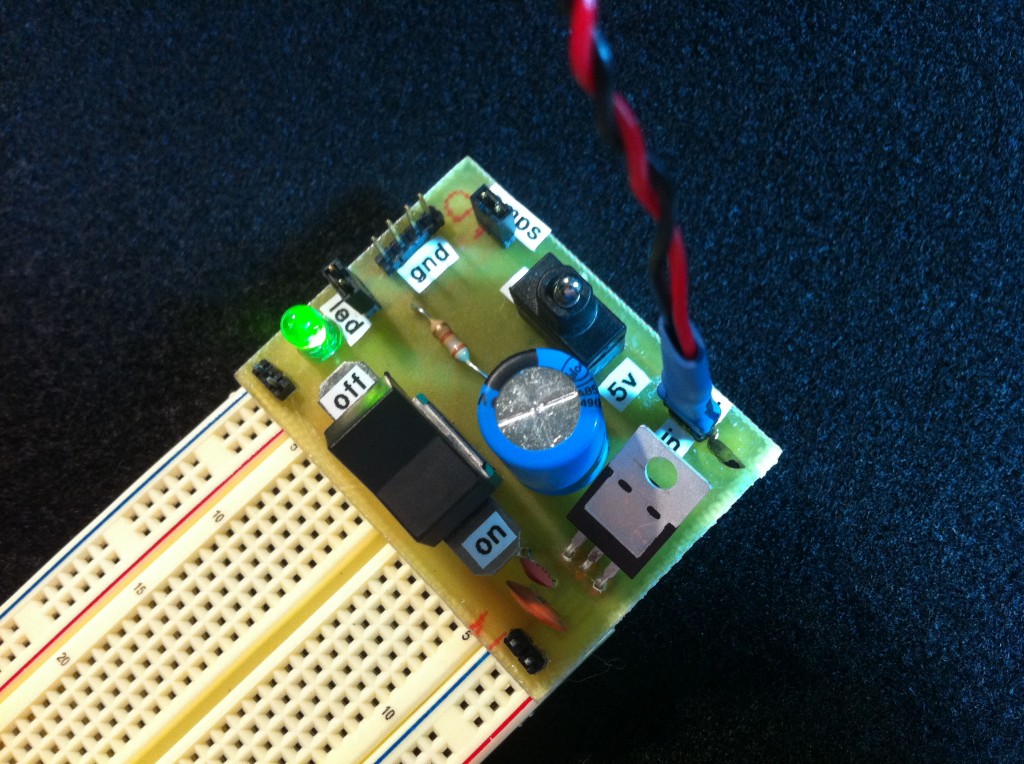
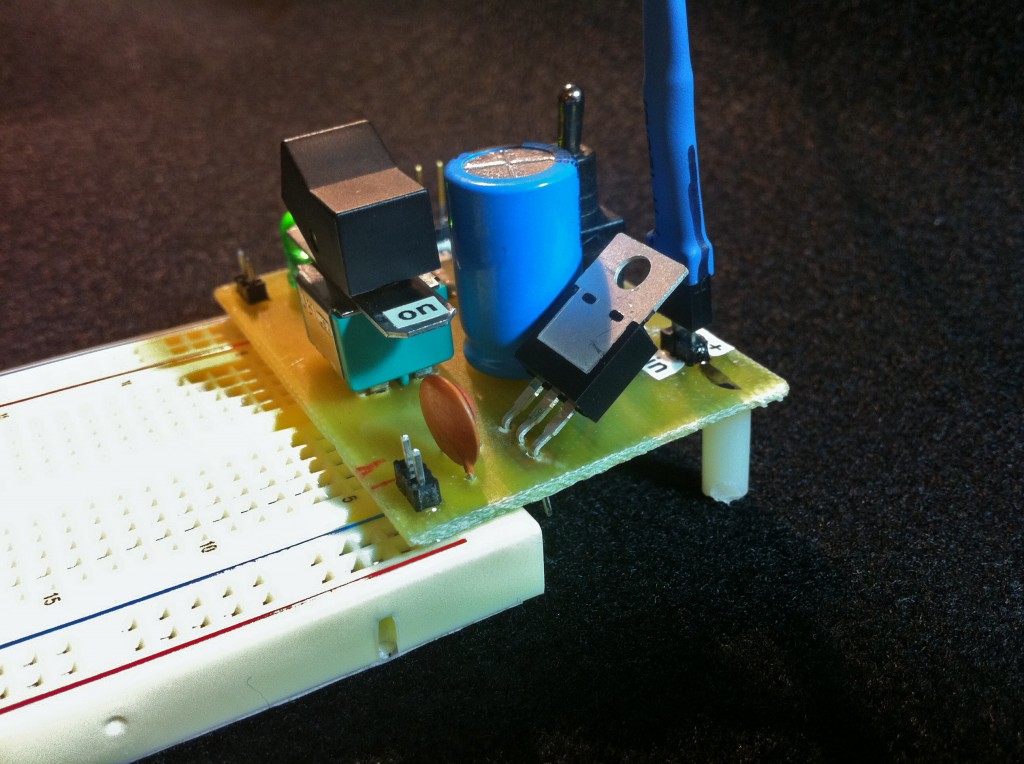
That’s all there is to this little guy. Do you have suggestions for improvements? What features would you add or change? Let me hear about it in the comments!
Very nice project!
Kudos!
One suggestion if I may;
use a “filling plane” ,in case this sound unfamiliar to you,it’s only a plane of copper covering unused space of your circuit so when you etch,it takes less time and yield better results. Also,do not hesitate on traces size.
again,good job!
You shouldn’t make those traces so thin’, because you’ll get a _huge_ voltage drop even under small loads!
Nice project, I especially like the way you added jumpers to allow for easy connection to an ammeter etc. I also like the way you added the legs to save on breadboard space.
For improvements, I think the tracks should be wider, especially for a power supply.
A heatsink on the regulator might also be a good idea (they can get surprisingly hot with a decent load!)
Good one! I will definitely make one of these as I do a lot of breadboard development and always felt the need to have a separate on/off switch and provision for ammeter, along with ground reference pins. You almost got all of it on a single board. Very handy
* May be the tracks could have been thicker as they are used to carry power, but guess what if you use only a few milliamps on a breadboard so they should be fine! Also, Thicker tracks means less etching time and more cycles of the etchant.
Cheers!
You might want to consider beefing up those skinny traces!
If not the 5V, at least the grounds. This will improve ground bounce on fast switching logic and decrease drop if you pull the full 1 Amp.
Also putting the LED across the output rail will light it with either power source and save you a switch and a pole on the other.
Putting the LED across the output rail is something I considered, but the catch there is the unregulated mode, right? I’m leveraging the 7805 to drive the LED even when the mode switch is sending an arbitrary voltage through to the board, bypassing the regulator.
True, but then you’d just increase the LED resistor to handle say 12V without popping it. You really don’t want to run much more than 12V on the 7805 due to heating. Adjusting the layout to accommodate a heatsink might be useful too.
Yah, a heatsink does seem like a good idea, and there is room for it. I think if a chose a resistor suitable for 12v, the LED might be too dim at 5V. My bench is very brightly lit, so I’m trying to keep the LED at full brightness so I can see it easily out of the corner of my eye. It’s worth a try though.
Potentiometer for LED brightness?
Hi Quinn,
This is a neat little idea and you’ve done it pretty well.
There’s a couple of suggestions I’d like to make regarding further versions.
For 12V and 5V usage, use a low current (2mA) LED. A higher value resistor will be required for the 12V, but you will still be able to see the LED when the 5V is required.
The exposed terminals of the OUTA and OUTB can be pushed through so they are level with the top of the plastic of the connectors, before they are soldered in place. This will reduce the risk of short circuits, as they have your rail voltage and ground on them.
Make the solder pads as large as you can (they don’t have to be circular), especially with the resistor, capacitors, LED and connectors. This will reduce the risk of the pads lifting when soldering, as they will have a greater surface area to bond with the pcb.
Try to make your tracks go directly from pad to pad, in the shortest distance possible, and have them as large as practical, 50thou (0.05″) to 100 thou (0.1″) will be enough for a small psu like this. Also try to avoid acute angles when connecting traces. Sometimes etchant can remain in the corner and continue to remove copper well after the pcb is populated.
If you can, mount the regulator flat against the pcb, preferably with a small heatsink. You will avoid accidentally touching a potentially hot regulator tab, especially with switches nearby.
Make sure that the pin numbers of the components match the components in the schematic and the pcb component patterns.
Good luck
David
great job on getting another feature on HAD. keep it up!
Good job! And a really good idea The only suggestion §I can find to make it better is use some wider traces.. since you have so much mode space laying around, ticker traces would help when more power is needed. Keep up the good work
Thanks for all the great tips, everyone. That’s especially good advice on the trace sizes and filling plane. The next revision will definitely include those changes. I was trying out a new PCB etching technique, and wanted to see how small I could get them. I should have perhaps chosen a different project to run that test.
Neat job, especially making it from scratch. Some suggestions if you ever do a version 2.
You could use a 3 way terminal block so different 780X regulators could be plugged in. You could also look at how it could be used for -V supply i.e. 790X. I could imagine having one of these plugged in each end of the board. also maybe an option for plugging in sideways.
I think with a little more thought you could have avoided the requirement for the extra wire links. And traces look so thin for power lines.
I would make both switches same type for aesthetics especially since they have that nice frame for labelling.
The big cap could be made axial so that it is lower than the switches or even allow for two smaller caps in parallel.
But these are all suggestions coming from someone who has never done this much, so well done.
regards Phil
Those are all good ideas, Phllip, thanks! The wire jumpers were definitely mistakes in my layout. Live and learn on that one.
The switches are different mainly because I build stuff out of surplus bits I salvage from old gear. Those were what I had lying around, although the rocker was chosen for being easy to flick, and having a soft touch. Same for the passives- beggars can’t be choosers when it comes to salvage. :). I like the socketed regulator idea a lot. That will find its way into revision B, I think.
My problem is not getting magic smoke into my breadboard projects, but the magic white smoke that comes out of them…
Do you have a gadget for that as well ?
Maybe version…. ten. I’m still working on that feature.
‘I like the socketed regulator idea a lot’
Yea, I absolutely love when my regulators ground gets disconnected due to a crappy connection in a socket, and Vout rises to Vin, frying the connected circuit
Hah, you make a good point. Maybe that idea won’t make it into the next revision after all.
Like BadWolf, i’d also suggest a filling plane. But instead of making it fill unused space, it’s a way better idea to use it as a GND-Plane. Essentially the same process in eagle (drawing a rectangle around the board with the polygon tool and hitting “ratsnest”), but with additional naming of said rectangle to GND before klicking ratsnest. Of course for this to work, your other GND segments should be called GND, too.
Have you had good luck with ground plane polygons in eagle on single sided PCBs? My attempts to use them have been unsatisfying because keeping all the filler areas connected seems to be too much of a burden on the autorouter. I’ve had great results with fill planes for reducing etching, but not when trying to make them a signal.
For a circuit this small (and some quite a bit larger!) just forget the autorouter. You’ll get much better (sensible) results if you route the tracks yourself.
Great idea. I can’t believe I never seen these around before. I think for my use though I’ll add a onboard variable supply. I don’t have a good bench supply, and many beginners probably don’t either.
Noobiest Project I´ve seem in years… look at the “Power Supply traces width”… ahahaha you must be kidding to put it in the internet
There’s some lovely troll food under that bridge over there. I recommend you check it out.
Nice going!
Next time:
– Make the traces way thicker, especially for the power but there is never any point in making them thin when you don’t have to.
– Use a ground fill. Don’t worry about every island connecting, it still makes the etching faster (which will prevent the little holes you have in the copper and make the edges sharper). Don’t make the clearance to the traces too small.
– Make sure the black on the film is really black (look in printer’s quality settings, it’s usually called “glossy”) to get better exposure.
– Don’t use the autorouter, or clean it up by hand to remove weirdo stuff like the extra bend on the rightmost trace and the fork in the botton right corner.
This is great! I really like the ability to patch in an ammeter and the reference ground pins. Once you’ve got v2, maybe consider selling the PCBs or a kit? I’d love to have one of these, but I can’t etch my own PCBs.
Thanks! Yes, the response to this one has been so strong, that I may just put out a kit for it (after making many of these suggested improvements, of course).
Also, you might try Adafruit’s version of this. It’s quite nice, if you want to use a wall wart.
http://www.adafruit.com/products/184
Yes, I’ve actually got one of Adafruit’s PSs, but your’s is an improvement for sure. I’ll follow this for updates, thanks!
I’ve done a lot of this too.
http://www.dansworkshop.com/electricity-and-electronics/breadboarding-modules.htm
It’s a great way to modularize stuff that doesn’t change and doesn’t need to be breadboarded in “solderless mode.”
Quinn. I made a poor pre-echo of your juice bridge, as described here…
http://m0xpd.blogspot.com/2010/11/breadboard-plugin-modules.html
Yours is better in every respect, but I want to point to one small aspect where I found an improvement which might be useful to your readers…
You’ve done exactly what I did – used ordinary header plugs for “OUTA and OUTB” in what I’d call an “upside down” orientation. I found that, in the orientation shown in your photos (i.e. with the plastic “base” on the “top” side of the PCB and the shorter pin length – the part conventionally used for soldering – sticking up above that) there’s not so much pin length left under the board. I found this makes the connection to the breadboard imperfect.
If you put the header into the PCB (here used just as a “jig” to hold the header pins whilst we use brute force to modify the headers) and – before soldering – press down on the shorter end of the pins, they can be persuaded to move. Keep pushing until they’re flush with the top of the black plastic, then solder in place. This gives a little extra length “under” the board that makes a big difference!
The trick there is that those are longer than usual headers. Check out my Bread Head article to see what I mean. Next time, though, I would push those header pins through further anyway, just to reduce the risk of shorts caused by having the +/- pins exposed on top.
I just looked at your link, and I like those switch breakouts. Good idea! I always end up soldering wires to switches, tinning the ends, and sticking them in the breadboard. You’ll see that in a lot of my photos, such as the EEPROM Programmer. It works, but it’s messy. I like yours better.
Hello, I am trying to find different ideas for making a voltage regulator I can carry around in my pocket, and I managed to build one, and then, while searching for home ways of etching a breadboard power supply, I found your site.
I am familiar with how diodes work, but I just can’t understand in this case how does it point out that the breadboard is being hot. I would really appreciate if you could point it out to me, I know the LED will light up if it receives enough current through it and the voltage across it is sufficient, and in this case if you have a stable 5V on the output and any current flowing, won’t the LED always be lit?
The LED is connected through the main power switch (shown in the upper right corner of the schematic), so it only receives power when the switch is closed.
Hey Quinn,
What kind of pins did you use for the breadboard connection? Did you just purchase some loose pins?
Most of my projects use either 5v or 9v. I want to make something similar to switch from straight 9 to the 7805 regulator.
Those are standard snappable headers.
I really hate you. I should have been in bed hours ago.
Blondihacks: Ruining bedtimes since 2009.