New materials and new techniques.
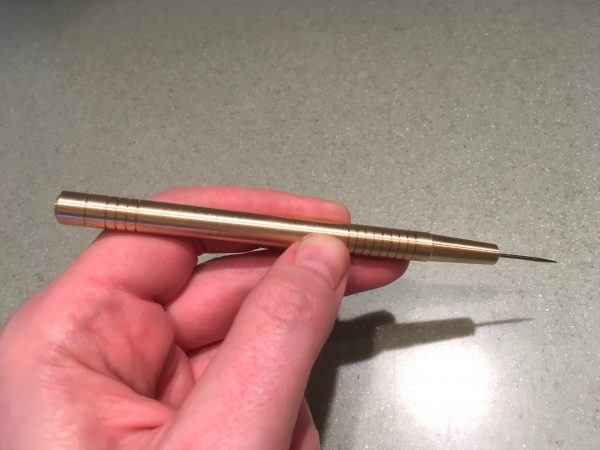
Now that we’ve learned how to grind HSS tool bits, some really nice new avenues open up to us. One of those avenues is new materials. In this post, we’re going to make a brass scribing tool. A scriber is a lovely way to mark metal, either with or without layout fluid. When used with layout fluid, this is a very precise way to mark guide lines on a part for machining. It’s also useful when you’re fabricating big things with steel from the mill, which has crud and scale on it. Pen or pencil marks are difficult to see, and silver Sharpie or chalk marks are imprecise. A scriber solves all these problems. And it’s pretty!
As with my other lathe posts, I’ll assume you’ve read all the previous articles, and now own the tools described therein. This project requires no additional tools beyond what you already have if you’ve followed along this far. The only materials required here are a sewing needle and about 10″ of 3/8″ brass round bar.
Before we begin, a quick shout-out to Clickspring, from whom I shamelessly stole this design. His YouTube channel is among the best on the internet, and if you are somehow a reader of mine and not already a viewer of his, go correct that immediately. The design of this scriber is absolutely terrific, in my opinion. If you agree, please patronize him. He has a great video on making this tool, but I have a slightly different order of operations that I think is a bit easier. It’s also a good chance to elucidate some new techniques more verbosely. Verbosity is my thing, as you all know, so buckle up.
To start with, we’ll make the point. The cleverness of this is that it’s nothing more than a sewing needle shortened to length. Sewing needles are very very hard and hold their point very well. Furthermore, because of how we’re going to attach it, you can easily replace it if it ever dulls or bends. Again, all credit to Clickspring for the cleverness here.
Find a fairly heavy hand sewing needle to use for your point. I like a #18, because this is beefy enough, and a standard size that is readily available. A little smaller or a little bigger is okay.
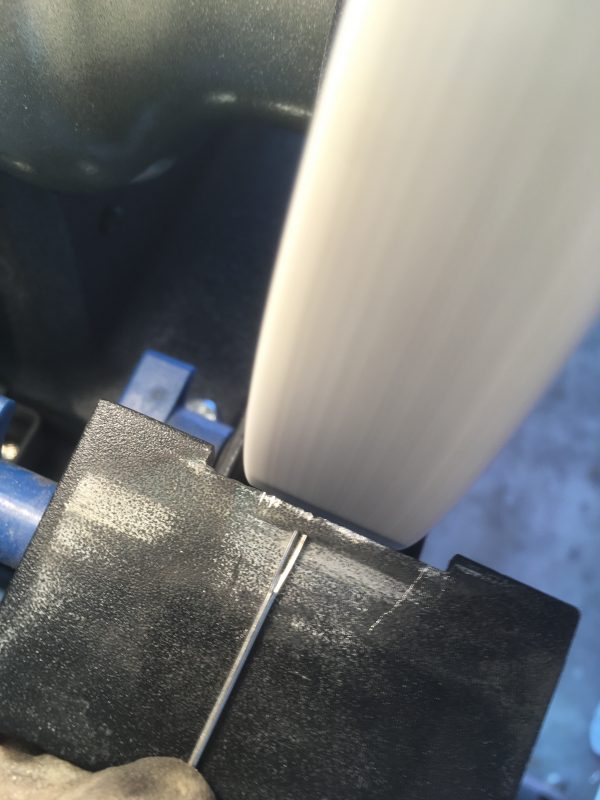
When grinding the sewing needle, stop and dunk it very frequently! If you get carried away and overheat it, you’ll take the hardness out, ruining its ability to hold the point. Take your time and dunk in water frequently.
Do not attempt to cut this needle with wire-cutters, tin snips, a hacksaw, or anything other than a grinding device. This steel is harder than all those tools, and you’ll damage them while the needle laughs off your attempts to affect it. If you have a Dremel rotary tool, the diamond wheel would also work well, but be careful not to overheat it.
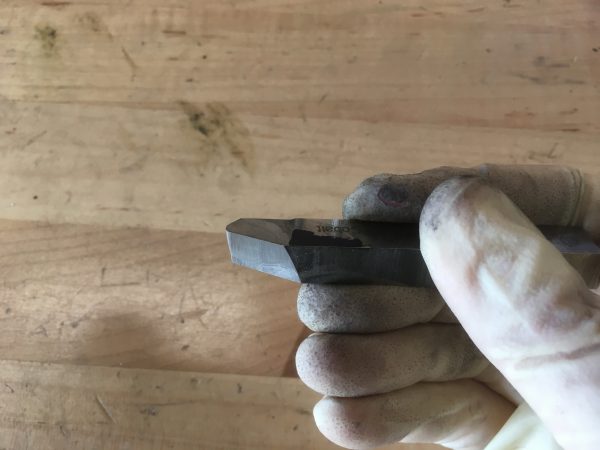
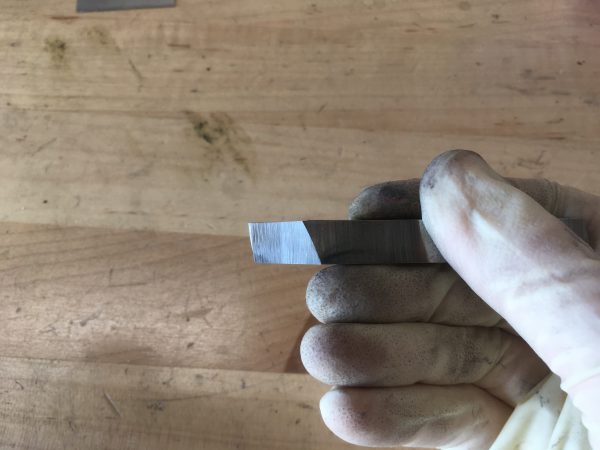
While we have the grinder out, we will need to make a new tool bit for turning brass. You should already have some bits made for steel from our last lesson, but brass has different needs. Brass is softer than steel (no kidding), and tends to be “grabby”. The chips don’t like to break off as they hit the cutting edge, so they need extra help. The way we do that is by eliminating the back rake. The top surface of the tool is flat, except for a bit of side rake. That way the chips are basically hitting a 90° angle at the cutting edge, and are forced to break off right away.
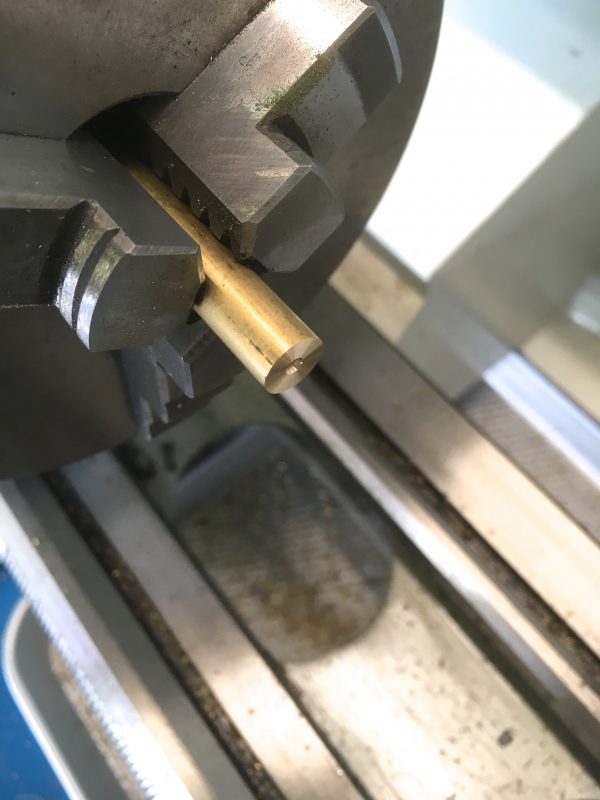
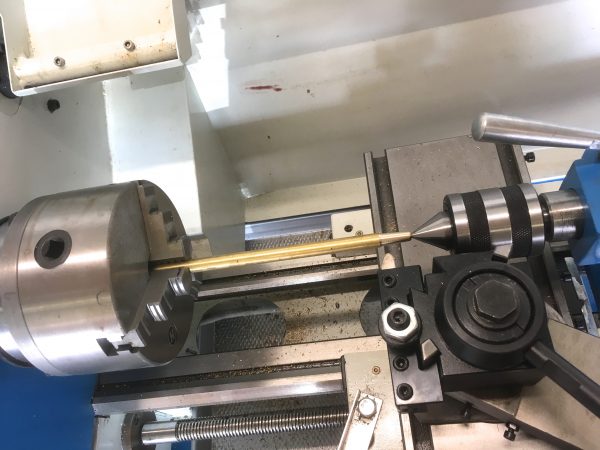
Now let’s get to the lathe. Chuck up about 10″ of 3/8″ brass rod.
The next operation is going to be a new skill- turning a taper. There are a few different methods of doing this on the lathe, but the simplest is the compound-feed method. This involves using the compound as though it was the carriage hand wheel to feed a turning operation. This works great when you need a steep angle, or a short taper. You are severely limited by the travel of your compound, and on most hobby lathes, that isn’t much. Around 3″ is about the most you’ll get in bench top lathes. Other methods of turning tapers include offsetting the tailstock, offsetting the headstock (typical on very small mini-lathes), or using a tapering jig (typical on very large lathes). The compound-feed method has the tremendous advantage of not altering your tailstock-to-spindle alignment, however. Getting that critical alignment back where it was can be a real bear on some lathes. Best not to touch it unless you have to.
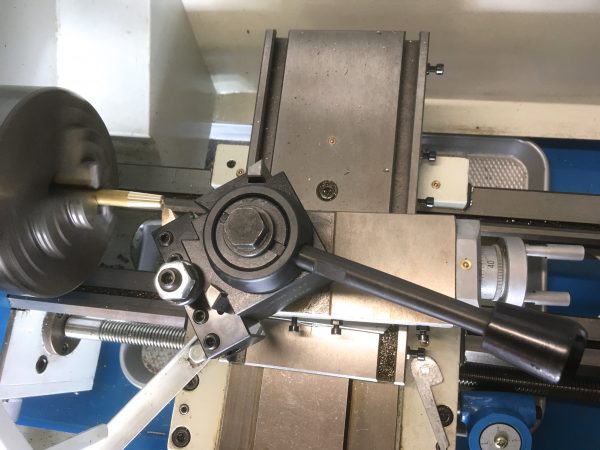
This operation is just like a normal turning, except that you are locking the carriage, and feeding the tool with the little compound wheel. The cross-slide still acts to advance you inwards between passes just like normal turning. As you do this, you’ll see your taper magically appear.
Turning smoothly with the little compound crank takes some practice, and it’s pretty tedious to back-track between passes because that little wheel is tricky to turn quickly. Use both hands to keep a continuous, smooth motion going. Patience and practice, as with anything in machining. The biggest gotcha with turning a taper is that it’s hard to judge how close to the chuck you are going to get. Tapers are deceptive in their final length (math is hard), so make sure you’re not going to hit that chuck with your tool post as you near the end of your taper!
Cut the taper as deep as you like, until you have an aesthetically pleasing end of around 100 thou in diameter (at the small end).
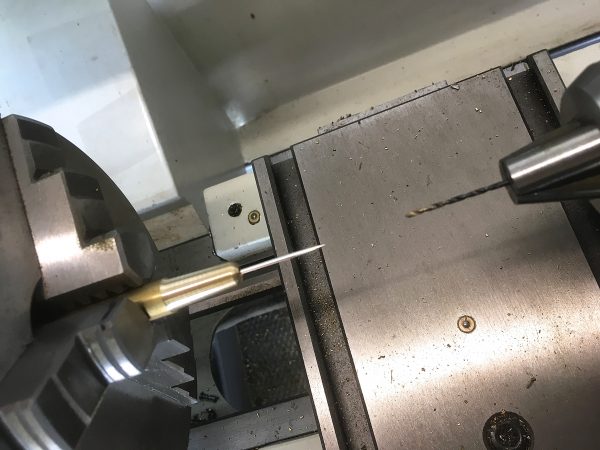
Next, set up for drilling so we can mount the point. Measure your sewing needle to see how big a hole you need. A #18 hand sewing needle is nominally 50 thou in thickness, but quality on them varies greatly. Mine is 51 thou in diameter, so I chose a 55 thou drill bit. Four thousandths of clearance gives a nice snug, sliding fit.
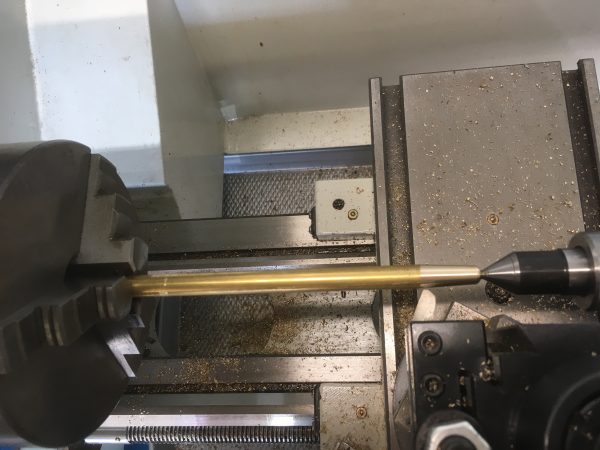
Now we’re going to turn down the body of the tool. I find that 350 thou results in something pleasant to hold. Since we started with 3/8″ (375 thou) stock, we don’t have much work to do here. You can really just do one finishing pass of 12-14 thou depth of cut (or 24-25 thou on a direct-read cross slide).
Since the handle is long, we’re going to support the end with the tailstock. We want the overall length to be about 5″, so leave that length plus enough room for the tool post to remain clear of the chuck.
Note that this is small-diameter material stretched out over a long distance. Even with the tailstock supporting it, some flex is likely. You would want to take light cuts in a setup like this. Luckily, since our stock is close to final dimension already, that’s exactly what we’re doing.
This is a good time to take a sidebar for a lesson on the grabbiness of brass. I didn’t have my tailstock firmly locked, and while turning, the brass grabbed the tool bit and yanked itself free.
With the right tool bit and good support, brass is actually very nice to machine. It also doesn’t generally need cutting fluid, so it’s tidier than steel. No oily mess to clean up!
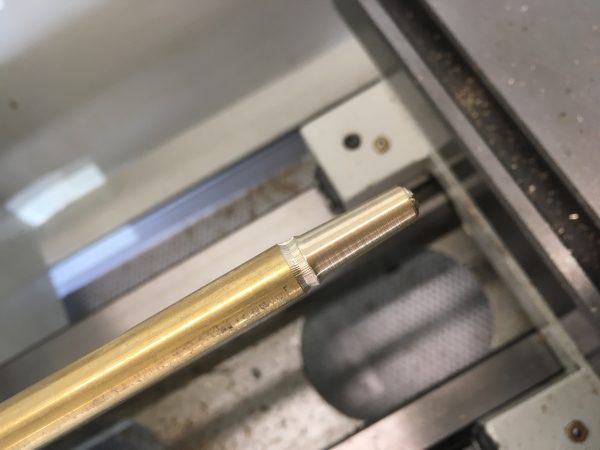
With the diameter turned down, and (hopefully) a nice finish on the part, we’re ready for some decorative grooves. In addition to adding some style, these give you better grip with oily hands.

Now it’s time to part it off. Parting brass is very easy compared to steel, and if you set up properly (remember- square, close, and tight), you don’t even need cutting fluid.
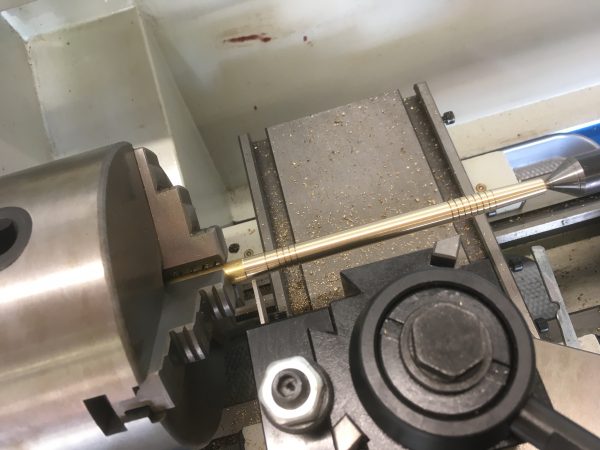
Once parted off, flip the handle around and chuck it up so we can face and bevel the end.
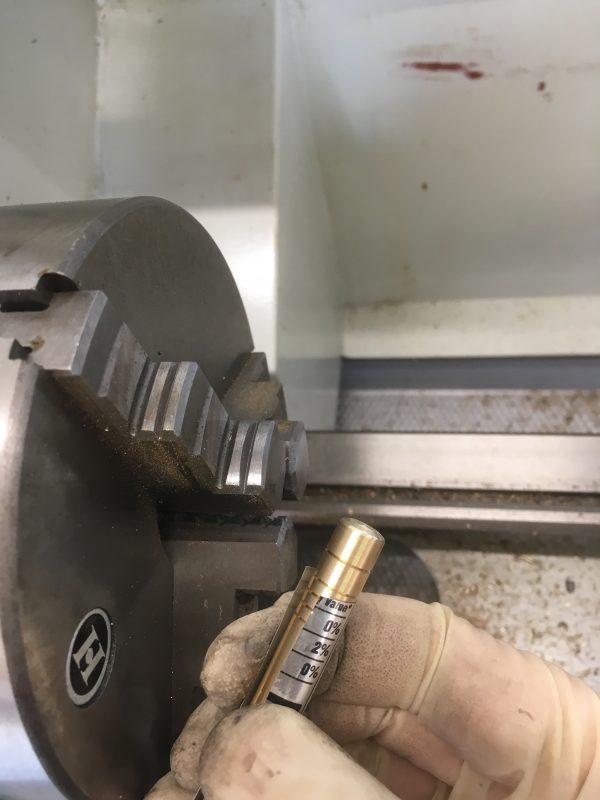
To install the needle, just put a drop of superglue (cyanoacrylate) on it, and slide it into the hole. If and when you need to replace it, heat up the end, and the glue will break. Make a new needle the same way we did at the start of this project, and glue it in. Easy peasy lemon squeezy.
As early lathe projects go, I think this one is a real winner. The end result is very useful around the shop, and it introduces just enough new techniques to be educational as well. We’ll continue to build on these skills in a future post, so stay tuned!
I have this urge to not that Quin DUNKi knows enough to DUNK her parts often…
You get one of those. 😉
” If you agree, please patronize him.”
Like ” I think it’s sweet you have a little hobby”?
Sorry, couldn’t resist. I think Clickspring is a strong contender for most inspirational person on YouTube because of that incredible combination of skill and patience -perhaps dedication is the word.
Haha, that’s actually pretty funny. Interesting how the meaning of that word has changed so radically from the more-or-less Renaissance way that Patreon intends.
Clickspring is remarkable. I’m not sure everyone appreciates how much work that level of production value in a video is. The animations, the audio quality, the lighting, the compositions, the list goes on. That’s someone who is spending more time working on the videos than he is doing the work featured in them, and you have to admire the heck out of that. I used to do more video stuff, but figured out pretty quickly it wasn’t for me. The hours required to create quality content is 10x what it is for audio or written work.